


Bubbling rock water feature

I wanted a water feature outside my front door, but was afraid of the safety hazard a pond may pose for small children when I decided to construct this bubbling rock fountain. Here's a supply list and step by step instructions:
Supplies: 1) 5 gallon bucket and lid 2) pond liner or heavy duty vinyl 3) small submersible pond pump, I believe mine is 135 GPH 4) flexible tubing which will fit the pump and possibly connectors and smaller size tubing if you want increased pressure and higher flow 5) Hardware cloth or wire fencing with tight weave. 6) Rocks (whatever you'd like) 7) drill with Masonary bits and a regular bit 8) shovel
Instructions:
1) Drill holes into as many rocks as you'd like to stack together. *** The size of the hole you will need will depend on the diameter of your tubing. The tubing size can be reduced with different sized adapters if you want higher flow or want to drill smaller holes.
2) Dig hole large enough for 5 gallon bucket to fit completely into and perhaps be an inch or 2 below ground level and place bucket into hole
3) Place pump into bucket with tubing attached. Make sure tubing is long enough to come up through rocks, it can always be trimmed after you put it all together.
4) Fill bucket enough to test pond pump and flow of water. Adjust as needed.
5) Drill drain holes in the lid of the bucket (about 15 -1/2" should be enough.) You'll also need one hole large enough for the tubing to fit through the lid and one that the electric plug can fit through.
6) Cut hole in pond liner smaller than diameter of bucket. Place over bucket and thread tubing through it.
7) Place lid on bucket over pond liner making sure hole in pond liner is centered over bucket. Pond liner should be secured by lid bucket.
8) Fold pond liner over bucket top and back fill dirt in any gaps around bucket. Spread pond liner back out after this is done and everything is level.
9) Place hardware cloth or fencing over bucket so it is overlapping the ground. Be sure there are no sharp edges poking into the pond liner. Thread tubing through center of hardware cloth ( you may need to cut a hole for the tubing to fit through. ) You need this to support the rocks. The bucket lid alone will break.
10) Rinse your rocks to get any sediment or anything that could block you pump out. After you are sure pump is working correctly you can start to arrange your rocks how you like.
11) Thread tube through holes previously drilled in main rocks.
12) Fill bucket the rest of the way. When you see water start to pool around the bottom of the main rock pile the bucket should be full.
13) Plug in and enjoy.
* You will need to add water to the bucket occasionally to make up for evaporation or wind blowing it our. If you are adding water every day or 2 you may have a leak or you may not be completely level. I had a low spot at first and the water was pumping right out.
** When you need to add water the flow will become reduced. I add water about once a week. More if its windy or extremely hot.
***Keep in mind drilling the holes in the rocks can be time consuming and difficult depending on the type of rocks you use. These are granite cobbles. It took me several hours over several days and I killed the drill. If I had to choose again I would not use granite. There also are kits with predrilled rocks. Here's a link with video instructiions. www.youtube.com/watch?v=P9ICyAa__TY
WINTERIZE IN CLIMATES THAT FREEZE: You can just pump the water out instead of letting it recycle into the bucket and pull the pump to the top and secure so it doesn't freeze up with any possible leftover water. You may want to cover it with plastic so no additional water gets in.
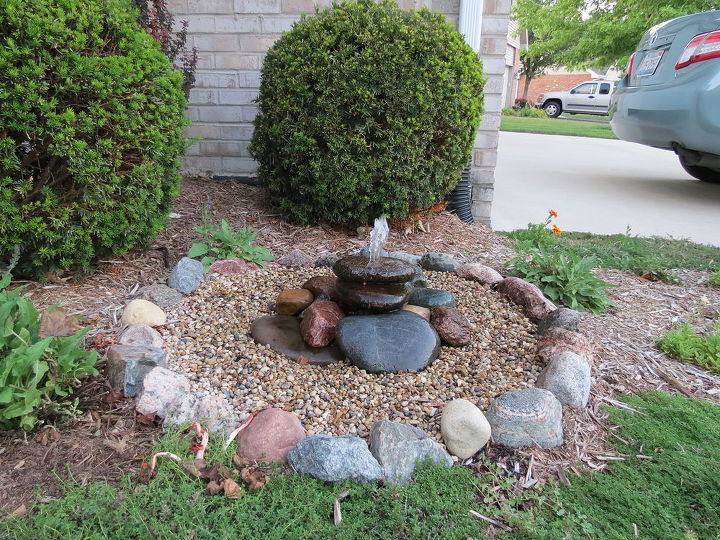
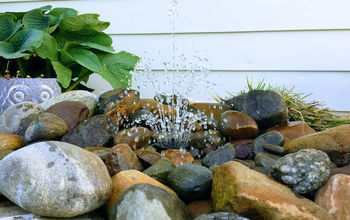
Fountain after fixing leak and increasing flow.
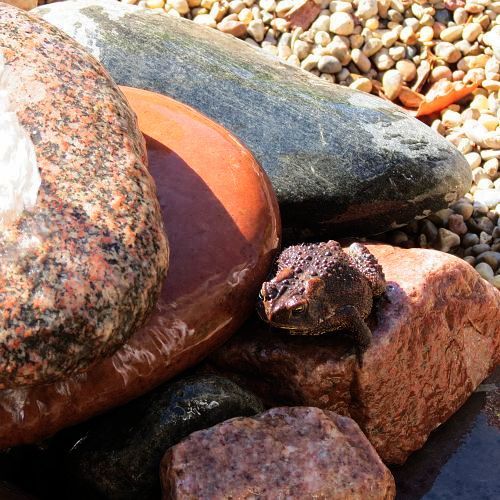
Toad
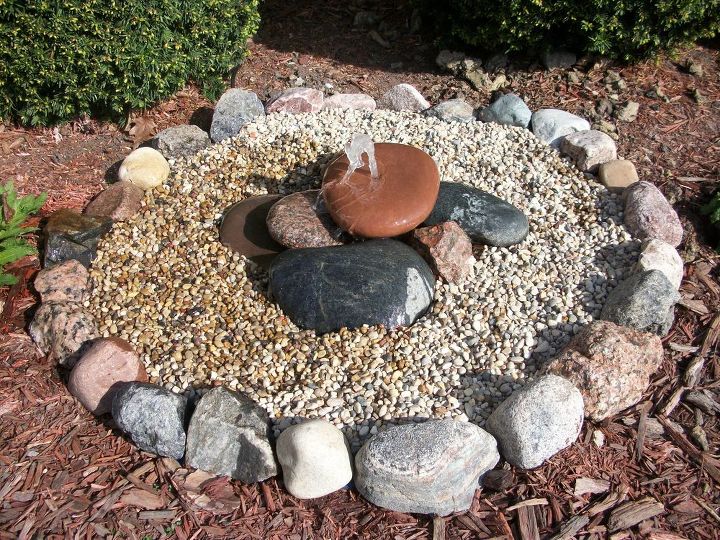
Bubbling Rock 1
{
"id": "631",
"alt": "Video after fixing a leak and making adjustments to increase flow",
"title": "Video after fixing a leak and making adjustments to increase flow",
"video_link": "https://www.youtube.com/embed/ixUMMufD9D8",
"youtube_video_id": "ixUMMufD9D8"
}
{
"width": 634,
"height": 357,
"showRelated": true
}
{
"id": "632",
"alt": "Video of original bubbling rock.",
"title": "Video of original bubbling rock.",
"video_link": "https://www.youtube.com/embed/ixUMMufD9D8",
"youtube_video_id": "ixUMMufD9D8"
}
{
"width": 634,
"height": 357,
"showRelated": true
}
{
"id": "634",
"alt": "",
"title": "",
"video_link": "https://www.youtube.com/embed/bcqZbFBNHd0",
"youtube_video_id": "bcqZbFBNHd0"
}
{
"width": 634,
"height": 357,
"showRelated": true
}
{
"id": "635",
"alt": "",
"title": "",
"video_link": "https://www.youtube.com/embed/bcqZbFBNHd0",
"youtube_video_id": "bcqZbFBNHd0"
}
{
"width": 634,
"height": 357,
"showRelated": true
}
Comments
Join the conversation
2 of 84 comments
-
I love it...exactly as it is. Good job!
-
Thanks for answering!


Frequently asked questions
Have a question about this project?