« View Post
Photos

Oops! Leave without saving?

If you leave this page, the information you have entered will not be saved!
Are you sure you want to leave this page?

Leave this page Stay on this page

Hometalk.com

  • Sign Up
  • or
  • Log In
  • Professionals
  • Community
    • All Members
    • Professionals
    • Bloggers
  • About
    • About Hometalk
    • Blog
    • FAQ
    • Guidelines
    • Resources
    • Support
    • Press
    • Contact
    • Terms of Use
    • Privacy Policy
  • Following
  • All Topics
    • Cleaning & Organization
    • Crafts
    • Design & Décor
    • DIY Projects
    • Gardening
    • Home Maintenance & Repairs
    • Outdoor Living
    • Painting
    • Remodeling
    • Repurposing & Upcycling
    See More Topics »
  • Questions
    • All Questions
    • Open Questions
    • Unanswered Questions
  • Clips
Post & Ask
Join Now Log In

Hometalk is where people share and help with everything home & garden

12K
Robert A
Robert A Dacula, GA on Sep 07, 2010
Like Clip

Revamp that large bathroom mirror

I added shelves and some trim to dress up the large bathroom mirror.

*Options I considered for this project:

We considered replacing the mirror altogether, but decided to go the less expensive route first and see how long it would buy us.

*Questions and unexpected events that arose during the project:

I didn't know how well the mirror was attached to the wall. I also didn't know how well my adhesive would adhere to the mirror and trim.

* Cost Comments:

1"x4" MDF (32 ft) - $20

1/2 birch plywd - $15

Trim (40 ft) - $20 ...»

Crown (3 ft) - $4.50

Lights - $60

*My motivation to do this project:

The mirror was large and an eye sore. We wanted something a little nicer.

*Project Steps:

The first step was to replace the single light fixture with matching twin ones. I ran the wiring, secured the boxes and mounted the new lights. This was required due to the shelving unit. I then measured out the surface and determined the size of the shelving unit. Then I purchased the materials and started designing as I cut. The shelving unit was assembled and attached first. It was ~2 inches higher than the mirror and secured to a stud to help support the mirror against the wall. The trim and molding was measured, cut and secured using GOOP adhesive and tape to hold in place until it was dry.

Advice:

Don't assume the mirror is attached to the wall well enough to hold the additional weight. Make sure it is supported fully.

Do measure twice and cut once.

Materials:

Wood, MDF, Trim - $0.00

Light fixtures - $0.00

  • Like Clip
    8
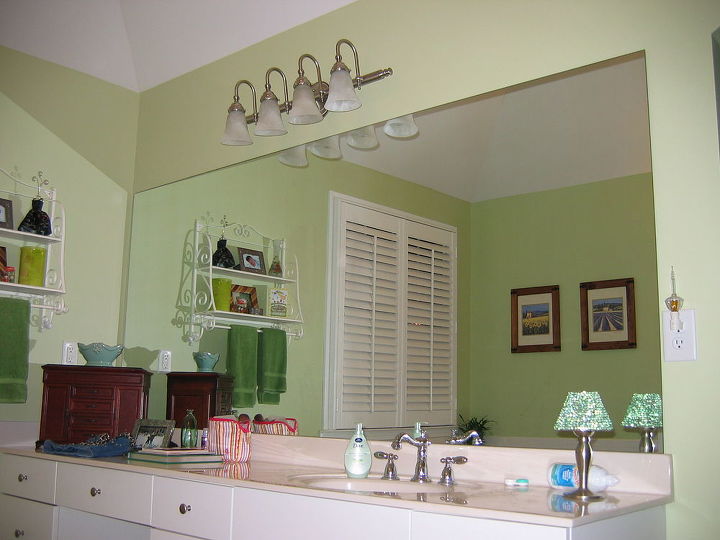
    Before project began
  • Like Clip
    10
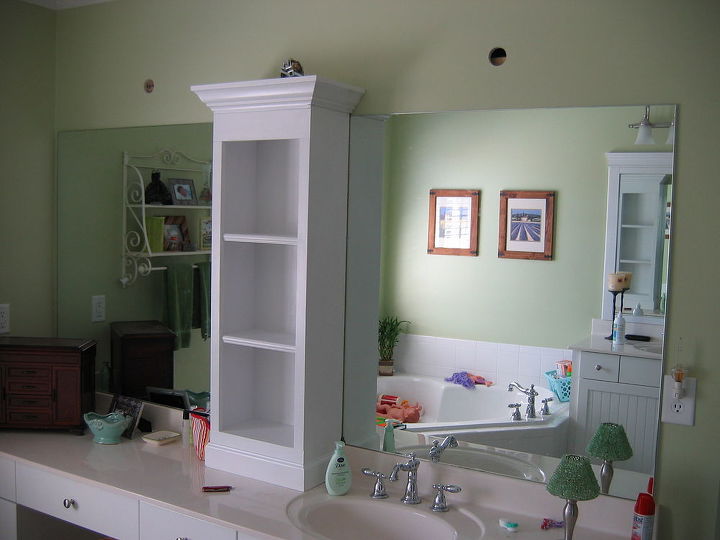
    Added shelving unit and attached to wall just above mirror to help anchor the weight
  • Like Clip
    1
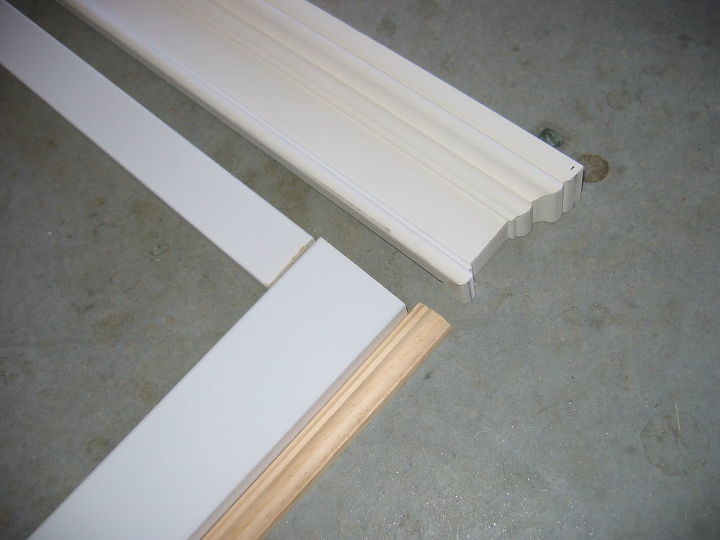
    Set out the trim and molding
  • Like Clip
    2
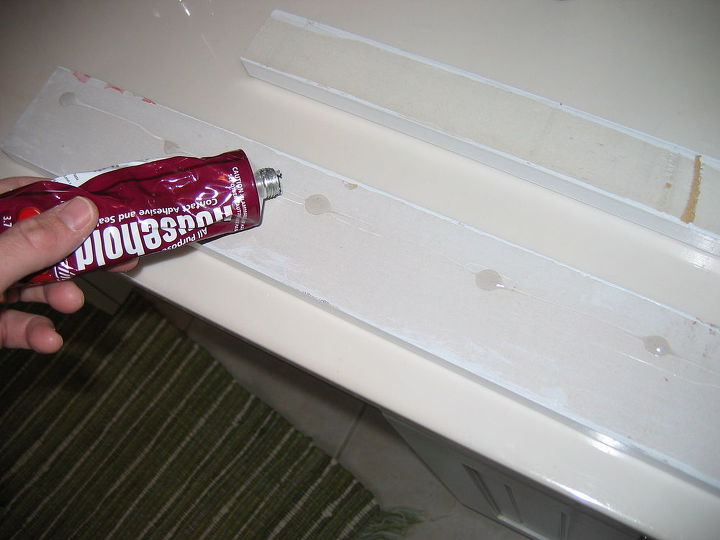
    Used GOOP adhesive to position MDF on mirror front. It was held in place by tape until it dried
  • Like Clip
    23
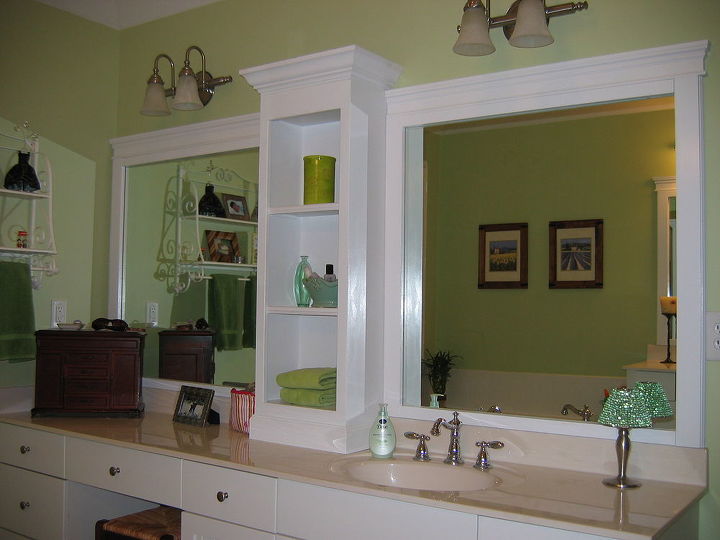
    Finished product without cutting or removing the original mirror.
Post Comment | Like | Clip | Share
579519 Views
144 Comments Displaying 25 of 144 comments | See Previous
  • A Little Claireification Orlando, FL
    I LOVE this!!!! The "before" is almost identical to our current Master setup. I also want to know the answers o Patty's questions above! Almost at the end of my "31 Days to An Organized Home" series and wish I would have seen this sooner! :)

    ~ Claire

    on Oct 30, 2012 · Like 0
  • Lauren East Walpole, MA
    Patty Brothers We ended up building the shelf ourselves. We weren't able to find any measurements so we just winged it. We measured everything out for our bathroom and then went to Home Depot, bought a piece of plywood and then they made all the cuts right there onsite. There is a shelf at Ikea that you could use that is around $60 that you could add molding too if you don't want to build one yourself.
    on Oct 31, 2012 · Like 0
  • Kelli Troiano Tiffin, OH
    I just bought a house with a huge mirror and this would be perfect for the remodel without having to take the mirror down!!!! Thank you!!!!
    on Nov 15, 2012 · Like 0
  • Jean Fort Myers, FL
    How did you keep the shelving unit flush with the mirror considering that there is a backsplash?
    on Nov 23, 2012 · Like 2
  • Danielle Fraser Canada
    are there step by step plans for this DIY? I would appreciate a copy please and thxs :) Looks great btw
    on Jan 02, 2013 · Like 0
  • Jeanette Cohutta, GA
    I'm thinking about finding some foamboard-type trim to attach to my large mirror, which has plastic clips, and I'm not sure if it is glued to the wall at all. The foamboard would allow me to easily make divots in it to accommodate the trim.
    on Jan 03, 2013 · Like 0
  • Fran hansen Canada
    need set by set instruction for the mirror love it trying to wake up a tired bathroom "
    on Jan 06, 2013 · Like 0
  • Trish Simmons-Urban Canada
    I used regular mdf trim around my builder grade mirror and did not have to worry about the clips at all!
    on Jan 15, 2013 · Like 0
  • Danielle Fraser Canada
    we're almost done just need to do a topper with crown molding thanks for the idea!!!
    • Before  and before I realized I didn't have to remove the mirror should've checked this website first lol
    • after :)
    on Jan 16, 2013 · Like 2
  • Diane Sinnott Wurdack Lake Saint Louis, MO
    How did you move the light fixtures?
    on Jan 26, 2013 · Like 0
  • Kim Flat Rock, MI
    any ideas on how to do this with a single sink, with the mirror that goes over the toilet?
    on Feb 03, 2013 · Like 0
  • Danielle Fraser Canada
    Thanks for the idea to make our bathroom GORGEOUS !!
    • this is basically what we started with
    • then from your pics and material list we made this 1
    • then primed and painted with trim and door paint and added more height to hide the plate which covered the old electrical and  voila :)
    on Feb 04, 2013 · Like 3
  • Yair S
    Danielle Fraser that is awesome!

    You should make a post with this project (Post/Ask button on top) so everyone can see!

    on Feb 05, 2013 · Like 0
  • Carole Ingram Lebanon, OH
    Love this!! :)
    on Feb 11, 2013 · Like 0
  • Mary jane b Frisco, TX
    What if the countertops are uneven in the center?
    on Feb 13, 2013 · Like 0
  • Sandi Bruce Buchwalter Ho... Forest Lake, MN
    Why has no one mentioned the change in the lighting fixtures? You need to get rid of the (4) light bar, and add 2 (2) light bars. Not a one day project.
    on Feb 18, 2013 · Like 0
  • Danielle Fraser Canada
    @SandiYou're right its not a 1 day project and again you're right about the light fixtures :) The whole reno with paint, 2 light fixtures and a new blind and building material cost me 160.00. The paint was a mis tint (5.00) light fixtures were on sale at 38.00 each and the blind was 40.00. The primer and trim and door paint I used to finish the project was stuff I had on hand:) @ Mary janeB my counter top is one continuous piece and to avoid rounded and specific cuts to go along the "so ...»
    called" backsplash we started at the "backsplash" and framed the bottom and the top to match I am very pleased with how it turned out but it definately pays to have a handyman in the house :)

    on Feb 19, 2013 · Like 1
  • Erica Acworth, GA
    I was thinking of making a corner shelf, just like the middle shelf. Should I put the decorative molding at the top of the shelf just like the top of the mirror?
    on Feb 19, 2013 · Like 0
  • Linda Kessel Menasha, WI
    For the longest time, I've wanted to frame my standard bathroom mirror but Mirror Mates was too expensive (and overly priced in my opinion). Thanks for an inexpensive and easy alternative.
    on Mar 04, 2013 · Like 0
  • Linda B Trumbull, CT
    Beautiful. Clipped.
    on Mar 08, 2013 · Like 0
  • Dotti Johnson-Porrett
    do you have the dimensions of the center piece and the cut list if you still have it or about sizes...THANK YOU SO much...it is exactly what we need and the my husband couldn't get a clear view to figure out dimesions...thank you again if you can help out.
    on Mar 25, 2013 · Like 0
  • Sandy Wilhite Kannapolis, NC
    Loved this idea. Will definitely be our next project!
    on Mar 25, 2013 · Like 0
  • Yair S
    For all those looking for more info, you can also see Danielle Fraser's awesome post here: http://www.hometalk.com/1025680/large-bathro... She's very helpful with answering questions.
    on Mar 26, 2013 · Like 2
  • Danielle Fraser Canada
    awww thxs Yair :)
    on Mar 26, 2013 · Like 1
  • HomeSpot HQ Durham, NC
    I did the same see with the mirrors in my old house. It works great and looks so much better.
    on Apr 28, 2013 · Like 0

NOTE: You can drag and drop your photos to reorder them
Required
Comment Saving...

Related Posts

  • Repurposing our dining room buffet into a bathroom vanity
  • Linen Cabinet from Old Crates
  • Bathroom Renovation
  • 207 Likes

    Mairin Helmsmyth Salina Ang Laura Sullivan Jennifer McConnell Misty Countryman Karen LaValley Lynn LindaChaney2 Patricia Dengler Sue Kopp Kathryn Ellensohn-Cogar Jessica Kirk Fran D
    +194 more

Clipped to 299 Boards »

  • Wanda
    Bathroom floatng shelves
    by Wanda
  • Honeybear Lane
    Shelving
    by Honeybear Lane

Related Topics

Bathroom, Design & Décor

Recent Questions »

  • Kathy Portie
    Miracle Method Bathtub Refinishing
    30 minutes ago 5 answers
  • Rose S
    Pink 1960 bathroom??
    2 hours ago 8 answers
  • Have a question?
    Ask now & get answers»
Back
to top
Feedback