


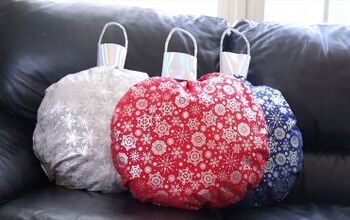
Fringe Memory Pillow
When we lost grandpa a couple years ago I collected some of his clothing so I could make a quilt. Now I'm looking for projects to use up what's left of the fabric (it's not a lot). Throw pillows allow me to be creative, my scraps to go farther and more people to get a piece of my handiwork in grandpa's memory.
I've got lots of designs in my head and can't wait to get more done. Here's the first.
I've got lots of designs in my head and can't wait to get more done. Here's the first.

I always have to draw it out. Those pesky seam allowances get forgotten otherwise, and then I'm left wondering why in the world this silly pillow cover won't fit. Always best to take the time to think it through and put it to paper.

My pillow form is 14" square so I cut a 15" square piece of fabric for a base. I used 1/2" seams and laid my fabric strips over the base in the design I'd chosen and pinned them. Slightly overlapping them.

Simply run a straight stitch down the middle of each fabric strip.... attaching it to the base. I used a grey thread for all stitching. It's a nice neutral that blends well with all colors involved in the project and I'll be honest, I'm too lazy to change out the color of thread to match each strip..not gonna happen. I figure if I hate it and it's too noticeable I'll stitch a piece of ribbon over the top of each strip for a little something extra.

Here's what it'll look like when you're done stitching all fabric strips to the base fabric.

Here's the back. The base fabric after all strips have been stitched on.

I thought about adding a zipper but alas, no zippers. I also didn't have backing fabric so I changed my design to "use what I have". This stripe fabric (also a sheet) was used on the quilt I made and these are the leftovers. I didn't have a 15" width of fabric so I decided to make a pocket instead- another plus. The sheet fabric already had a finished edge so I didn't need to do any work on one side of the closure.

Once you've cut your two overlapping pieces for the back, pin it to the pillow front (finished sides of fabric face to face).

Sew all four sides using a 1/2" seam allowance.

Turn right side out.

I've put the pillow form in and this is what the front will look like.

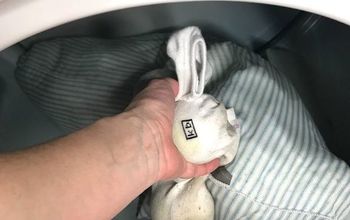
Now, time to cut some fringe. This was the most time consuming (and painful) part. I rounded up every pair of scissors in the house and still had a heck of a time with some of these fabrics.

Fringe.

Here it is. I have a simple stripe fabric on the back and am planning to add some buttons so it can be reversible. It's so cute and made from grandpa's shirts- can't beat that! Can't wait for design #2.

Want more details about this and other DIY projects? Check out my blog post!
Comments
Join the conversation
2 comments
-
Really cool end result!
-
What an awesome idea!


Frequently asked questions
Have a question about this project?