« Back to post
/ Photos

Oops! Leave without saving?

If you leave this page, the information you have entered will not be saved!
Are you sure you want to leave this page?

Leave this page Stay on this page

Hometalk.com

  • Sign Up
  • or
  • Log In
  • Professionals
  • Community
    • All Members
    • Professionals
    • Bloggers
  • About
    • About Hometalk
    • Blog
    • FAQ
    • Guidelines
    • Resources
    • Support
    • Media Center
    • Contact
    • Terms of Use
    • Privacy Policy
  • Following
  • All Topics
    • Cleaning & Organization
    • Crafts
    • Design & Décor
    • DIY Projects
    • Gardening
    • Home Maintenance & Repairs
    • Outdoor Living
    • Painting
    • Remodeling
    • Repurposing & Upcycling
    See More Topics »
  • Questions
    • All Questions
    • Open Questions
    • Unanswered Questions
  • Clips
Post & Ask
Join Now Log In

Hometalk is where people share and help with everything home & garden

28
222
1
Find me on g+
Kristi @ Addicted 2 Decorating
Kristi @ Addicted 2 Decor... Blogger Waco, TX
Like 43 Clip 38
Bathroom Carpentry / Woodworking Countertops

Bathroom Vanity Makeover

I'm in the middle of a bathroom makeover, and I just finished my vanity. I made new doors and drawer fronts using 1/2" plywood and decorative trim, and then made the countertop for under $35 using cedar fence pickets. Next up, I'll be working on the walls, and getting rid of (or covering up) the 30+ year old berry wallpaper.
  • Like 10 | Clip 9
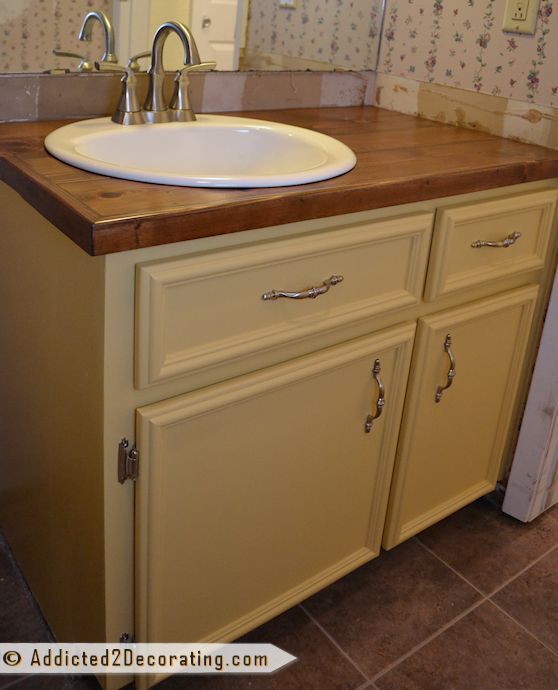
    Vanity after makeover with new DIY doors and drawer fronts, and $35 wood countertop made from cedar fence pickets
  • Like | Clip
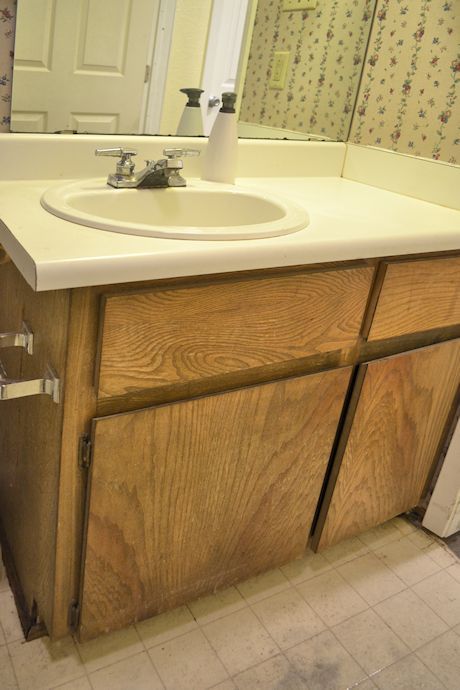
    The bathroom vanity before, with very old and disgusting apartment-grade cabinet and laminate countertop

To see more: http://www.addicted2decorating.com/bathroom-makeover-day-5-the-finished-vanity-before-after.html

Post Comment | Like | Clip | Share
on Jan 25, 2013 | 6151 Views
16 Comments
  • Storywood Designs Raleigh, NC
    Amazing Kristi! You did a great job!
    on Jan 25, 2013 · Like 0
  • Becky Blair, NE
    Kristi, it looks awesome!
    on Jan 25, 2013 · Like 0
  • Lisa M Atlanta, GA
    Impressive!
    on Jan 25, 2013 · Like 0
  • Organized Clutter International Falls, MN
    I love this transformation.
    on Jan 25, 2013 · Like 0
  • Miriam I New York, NY
    Kristi, this is so impressive!
    on Jan 25, 2013 · Like 0
  • Rosemary N Klamath Falls, OR
    Wow! You did a wonderful job; it looks so much better in the "after" photo!
    on Jan 26, 2013 · Like 0
  • Laurie Lee Campbell Pembroke, MA
    Congrats! The end result was well worth all the work you put into it, The colors are so pleasing...the wood top...great job!!
    on Jan 26, 2013 · Like 0
  • Jen Miller Branch, MI
    Very nice! Looks awesome.
    on Jan 26, 2013 · Like 0
  • Joyce T Springfield, MN
    Kudos to the lovely DIY project. It turned out fantastic.
    on Jan 26, 2013 · Like 0
  • Karen Cooper @ Dogs Don't... Decatur, GA
    Looks beautiful - great job!
    on Jan 26, 2013 · Like 0
  • Susan Lewis
    Looks great. Good luck on the wallpaper. We just took down some 30 year old paper--what a job! Please post your hints on wallpaper. We had to use a steamer.
    on Jan 26, 2013 · Like 0
  • M Gail Greene Charleston, SC
    Very nice Kristi ! Thank you for sharing.
    on Jan 27, 2013 · Like 0
  • Rose Adams Cranberry, PA
    To remove wallpaper. You can get a tool that you roll over the wallpaper and it makes little slits in the paper. Use diluted fabric softener with warm water in a spray bottle. Soak the wall and wait. (Protect your floor) It will just scrape off. (I didn't measure how much fabric softener, just poured some in. Went thru 2 large generic bottles to do the room. The room smelled good too. Cheaper than renting a steamer.
    on Jan 27, 2013 · Like 0
  • Connie K Kennesaw, GA
    I love the way your new counter top looks. Good job! Take Rose's advice and get the paper tool. One is actually called Paper Tiger. I haven't used the fabric softener but I wish I had known about it. In our former house the wallpaper was hung with no prep first. It was a nightmare. Good luck.
    on Jan 27, 2013 · Like 0
  • Pam Oleson-Kremer Minneapolis, MN
    A great looking re-do, Kristi. Looking at what you did with the new doors has given me an AHA for my kitchen cabinet doors that are desperate for an upgrade. Thank you for sharing the great pix. Also, I had to remove years of wallpaper from a bedroom. Tried multiple methods - rent a steamer. It was magic!
    on Jan 28, 2013 · Like 0
  • Polly Lynn Sandusky, OH
    I loved your idea of using wood for a vanity top and decided to try it for myself. It turned out wonderful. thanks for the idea
    • my vanity top
    on Feb 23, 2013 · Like 0

NOTE: You can drag and drop your photos to reorder them
[?]
You can select multiple files by holding down the Ctrl key (or Command key on a Mac) and left-clicking on individual files. Each file can be up to 20 MB.
or Embed Video
Add
Required
Comment Saving...

Related Posts

  • How To Transform A Builder's Grade Mirror
  • $60 Bathroom Makeover
  • Frame Out Your Builder's Grade Mirrors...No Mitering Required!
  • 43 Likes

    Pam Andrea N Carlee T Stacy Teunissen Terri Haakenson Pamela K Pam Oleson-Kremer Debra Maureen H Judy baker Katherine L.E. & Company Karen Cook
    +30 more

Clipped to 38 Boards»

  • Bathroom Remodels
    By Rhonda Scott
  • bathroom
    By DeDee Smith

Recent Questions»

  • Linda Vines
    Plastic strip around tub
    8 hours ago 3 answers
  • Barr
    Slow running toilet that is NOT clogged
    9 hours ago 13 answers
  • Have a question?
    Ask now to get the best answers & advice»
      Back
      to top
      Feedback