


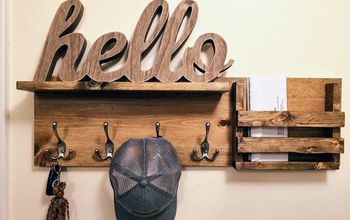
Coat Rack from a Single 1" x 6" x 6' Board

by
Jeremy Dixon
Easy
Originally Posted at simplydixon.com (Cheap, Quick and Easy Coat Rack)
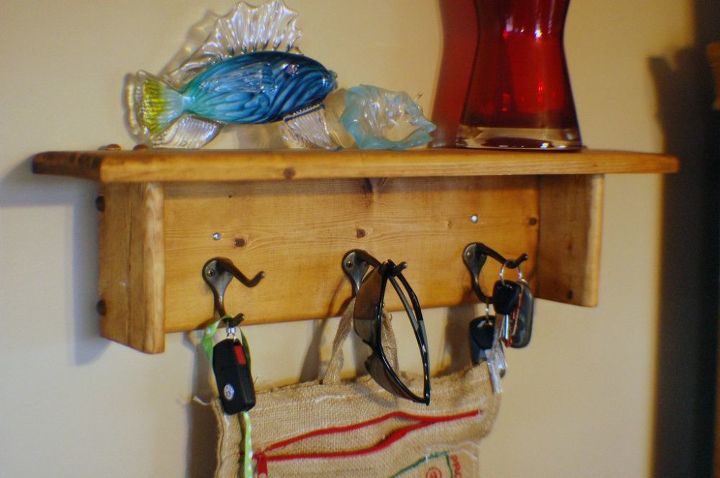
I'm not much of a carpenter, so it's probably not done right, but it works and I think it looks really nice too.
I can't tell you much about the construction since I built it 9 years ago, but i do know that It's a very simple, straightforward design, but completely build by me from a single board of pine.
Supplies:1″ x 6″ x 6′ Pine Board – (example here)1 1/2″ Wood Screws (example here)Screwhole Buttons (example here)Coat and Hat Hooks (example here)
Process
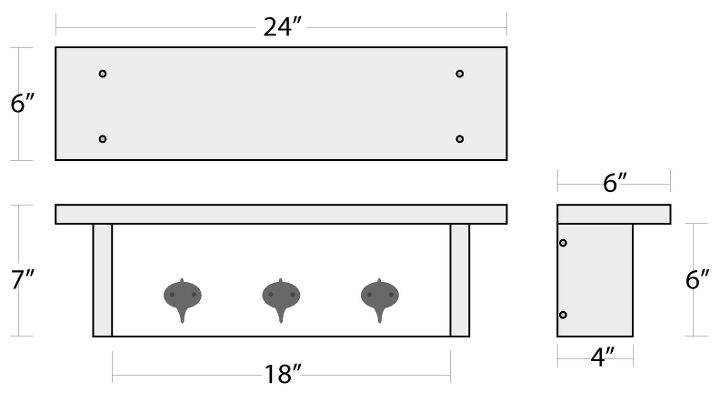
1. Start by cutting the following lengths from the board. (24 inches, 4 inches, 18 inches)
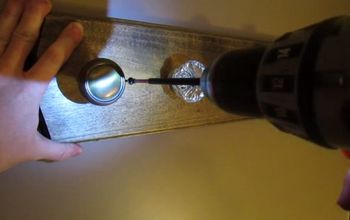
Assemble according to the drawing below. The exact placement of the screws is not real important. Just make sure to countersink the screws by pre-drilling for the screw then predrilling just below the surface with a bit that's just larger than the screw head and about 1/8″ deep to account for the button.
2. Once assembled, I took some chains and metal brushes and "distressed" it. I also had a router with a round-over bit, but you can simply sand all the edges so they're slightly rounded.
3. Pick a stain you like and coat the entire rack with a rag. I used a honey maple stain (like this).
4. Once the coat rack is stained and dried fully, space out the hooks. From the left the first one is at 3 3/4″, then 9″ in the center and from the right 3 3/4″ for the far left one. Pre-drill by placing the hooks on the location and push a pencil or pen through the screw holes to mark.
5. To mount, you can simply find your location, drill for a stud and if there is none, use a wall anchor (like these).
Originally Posted at simplydixon.com (Cheap, Quick and Easy Coat Rack)
I'm not much of a carpenter, so it's probably not done right, but it works and I think it looks really nice too.
I can't tell you much about the construction since I built it 9 years ago, but i do know that It's a very simple, straightforward design, but completely build by me from a single board of pine.
Supplies:1″ x 6″ x 6′ Pine Board – (example here)1 1/2″ Wood Screws (example here)Screwhole Buttons (example here)Coat and Hat Hooks (example here)
Process
1. Start by cutting the following lengths from the board. (24 inches, 4 inches, 18 inches)
Assemble according to the drawing below. The exact placement of the screws is not real important. Just make sure to countersink the screws by pre-drilling for the screw then predrilling just below the surface with a bit that's just larger than the screw head and about 1/8″ deep to account for the button.
2. Once assembled, I took some chains and metal brushes and "distressed" it. I also had a router with a round-over bit, but you can simply sand all the edges so they're slightly rounded.
3. Pick a stain you like and coat the entire rack with a rag. I used a honey maple stain (like this).
4. Once the coat rack is stained and dried fully, space out the hooks. From the left the first one is at 3 3/4″, then 9″ in the center and from the right 3 3/4″ for the far left one. Pre-drill by placing the hooks on the location and push a pencil or pen through the screw holes to mark.
5. To mount, you can simply find your location, drill for a stud and if there is none, use a wall anchor (like these).
Originally Posted at simplydixon.com (Cheap, Quick and Easy Coat Rack)
Want more details about this and other DIY projects? Check out my blog post!


Frequently asked questions
Have a question about this project?