« View Post
Photos

Oops! Leave without saving?

If you leave this page, the information you have entered will not be saved!
Are you sure you want to leave this page?

Leave this page Stay on this page

Hometalk.com

  • Sign Up
  • or
  • Log In
  • Professionals
  • Community
    • All Members
    • Professionals
    • Bloggers
  • About
    • About Hometalk
    • Blog
    • FAQ
    • Guidelines
    • Resources
    • Support
    • Press
    • Contact
    • Terms of Use
    • Privacy Policy
  • Following
  • All Topics
    • Cleaning & Organization
    • Crafts
    • Design & Décor
    • DIY Projects
    • Gardening
    • Home Maintenance & Repairs
    • Outdoor Living
    • Painting
    • Remodeling
    • Repurposing & Upcycling
    See More Topics »
  • Questions
    • All Questions
    • Open Questions
    • Unanswered Questions
  • Clips
Post & Ask
Join Now

Hometalk is where people share and help with everything home & garden

281
Find me on g+
Shelley @ Sow and Dipity
Shelley @ Sow and Dipity Blogger Canada on Feb 15, 2013
Like Clip

Thyme to Sow

Right now retail stores and nurseries are loaded with racks of pretty little packages of seeds...it's hard to resist filling your basket full of them! If they don't have you #Itching4Spring...the rows of primula's definitely will ( that's another post coming this weekend....stay tuned....)

If you plan to start seeds indoors you've most likely seen the toilet paper tubes or egg carton planters or even just the egg shells themselves being shared as nifty planting vessels. Let me warn you, after so many watering's, these paper based liners break down pretty quick and become quite unstable for transplanting...even rotting faster than your seedling can grow!

And as far as the egg shells go, you're going to have to crack them eventually so the plant can put on size, risking damage to the young roots. As darling as this method appears the truth is egg shells take years to break down in the soil....which is why they get crushed with my boot when I throw them into the compost. I have tried it all, so I know from experience.

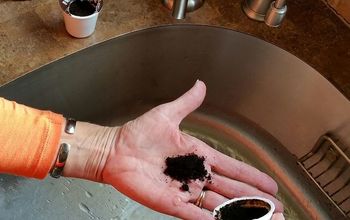
A simple tried and true method for the virgin gardener would be to use peat pellets. They look like little brown discs the size of a ...»

Toonie...yep, I'm Canadian...eh :) I explain the easy steps below in the photo's.... #gardening For the full tutorial go to: http://www.sowanddipity.com/thyme-to-sow/

  • Like Clip
    1
    Some of the tools you can use to sow seeds. My favorite is my green dibbler but a chopstick with a narrow end works great too. ( even a pencil if you only hav...
  • Like Clip
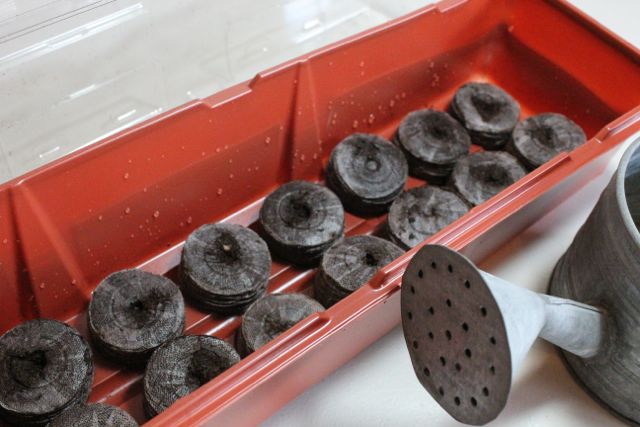
    You can buy little greenhouse kits like this one above to place your pellets in. I usually use long black seeding trays. Lay the flat round discs in an even row and a...
  • Like Clip
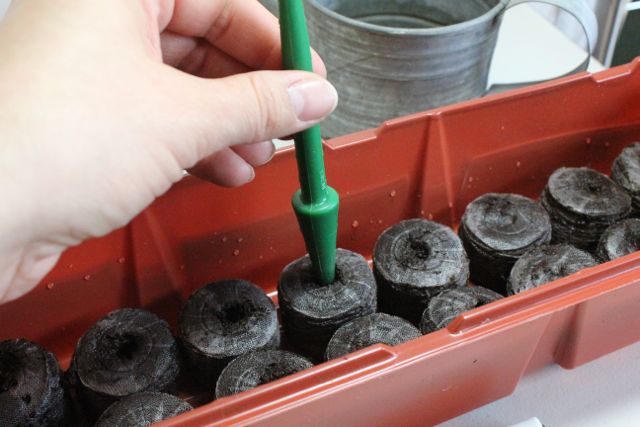
    Once pellets have completely swelled (takes several minutes ) then use your dibbler tool to gently make a shallow indentation in each pellet.
  • Like Clip
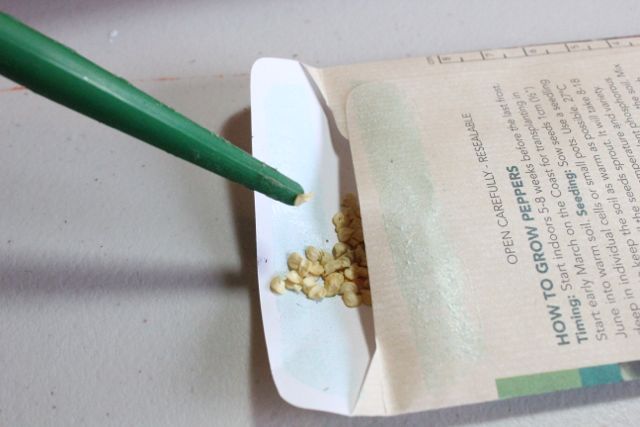
    Use your dibbler to sow seeds, it's the easiest way to handle them. With a moist end, gently pick up a seed and as you place these into the soil, it will be re-m...
  • Like Clip
    Place 2-3 seeds in each pellet. You will thin these later to the strongest seedling.
  • Like Clip
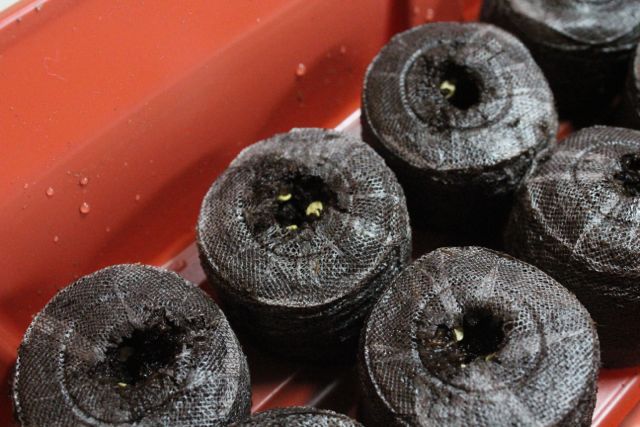
    Gently squeeze the peat over the seeds. Now you talk to them and send lovingly growing vibes...well, that's what I do :)
Post Comment | Like | Clip | Share
12687 Views
37 Comments Displaying 25 of 37 comments | See Previous
  • Randall S Debary, FL
    Great, timely tips. Excellent ideas. Experience counts!
    on Feb 17, 2013 · Like 1
  • Becky Blair, NE
    I tried starting my own seedlings last year and they all died before it got warm enough to transplant them and I started a few weeks late too. I bought the 72 pellet covered green house starter kit. They started wonderfully, but then all fell over and died. I was broken hearted. I'm debating on giving them a try again this year even though I've very leery. I'd only have to buy seeds and the little pods.
    on Feb 17, 2013 · Like 1
  • Rindy Bergbower Newton, IL
    Becky you probably had dampening off where the stem pinches at the soil line. this is caused by too wet of soil. Water from the bottom not the top and keep the soil slightly damp on top and not too wet. The roots will go deeper into the soil for the moisture which will give you better roots. also if you have a shop lite put your trays of seeds under it about 1-2inches above them. Move the lite up at the plants grows, this makes for healthy stems and not leggy looking plants. Plus the heat of the lite makes things excell along nicely.

    on Feb 17, 2013 · Like 4
  • Karen - The Graphics Fairy Frederick, MD
    I've used these before, and you are right, they are great! Thanks for reminding me that I need to get started!
    on Feb 17, 2013 · Like 1
  • Becky Blair, NE
    Thanks for the great tip Rindy. I'll have to bring in my plant rack from the garage and buy a light for it. I'm not sure how I'd water from the bottom since the pods sit in cups in the tray. Maybe I could get other trays and poke holes in the one I have now and add the water to the extra tray. Do you think that would work?
    on Feb 17, 2013 · Like 0
  • Rindy Bergbower Newton, IL
    I use the s.foam tray that chicken come in at the store's meat dept. Or even aluminum cake pans, anything that will hold water will work . I use the plastic containers that veggies come in too, but I line the bottom with coffee filters, then set them in the pans or trays and add small amounts of water to it each day. Once they are up and have several leaves I start adding small amounts of Miracle Grow to them and watch them take off.
    on Feb 18, 2013 · Like 3
  • Kelly S Bremerton, WA
    I can't wait for fresh home grown tomatoes and sugar snap peas. I'll have to try this to get a jump start on the growing season.
    on Feb 18, 2013 · Like 1
  • Pattie Patterson
    I find that using the larger, 72 pellet plant starter is only good if you have the same type of plants in them, or ones that germinate at the same rate. I tend to like to use the smaller ones. After the initial investment, save the containers and you can use them over and over, year after year, as they sell the refills of the pellets separately. Oh, Becky, once my plants get bigger, I have some plastic cups that I have poked holes in the bottom that I transfer them to and sit in the trays I have collected. Works GREAT!

    on Feb 18, 2013 · Like 2
  • Becky Blair, NE
    Thanks Rindy and Pattie. I tried the Miracle Grow, but will be transferring my plants once they get a little growth behind them. I think had I done that before I started feeding them they may have made it.
    on Feb 18, 2013 · Like 0
  • Shelley @ Sow and Dipity Canada
    Becky, it does sound like damping off...there is a fungicide called Damp Off, but may I suggest a few chemical-free remedies you can try.

    1) I recommend a small desk top fan set on low to gently graze the tray. ( be mindful of watering to prevent drying out ). This prevents the surface from forming a soggy environment for the ...»

    bacteria to form thus attacking your stem.... but it is also a wonderful tool in establishing strong roots and stem. It's all in the resistance...if I gave you a push you would plant your feet as to not fall over... that's how they grow strong.

    2) Like Rindy Bergbower suggested with the light lowered to within inches of emerging seedlings...raise the light as the grow and this will prevent stretching. I have used regular old fluorescent shop lights for this... one cool colored bulb and one warm for a full spectrum of light.

    3) Cinnamon has anti bacterial properties, many people have used this with great success....just sprinkle at time of sowing as the disease becomes present right after germination.

    4) Chamomile tea is another option. It's used more like a spray tonic where you just mist the surface area of the soil a couple times a week but not necessarily water with it.

    5) Blow kisses and tell the seedlings how wonderful they are :)

    on Feb 18, 2013 · Like 2
  • Becky Blair, NE
    Thank you Shelley. I appreciate your time and knowledge. I also appreciate chemical free solutions because I'm highly allergic to most chemicals.
    on Feb 18, 2013 · Like 1
  • Katie Wells Midland, TX
    I am thinking of buying an 10 gal aquarium and lining the side with red and green plastic wrap, putting a net over top and a light for heat and growth, it is nice someday's here in west tx but nights getting down to freezing, Does it sound like a good idea?
    on Feb 18, 2013 · Like 1
  • Vallery Dietrich
    I like this idea!! Unfortunately, I just filled all my saved egg cartons today with starter. I will be exta careful not to overwater. Thanks for the great ideas.
    on Feb 18, 2013 · Like 1
  • Elaine Simmons Florence, AZ
    I have tried all kinds of ways to start seeds and you are right about them breaking down before transplant time. I think a lot of people have problems with them dampening off (wilting). I water mine from the bottom and put the tray on a heating pad set on low. I run a small desktop fan on low across the plants and use a grow light too. This is what has always worked best for me.
    on Feb 18, 2013 · Like 4
  • The Treasured Home Fair Oaks, CA
    I don't sew seeds, but this certainly has me thinking about it!!
    on Feb 18, 2013 · Like 1
  • Mary-Ellen Rogers Holden, MA
    I don't have a green thumb, but am interested in all that everyone wrote. I may just turn over a new leaf and get started on sewing so seeds. I especially love to have herbs around the house for cooking. Thanks all.
    on Feb 19, 2013 · Like 1
  • Eileen Millsap Kansas City, MO
    Gardeners Supply Co. has some neat bottom watering seed starter kits. A bit expensive but will last a long time (I've had mine for over 10 years). If you don't want to buy, looking may help you brainstorm something. ( I just replaced my "wicking mats" with white felt this year.)
    on Feb 19, 2013 · Like 1
  • Loretta B Keller, TX
    Thanks for the timely advice! I myself was just about to start some catnip seeds for my new kitty to enjoy all summer and wasn't sure the *best* way to get them going. I was thinking back to my gradeschool days (many, many moons ago-LOL) when we started seeds for our mother's day plant gifts but the memory was a little sketchy! :D
    on Feb 21, 2013 · Like 1
  • Kristen P Wallingford, CT
    Although I am a avid gardener I am trying to grow from seed for the first time. How long before I put them into the ground should I sow my seeds. I won;t be able to plant here until late April early May on most crops.
    on Feb 22, 2013 · Like 1
  • Shelley @ Sow and Dipity Canada
    Hi Kristen P Your seeds should say how 'many weeks before last frost' on the package...then just work back from there. For instance, If your last average frost is April 28 and the seeds say start indoors 4 weeks before last frost....you get the idea.

    Here's a chart from the tried and true Farmers Almanac to help you out: ...»

    http://www.almanac.com/content/frost-chart-u... Happy Sowing!

    on Feb 22, 2013 · Like 0
  • Kristen P Wallingford, CT
    Thank you!
    on Feb 23, 2013 · Like 1
  • Linda Henning Wasilla, AK
    Kirsten P - as far as I've found there is no harm in starting earlier than the packet. since we have cool short summers I get seed started in Feb for a May 1 move to the greenhouse. But we can't count on that. Sometimes it means moving lots of pots every night in and out until we can count on 50 degree nights. The plants don't go in the ground until May 31 so I get as much growth as I can inside. The only direct seeding I've done is peas (already sprouted) carrots, radishes and some ...»
    lettuce but may change that this year to starting lettuce inside. Our ground is just too cold to get anything out of it by late Aug. Then we are done.

    on Feb 23, 2013 · Like 1
  • Linda Henning Wasilla, AK
    Loretta - catnip is a mint, so in TX I bet you can seed any time. But you can start them any time and put them out in May. They will come back each year for free, even here in Alaska, and even after the cat has passed on....
    on Feb 23, 2013 · Like 2
  • Pattie Patterson
    Kristen P, like Laura Henning I also start my seeds earlier, although I don't have a greenhouse. I just transplant them into plastic cups with a hole in the bottom, set them in the trays and continue them in my dining room, where I start my seeds. This seems to give them a much better chance for survival, as they are usually the size of "store bought plants" by the time I transplant into the garden. My tomatoes and cucumbers are already just about ready to transplant now. Other seeds should be ready in a week or so.

    on Feb 25, 2013 · Like 1
  • Terri J York, PA
    Thanks for all the tips about planting seeds. I never thought about damaging the little roots b4 now when you have to break the egg shell.
    on Feb 25, 2013 · Like 1

NOTE: You can drag and drop your photos to reorder them
Required
Comment Saving...

Related Posts

  • Framing Succulents
  • Re-Purposed Tree House Ladder
  • Creating a raised garden bed – in just a few hours
  • 75 Likes

    MaryAnne Corliss Betsy Wright Madelyn Urso Carol L Lynda M Delana Elliott Morrison Diana P Pat Wells Melissa Terri J Carol Pogorelc Suzi Grosart Judy Coleman
    +62 more

Clipped to 73 Boards »

  • Douglas Hunt
    Gardening
    by Douglas Hunt
  • Sharon @ mrs. hines class
    how does your garden grow?
    by Sharon @ mrs. hines class
  • Donna Glenn Becker
    gardening
    by Donna Glenn Becker

Related Topics

Gardening

Recent Questions »

  • Jayme
    Rhubarb Help Please!!
    30 minutes ago 7 answers
  • Louise
    I bought a somewhat leggy tom...
    37 minutes ago 25 answers
  • Have a question?
    Ask now & get answers»
Back
to top
Feedback