« View Post
Photos

Oops! Leave without saving?

If you leave this page, the information you have entered will not be saved!
Are you sure you want to leave this page?

Leave this page Stay on this page

Hometalk.com

  • Sign Up
  • or
  • Log In
  • Professionals
  • Community
    • All Members
    • Professionals
    • Bloggers
  • About
    • About Hometalk
    • Blog
    • FAQ
    • Guidelines
    • Resources
    • Support
    • Press
    • Contact
    • Terms of Use
    • Privacy Policy
  • Following
  • All Topics
    • Cleaning & Organization
    • Crafts
    • Design & Décor
    • DIY Projects
    • Gardening
    • Home Maintenance & Repairs
    • Outdoor Living
    • Painting
    • Remodeling
    • Repurposing & Upcycling
    See More Topics »
  • Questions
    • All Questions
    • Open Questions
    • Unanswered Questions
  • Clips
Post & Ask
Join Now

Get advice, inspiration and feedback on all your home & garden projects!

Bonnie F

Atlanta, GA
23 Followers 7Likes 1 Share
  • Overview
  • Posts3
  • Q&A5
  • Comments39
  • Likes4
  • Following21
  • Send a Message

Featured Photos

About Me:

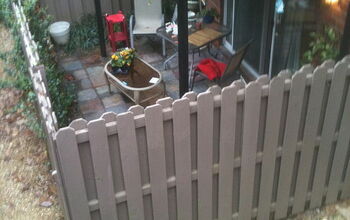
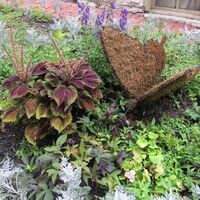
I retired and bought an old condo in Sandy Springs. As funds permit I am trying to update inside and add to my garden space outside. Next big project will be the kitchen. Got new appliances, but the rest has to GO!

Favorite area of home improvement:

Kitchens always provide the biggest boost to my satisfaction with my home, but the area I love the most would be the garden area.


Recent Activity


  • House Mouse

House Mouse

Light brown to black in color, small eyes, pointed nose, large ears, long tail and about 2 inches in length. The house mouse is the most common rodent pest in most parts of the world. The female mouse can give birth every three weeks to a dozen babies, that's 150 babies a year! Their diet consists mainly of plants & grains but they will eat meat & dairy products as well and require very little water to survive. House mice nest in and around structures, especially in stacked firewood, ...»
stones, bricks, leaves and other debris. They establish a territory near food sources, generally 10 to 30 feet from their nest. House mice breed throughout the year and often share nests with their "relatives". House mice spread disease through bite wounds and contaminating food & water with their waste products. They can also spread disease through parasites such as ticks, fleas & mites. These parasites bite the infected mouse and then spread the disease by biting humans, this is why controlling rodent problems are extremely important. Prevention tips include: 1) Eliminate harborage in and around the house. Do not allow piles of leaves to accumulate next to the home, remove any piles of debris, stones, bricks, firewood, etc. 2) Seal holes & cracks inside & outside the home. Mice can fit through a hole as small as 1/4 in length. 3) Mice eat 15-20 times a day, so never leave food out. 4) Empty garbage on a daily basis and keep lids on the trash cans. 5) Frequently clean up sheds, crawlspaces, attics, storage rooms & garages. 6) Install weather stripping on the bottom of all doors. 7) Keep the house clean and free of clutter. - If problems persist, contact a Pest Control Company for help.

A-1 Watkins Pest & Termite Control
A-1 Watkins Pest & Termit... Long Beach, CA
42 Comments | Post Comment | 15673 Views
  • Bonnie F
    Commented on Jan 30, 2013
    Does the peppermint oil work for rats as well?
  • Share 753
  • Like 2
  • Clip 6
Clipped to:
  • Best of Hometalk

Gardening: Need Ideas for Perennials

I live in a condo community in the Atlanta area and twice yearly we pay to have annuals planted around the community for color. I think we could save a lot of money in the long run if we ...»
used perennials. Does anyone have any suggestions for perennials that would work for this purpose? Most areas are in full sun although a few are part sun. We definitely want color and don't want a lot of height. Thanks.

Bonnie F
Bonnie F Atlanta, GA
5 Comments | Post Comment | 93 Views
  • Bonnie F
    Commented on Jan 24, 2013
    The beds out by the community sign have automatic sprinklers. The rest get watered by hand. ...»
    Another problem I forgot to mention is that the rabbits have been eating the pansies and violas. No deer problems, but squirrels and rabbits. I'll have to get out and take pictures.

  • Share 0
  • Like 0
  • Clip 0
Becky FunkyJunk Interiors - Donna Leah DIY Show Off Karen - The Graphics Fairy Miriam I
  • Bonnie F
    Followed 6 people on Dec 31, 2012
  • Isn't this edge pretty? Trust me, this is very easy to do. All you need are three tools you likely already have on hand. 6
  • This was the before. Does this look more like what you have in your own yard? Let's fix this right up!
  • This is a simple half moon edger. Make a nice fresh cut along the grass part of your edges in a nice smooth arc.
  • Once the cut is made, trench out the soil with a hand held garden shovel and mound it away from the edge. Trim the grass along the edge horizontally and vertically to get that nice crisp haircut look.
  • The trench allows for water run off and soil falling, and the shadow just creates a really dazzling finish. 3
  • I created a fun little chart that displays the process a little better. Come check out all 4 steps as well as many other after shots at:

http://www.funkyjunkinteriors.net/2012/07/how-to-edge-flower-beds-like-pro.html 5
  • See 3 more photos

How to edge flower beds... like a pro!

My brother is a pro gardener and many moons ago, he shared how he professionally edged flowerbeds. I get comments asking how I do my own, so today I'm sharing my secrets! ...»

How do you edge your flowerbeds?

#Bestof2012

#itchingforspringOutdoorProjects

#BeforeandAfter

0.00 Easy
FunkyJunk Interiors - Donna
FunkyJunk Interiors - Don... Canada
53 Comments | Post Comment | 120431 Views
  • Bonnie F
    Liked on Jul 28, 2012
  • Share 17K
  • Like 285
  • Clip 360
Clipped to:
  • Housekeepin...
  • Garden Decor
  • 4
  • 1
  • 3
  • 1
  • 1
  • 1
  • 5
  • 1
  • 1
  • 1
  • See 14 more photos

Flowers in my backyard

I do not have much sun. I'm surrounded by trees. So I am proud of what i grow. I thought I would share =)
Missy M
Missy M Glenville, PA
26 Comments | Post Comment | 8110 Views
  • Bonnie F
    Commented on Jul 07, 2012
    I, too, would love a list, if you don't mind sharing!
  • Share 135
  • Like 21
  • Clip 5
Clipped to:
  • flowers
  • For the Garden
  • Paradise Sink 3
  • Paradise Sink 1
  • Paradise Sink 4

Concrete Bath Vanity

The paradise sink
Burco Surface & Decor
Burco Surface & Decor Dallas, GA
32 Comments | Post Comment | 9525 Views
  • Bonnie F
    Commented on Jul 02, 2012
    What a beautiful sink. I would love to have this in my bathroom. The free form shape is so ...»
    relaxing.

  • Share 153
  • Like 19
  • Clip 5
Clipped to:
  • D Y ideas
  • 18

Terra Cotta Pot Fountain

INSTRUCTIONS: You can see from the picture what kind of pots I used. The large basin on the bottom is plastic. You can also use a very large terra cotta saucer, but it doesn't hold much water and you have to keep refilling. I know because I tried it.

You can use any size pots you want. I like the strawberry pot because the water comes out of the holes.

The pump sits on the bottom of the big basin. You put a large size pot upside down in the big bowl to ...»

cover the pump as you see it in the picture, then stack other pots as you like. Then you just run clear hose (Lowes) from the pump (also Lowes) up to the top saucer. You have to do a little cutting and drilling on the first pot that the pump is under. Cut out a little space on the edge of that pot so the electrical cord can run through and so that the pot can sit flat and also drill a few holes in the upper rim of that pot so water can flow inside to the pump. Since the pots already have holes in the bottom, you will only have to drill through the center of the saucers to run the hose up.

You have to use a masonry bit. They are a little expensive, but well worth it. You should get a bit large enough to drill a hole the same size as the holes in the pots. Then get a hose wide enough, but one that will easily slide through to the top. I got everything I needed at Lowes.

Put colored stones or rounded river stones (Lowes again) in the top and middle saucers for decoration. The stones will control how your water comes out of the top. Good luck. Have fun.

Debbie M
Debbie M Hazleton, PA
86 Comments | Post Comment | 35273 Views
  • Bonnie F
    Commented on Jun 26, 2012
    Very clever and sounds doable! Thanks for posting
  • Share 4.7K
  • Like 257
  • Clip 308
Clipped to:
  • Projects
  • garden stuff
  • The Giant at the Back Door with siding sampler 2
  • This is the before picture. The door you see at the top of the stairs is actually a window that opens at the top works like a dutch door, with the bottom permanently fastened. The space to the right awaits my next design this fall.

Using Cedar siding for a pictorial mural

I'm a handyman carpenter and over the years I have done a lot of restoration work on houses and occasionally furniture. I've done a little bit of everything. That includes siding in it's ...»
various forms. But until tackling 'the giant', they've always been straight jobs.

This is my own house, and I took my time to build the giant. I started in the fall of 2011 and any I'd add to it time I had free and it was over 40 degrees. Fortunately it was a warm winter and I finished in the early spring of 2012. You will see from the before picture that this was a surface in need of a creative solution. The house was built in 1907 and the enclosed stairway was added some time later by someone who gave no thought to integrating the design with the rest if the house. Putting clapboards on to match the rest of the house would not really have made it look like it belonged. I had seen several examples of cedar siding art over the years that gave me the idea to do something different. On my website I've created a gallery to show other people's works as well.

I decided to tackle the project in 2 stages. First I created a sampler of traditional shingle patterns so I could get my head around this project. That's the vertical rectangle on the left side of the wall. That left me with a trapezoid shape. The second stage was finding something that worked in that shape. I sketched a number of ideas, but the one that worked best was to make it look like a stairway (surprise surprise). Not sure why I thought of a giant, but once I did, it amused me enough to want to create it.

I'm not an artist, but I have studied enough to know what I had to do. I worked with a graphic program to create perspective with vanishing points. In this case one plane is parallel to the viewer: the "wall" in back of the giant (on his left) and the near edge of the stairs. The stair treads and risers as well as the wall that has the arched door has a vanishing point to the left of the house.

Once I had a design I liked, I overlaid a grid on it and blew up and printed up each section. I nailed a story board to the left and used a roofing square to transfer my design on to the wall as I went. This is a bit tricky since each layer you add covers the layout design and you get to draw it again and again.

I would not recommend a project like this if you have never shingled before. It can be very confusing and you have to remember that the most important aspect is not how it looks, but that it sheds water properly. On several occasions, I'd reach a point where I realized there was insufficient overlap and had to redo a row. Two or three times I was able to work around this by sliding a piece of aluminum in place.

I'd be willing to bet that when most people draw a picture they visualize it from the top down. If you're like me, you'll find creating picture in shingles as very unnerving, because the only way you can do a project of this nature is from the bottom up. Just take a deep breath and try again and don't let it intimidate you. I wanted to go slow, so I did all the cuts with a utility knife, a small hand saw, and a coping saw. Of course power tools would go faster, but what really took the most time was thinking each step through. After I finished the project, I found examples of people who cut their pieces in the shop pinning them to a board and then bringing their lay out board to the site.

For a project of this size and scale, I highly recommend using scaffolding. Also it helped a lot to have my wife standing back and overseeing the process. Besides the fact she has a much better artistic eye than I do, I didn't want to climb up and down from the scaffolding to inspect my work, and she caught many a mistake that was more visible from 20 feet away than from 2 feet away.

I got more positive comments from my friends about this work than anything else I've done, but the best part is seeing it every day from my workshop.

You can find other examples of siding art along with helpful links at the website I created to showcase the giant at

http://www.tagyerit.com/ShingleArt/ (http://www.artshingles.com)

Richard N
Richard N Amherst, MA
26 Comments | Post Comment | 4921 Views
  • Bonnie F
    Commented on Jun 20, 2012
    Awesome
  • Share 2K
  • Like 27
  • Clip 9
Clipped to:
  • Members posts I like
  • Creative Design
  • 3
Commented on a photo from:

Our "Toy Garden"!

Christie J
Christie J Oceanside, CA
3 Comments | Comment on this photo
  • Bonnie F
    Commented on May 11, 2012
    So unique and cute. The colors are wonderful!
  • Share 67
  • Like 16
  • Clip 1
Clipped to:
  • Ideas
  • ideas
Anita Roll Murals
  • Bonnie F
    Followed 1 person on May 08, 2012
Loading
Back
to top
Feedback