


Make an Amazing Garden Lamp With Your Chainsaw

This is one of the most beautiful and amazing garden lights that I have seen, and it is made out of nothing more than an old, dried out log and an inexpensive outdoor light. If you have chainsaw skills, then this project is for you so grab your chainsaw and put your skills to the test with this cool lamp build. Once you create one you won’t be able to stop, and you’ll be making them for everyone you know.
Hometalk Recommends!
Tools and Materials
- Dried Hardwood Log
- Chainsaw
- Ratchet Tie-Down Straps
- Slip-Resistant Protective Gloves
- Protective Eye Goggles
- Wire Brush
- Soft Bristle Brush
- Small Inexpensive Outdoor Light
- Large Chisel
- Mallet
A little note of caution…
Please be careful if you are undertaking this project. You will have to use a chainsaw for most of the project and if you are inexperienced in using one, you may want to start or practice on something simpler first. If you choose to make a garden lamp, remember to wear protective gear like slip-resistant gloves and eye goggles and to take your time working slowly and carefully.
Find a Log
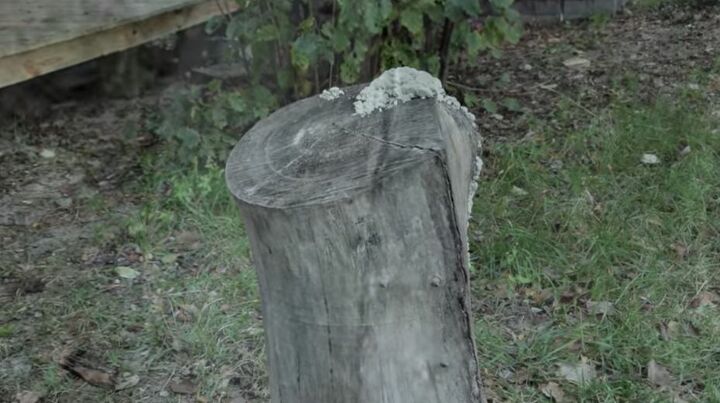
To make my incredibly cool new garden lamp I started with a log that I already had on my property. The log I chose was nice and large and I really liked the shape as it had lots of character with its bumps and cracks. I chose this log as well because it was nice and dried out, so the wood was hard and free of sap. My log was walnut, and even though you don’t have to use walnut, I would recommend using a species of hardwood. A hardwood log will hold up better in the long run and be easier to cut when creating this lamp.
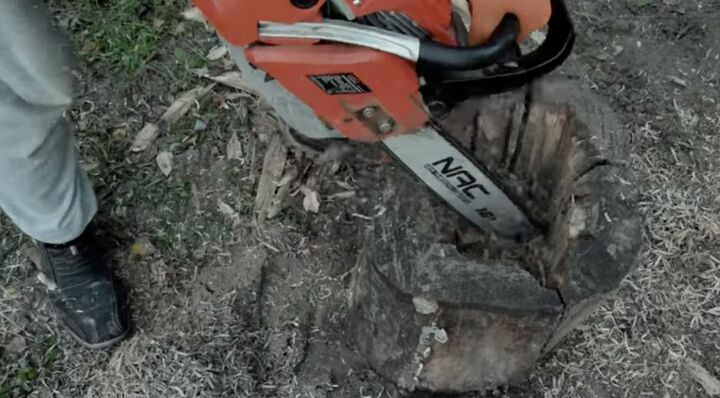
Cut it Down
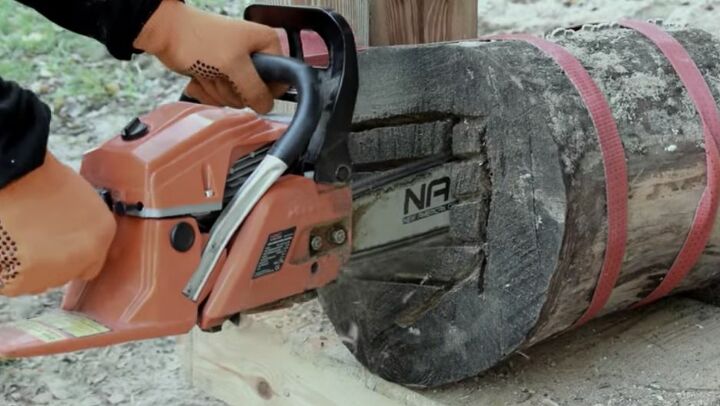
My log was a little too long for the lamp I wanted to create so I decided to cut it down to almost half its length. I used several ratchet tie-down straps to hold the log securely to one of my sturdy deck posts and then used my chainsaw to slice off the bottom half of the log. I tried to make the cut as straight and as even as possible so that the log would sit flat when I was finished. I did pretty well and didn’t need to straighten the cut out at all.
When I had finished cutting the log, I made sure to clean off the half I would be using with a wire brush, removing any loose dirt and debris before beginning to hollow it out. I didn’t want any debris flying up when I was cutting up the middle section of the log.
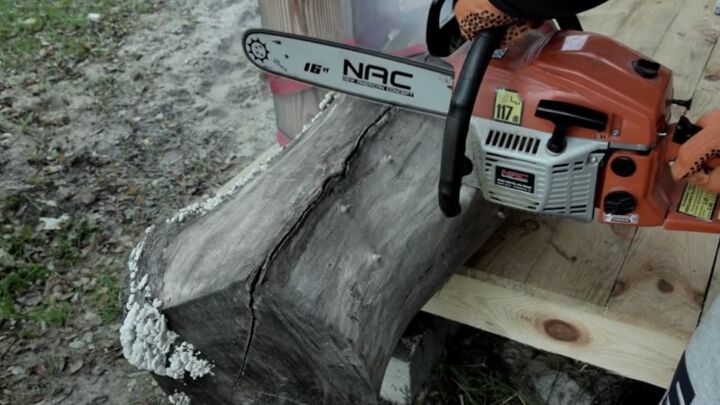
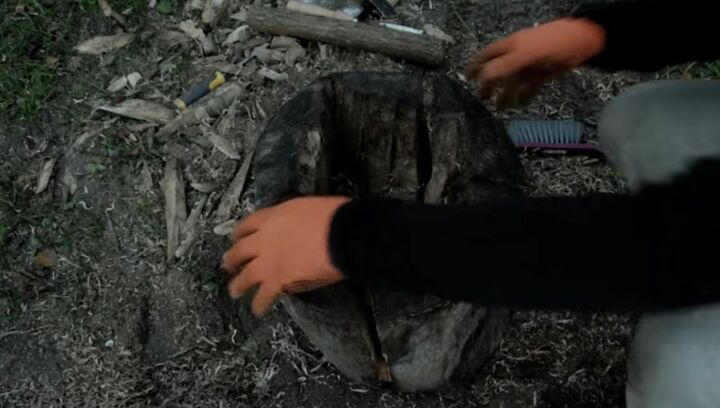
Carve Out the Inside
Carving out the inside was a bit more of a challenge than I had anticipated. I thought it would be pretty easy to use the chainsaw to carve out the center, but it proved a bit too much for the chainsaw causing it to overheat. (Did you see the smoke coming out of it?)
Making a grid pattern in the center and marking the edges around the center did help later, so I was glad that I had made those cuts with the chainsaw at least.
With the chainsaw smoking and overheating, I had to give it a rest and figure out another way to hollow out the middle of the log. I tried several different things and, in the end, the large chisel and a mallet worked out the best. It took a bit of work, but I was eventually able to clean out the center with the chisel until it was hollow.
Cut the Cracks
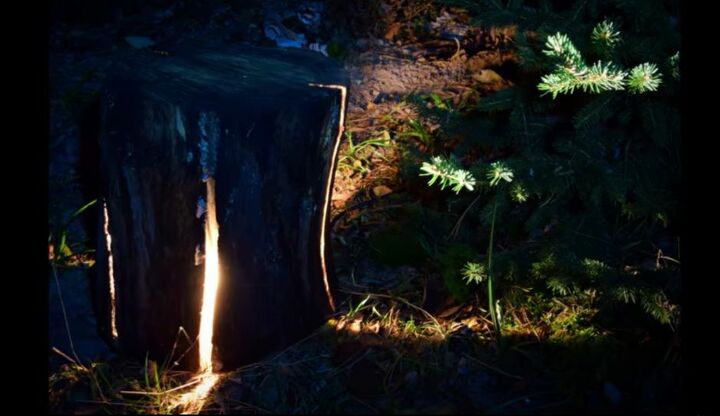
The most important part of this project was the next part. Okay, maybe not the most important, but the most fun. With the log hollowed out, it was time to cut the cracks that the light would shine through when the lamp was placed under it. I used my now cooled down chainsaw and made cracks all around the log, varying their width and height.
There happened to be one large, natural crack on my piece of wood, so I enhanced its look by using the chisel to make it a little larger. I was able to separate the wood around the crack enough to make it look even better.
Add the Light
I couldn’t wait to add the light to see how my new rustic lamp looked so I flipped the log over and placed it over an inexpensive garden light.
A little tip…
Make sure that you don’t use a solar-powered light as it will get no natural light inside of the log. I used a battery-operated light and it had enough power for the light to spill through the cracks of the wood making the log come alive.
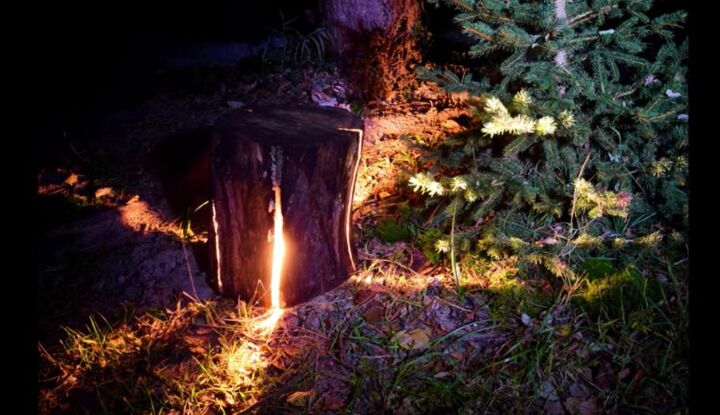
I couldn’t be more thrilled or amazed with how cool my hollowed-out log garden lamp looks. The lighted cracks look absolutely magical at night, and this lamp is so unique that I know nothing else would have worked for my yard. I can’t wait to make some more now and fill the yard with these incredible lights.
How have you made use of natural materials in your decor? Let me know in the comments below!


Comments
Join the conversation
-
What a great idea. Beautiful and thank you for sharing.
-
Niiice...


Frequently asked questions
Have a question about this project?
I wonder if you could use a solar light if it had a sensor that could come out to soak up the sun.... like the rope lights?
Loved it!!! Great video and beautiful light!!!
WHERE DID YOU PURCHASE THE OUT DOOR LIGHT?