« View Post
Photos

Oops! Leave without saving?

If you leave this page, the information you have entered will not be saved!
Are you sure you want to leave this page?

Leave this page Stay on this page

Hometalk.com

  • Sign Up
  • or
  • Log In
  • Professionals
  • Community
    • All Members
    • Professionals
    • Bloggers
  • About
    • About Hometalk
    • Blog
    • FAQ
    • Guidelines
    • Resources
    • Support
    • Press
    • Contact
    • Terms of Use
    • Privacy Policy
  • Following
  • All Topics
    • Cleaning & Organization
    • Crafts
    • Design & Décor
    • DIY Projects
    • Gardening
    • Home Maintenance & Repairs
    • Outdoor Living
    • Painting
    • Remodeling
    • Repurposing & Upcycling
    See More Topics »
  • Questions
    • All Questions
    • Open Questions
    • Unanswered Questions
  • Clips
Post & Ask
Join Now

Get advice, inspiration and feedback on all your home & garden projects!

Ione H

Gulfport, MS
30 Followers 62Likes 18 Shares
  • Overview
  • Posts22
  • Q&A2
  • Comments33
  • Likes22
  • Following29
  • Send a Message

Featured Photos

About Me:

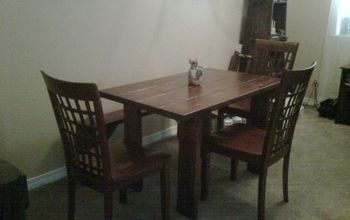
My husband calls me construction Barbie because I love building things and creating, I do all kinds of crafts from making quilts to making my dinning room table and I also do acrylics on canvas.

Favorite area of home improvement:

My next project is making a desk for my office.


Recent Activity


  • I grabbed an empty jar, some flat sided marbles and some good glue
  • I glued the marbles all over the jar in a random pattern. 1
  • I then took a solar light from the Dollar Tree and took the long pole off. I dropped the light part, solar cell at the bottom, into the jar
  • I spray painted a leftover wooden stake a dark blue and screwed the cap of the jar lid into the pole.
  • And then screwed the jar onto the lid. Not only does it shimmer in the sunlight, it gives off a soft blue glistening glow at night thanks to the solar light inside. 
Should the light quit working,
I can simple untwist it and replace the battery in the light. 1
  • See 2 more photos

DIY Garden Art

I wanted to add some new elements to my back garden this year.I wanted something that sparkled and stood out among the plants as they start to grow and bloom.And, because you know me, and ...»
my lack of patience, it had to be easy. I grabbed an empty jar, some flat sided marbles and some good glue and went to work.

Kathe With An E (Kathe)
Kathe With An E (Kathe) Aurora, CO
35 Comments | Post Comment | 21873 Views
  • Ione H
    Commented on May 06, 2013
    cute idea, I might have to try this
  • Share 3.8K
  • Like 207
  • Clip 221
Clipped to:
  • GARDEN IDEAS
  • Dream Home
  • And then screwed the jar onto the lid. Not only does it shimmer in the sunlight, it gives off a soft blue glistening glow at night thanks to the solar light inside. 
Should the light quit working,
I can simple untwist it and replace the battery in the light. 1
Liked a photo from:

DIY Garden Art

Kathe With An E (Kathe)
Kathe With An E (Kathe) Aurora, CO
1 Comment | Comment on this photo
  • Ione H
    Liked on May 06, 2013
  • Share 145
  • Like 12
  • Clip 7
Clipped to:
  • GARDEN IDEAS
  • Dream Home
  • I glued the marbles all over the jar in a random pattern. 1
Liked a photo from:

DIY Garden Art

Kathe With An E (Kathe)
Kathe With An E (Kathe) Aurora, CO
1 Comment | Comment on this photo
  • Ione H
    Liked on May 06, 2013
  • Share 4
  • Like 14
  • Clip 5
Clipped to:
  • GARDEN IDEAS
  • Dream Home
Becky FunkyJunk Interiors - Donna Leah DIY Show Off Donna Dixson Karen - The Graphics Fairy
  • Ione H
    Followed 6 people on Dec 31, 2012
  • 1
  • See 4 more photos

Old wire egg basket and thrift store floor lamp stand repurposed into an outdoor planter

I used an old wire egg basket and a thrift store floor lamp stand to make this outdoor flower stand. The basket is lined with black landscape cloth and a hanging basket liner. ASSEMBLY ...»
INSTRUCTIONS FOR PLANT STANDRemove lamp assembly and wiring from lamp stand, leaving the threaded nipple that connected it to the stand.Paint the stand & basket if desired. We used rust preventive outdoor paint. Cut a block from a piece of pressure treated wood. We used an old piece that we had on hand and cut our block approx. 1"x 5 ½ " x 5 ½".Then drill a hole in the block that will allow it to slip down over the nipple and fit snuggly onto the stand. You will now need to countersink a nut onto the nipple. The block should now be firmly seated.Next, center the basket onto the block and attach as shown in photo.If using the plant stand outdoors you will need to anchor it to the ground. We used two 1/2" pieces of rebar that were about 2 feet long. This will depend on the soil type. If using rebar, you will need a torch to bend a 90 degree angle that will fit over the top of the base as shown in photo. You can be creative with any of these steps, but be sure that it is weather proof and sturdy.

Pat aka Queen of Thrift
Pat aka Queen of Thrift Scottsboro, AL
48 Comments | Post Comment | 20798 Views
  • Ione H
    Commented on Sep 20, 2012
    what a cool idea
  • Share 1.4K
  • Like 75
  • Clip 102
Clipped to:
  • D Y ideas
  • Repurposing FUN...
  • Finished sanding
  • Finally finished it last night

Rocking Chair

Love a comfy rocker
Ione H
Ione H Gulfport, MS
3 Comments | Post Comment | 274 Views
  • Ione H
    Commented on Jul 29, 2012
    It's finally finished
  • Share 0
  • Like 2
  • Clip 0
  • Paisley table...sand, stencil, stain, seal! 7
  • Indian Inlay table after 7
  • Indian Inlay table 2
  • Paisley table - half before stain, half after 9
  • Paisley table with "dirty cowboy" turquoise legs
  • Indian Inlay before shot 3
  • See 3 more photos

Stenciled Tables

Recently I've stenciled a couple of dining room tables that have been fairly popular, so I thought I would share them with y'all! They are done so that the wood shows through the stencil ...»
and I love the look. Here are the links to the posts: Paisley table - http://www.domesticimperfection.com/2012/05/...

Indian Inlay table - http://www.domesticimperfection.com/2012/07/...

#bestof2012

Ashley @ Domestic Imperfection
Ashley @ Domestic Imperfe... San Antonio, TX
64 Comments | Post Comment | 63017 Views
  • Ione H
    Commented on Jul 17, 2012
    very cool idea
  • Share 20K
  • Like 149
  • Clip 110
Clipped to:
  • tables galore
  • Furniture Inspiration

Deck

this is a 12x40 deck we buildt onto our camper when we had it parked in the country, later added a roof on 12' area
Ione H
Ione H Gulfport, MS
12 Comments | Post Comment | 574 Views
  • Ione H
    Commented on Jul 15, 2012
    I love my airstream it has tons of storage, I lived in it for several years while traveling ...»
    for my job

  • Share 0
  • Like 6
  • Clip 0
Rhonda F Jean M
  • Ione H
    Followed 2 people on Jul 14, 2012

12' area we added a roof to our deck

Ione H
Ione H Gulfport, MS
1 Comment | Post Comment | 238 Views
  • Ione H
    Commented on Jul 14, 2012
    we added this roof to our deck so we could have a small eating area in any wealther, we spent ...»
    lots of sunday mornings having coffee out there

  • Share 0
  • Like 2
  • Clip 0
Loading
Back
to top
Feedback