« View Post
Photos

Oops! Leave without saving?

If you leave this page, the information you have entered will not be saved!
Are you sure you want to leave this page?

Leave this page Stay on this page

Hometalk.com

  • Sign Up
  • or
  • Log In
  • Professionals
  • Community
    • All Members
    • Professionals
    • Bloggers
  • About
    • About Hometalk
    • Blog
    • FAQ
    • Guidelines
    • Resources
    • Support
    • Press
    • Contact
    • Terms of Use
    • Privacy Policy
  • Following
  • All Topics
    • Cleaning & Organization
    • Crafts
    • Design & Décor
    • DIY Projects
    • Gardening
    • Home Maintenance & Repairs
    • Outdoor Living
    • Painting
    • Remodeling
    • Repurposing & Upcycling
    See More Topics »
  • Questions
    • All Questions
    • Open Questions
    • Unanswered Questions
  • Clips
Post & Ask
Join Now Log In

Hometalk is where people share and help with everything home & garden

Melissa K

Blythewood, SC
46 Followers 194Likes 380 Shares
  • Overview
  • Posts9
  • Q&A74
  • Comments321
  • Boards6
  • Clips38
  • Likes233
  • Following29
  • Send a Message

My Recent Boards

  • Melissa K's board
  • diy
See All »

Featured Photos

About Me:

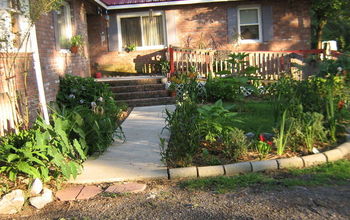
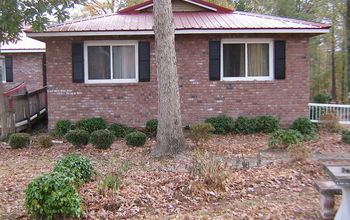
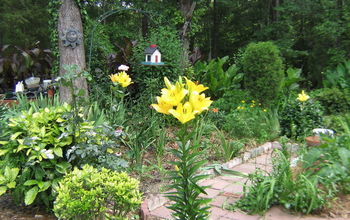
Gardner to the bone, want to develop a more efficient water collection system, looking for ways to improve home and landscape. Disabled with MS and Lupus, but I am a fighter

Favorite area of home improvement:

Upcoming projects: Have a double back porch that I want to incorporate. Consists of an enclosed area cut into two rooms measuring 24x10 ft. freezers, washer/dryer, clothes storage. Looking for the perfect dyi project or pictures


Recent Activity


  • Vintage drawer pulls for decorative curtain rod
Liked a photo from:

DIY Curtain Rod for Oversize Windows

Amanda - Cupcakes and Corndogs
Amanda - Cupcakes and Cor... Harvest, AL
Comment on this photo
  • Melissa K
    Liked on May 03, 2013
  • Share 0
  • Like 9
  • Clip 2
Clipped to:
  • DYI
  • Kitchen ideas
  • Look for bone china tea cups at your local thrift shops. Many times they are thrown away if a saucer is missing. 2
  • Use just a tiny bit of soil in bottom of cup.
  • Add your Viola plant.
  • Firm the soil with your fingers.
  • I love the finished tea cup! 4
  • Tea cup plant sale 2
  • See 3 more photos

Great idea for Mothers day gift! Kids love making these.

Did you know that often a thrift shop throws away old tea cups if they are missing a saucer? This is how we recycle them .
Easy
Deltagardener
Deltagardener Canada
46 Comments | Post Comment | 15132 Views
  • Melissa K
    Liked on Apr 29, 2013
  • Share 2.3K
  • Like 196
  • Clip 127
Clipped to:
  • garden junk
  • Gardens
  • Please don't ask me what these pretty plants are, I'm not a label reader at all (gasp!) but you're welcome to tell ME if YOU know! 2
Liked a photo from:

Forget the tea... these old kettles pour out rock gardens!

FunkyJunk Interiors - Donna
FunkyJunk Interiors - Don... Canada
2 Comments | Comment on this photo
  • Melissa K
    Liked on Apr 27, 2013
  • Share 4
  • Like 5
  • Clip 1
Clipped to:
  • Garden inspiration
  • Garden decor and rec...
  • The Lucketts Spring Market is legendary! While it's a 2 day event, the Hometalk Meetup is Sunday, May 19th only. Come Sunday! :)
  • I'm beyond thrilled to get to meet the locals! I'll be gettin' my junk on, ready to demo a DIY or dish up a talk.. whatever you desire!
  • Karen aka The Graphics Fairy will also be in our Hometalk Meetup tent! I fully anticipate her making something super cool with her infamous graphics she offers up on her blog... (for me to take home..) http://graphicsfairy.blogspot.ca/
  • Guess who else will be there... Hometalk's own Miriam! Hmm... maybe I should get HER to build something cool... I like it!
  • Lucketts Store is located in Leesburg, Virginia and houses antiques galore. Come May, they are going to put up the outdoor tents and go KABOOM with vintage junk vendors!
  • Here's a sample from last year. I'm jittery just looking at those letters...
  • Vendor Junxtapostion is going to be bringing their vintage junk inspired jewelry! Oh oh! I want a bracelet that reads JUNKER.
  • And a stamped spoon too please. Surprise me?
  • Miss Mustard Seed will also be there and I'll bet she'll be bringing her line of milk paint along with her... red please!
  • And I could just eat that welcome sign. Gorgeous!!!
  • Dressers always go better with coke crates. 1
  • Lemme at those metal numbers! Have I convinced you this is the event to run to?
  • You have no idea how well this event suits me. Junk is my middle name... http://www.hometalk.com/b/609921/funky-junk-s-projects
  • Stay in touch with the events as they unfold at: http://luckettstore.com/events/50-spring-market and on Facebook at: https://www.facebook.com/pages/The-Old-Lucketts-Store/236064556414995?sk=app_106878476015645
  • If you're on Twitter, follow the hashtag #HTLucketts to watch everyone involved! If you aren't on twitter yet, check it out! https://twitter.com/FunkyJunkDonna
  • See 12 more photos

Hometalk gets Funky Junked at Lucketts, in Leesburg, Virginia!!

Hold onto your junk, Virginia, this Canadian is on her way to check out Lucketts Spring Market and meetup with show goers in person! Sunday, May 19, in Leesburg, Virginia. ...»

Oh pretty please come so I can meet you too!

Follow the pictures for more details! You are gonna LOVE what you're about to see...

#HTLucketts

#HometalkMeetup

FunkyJunk Interiors - Donna
FunkyJunk Interiors - Don... Canada
26 Comments | Post Comment | 3268 Views
  • Melissa K
    Liked on Apr 27, 2013
  • Share 61
  • Like 39
  • Clip 26
Clipped to:
  • Hometalk Meetups!
  • Around the House
  • Second set of steps on the side of the house
  • Set of Steps in the backyard that lead to the play area
  • Steps that we completed last fall that lead to the front porch

DIY Stone Steps- You can do it too!

We just love a good DIY project and putting in stone steps is no exception. With the right mixer, stone, concrete and a great "mason " partner we were able to accomplish putting stone ...»
steps in the backyard and a few other stone projects around the house.

TopThisTopThat
TopThisTopThat Pendergrass, GA
10 Comments | Post Comment | 11499 Views
  • Melissa K
    Commented on Apr 27, 2013
    I think you did a superb job, knees, age and all! Gorgeous!
  • Share 2.6K
  • Like 52
  • Clip 60
Clipped to:
  • Cool Projects
  • Backyard Escapes
  • 1

Our Mailbox Makeover

We had a very sad looking mailbox. I bought a "kit" from Lowe's to create a beautiful new mailbox. I love it!
Beneath My Heart
Beneath My Heart Wilmore, KY
17 Comments | Post Comment | 2511 Views
  • Melissa K
    Commented on Apr 27, 2013
    I really like this idea, but I am such a cheapskate (not by choice), I would like to use all ...»
    those rocks and shells my kids have collected all these years! Thank you for sharing!

  • Share 230
  • Like 50
  • Clip 40
Clipped to:
  • DIY
  • Garden Decor
  • Before:  you can actually see how greasy and dirty the cabinets had become 1
  • After:  white and clean

How to easily remove grease build-up from your cabinets

This is just a simple little story about how I finally got all the grease off the cabinets above my stove. ...»

I have had a dirty little secret!Everyone always tells me how clean my house is. It's not really. Not since I've had kids. You've seen those cute little signs, Excuse the mess, we are busy making memories or Excuse the mess, we live here? Well that's not really my style. In fact, my house is nothing like the clean it used to be before the kids. I've grown more accustomed to the mess, but so many little things tend to get over looked these days. Many people have exciting goals like running a marathon or skydiving (and I may have just become the biggest loser because I just googled Common goals people have, because I couldn't come up with 2 good ideas), you know what I've always wanted? To put my house on the market and have the ad say, "Mrs. Clean lives here". I'm not kidding, I actually told my realtor I wanted that on my add. She said, your house will sell itself. OK, she was right, but I really wanted that at the time. One thing I've been over-looking lately is my kitchen cabinets. I'm home cleaning today and thought, maybe today's the day to get that grease off the cabinets. Now keep in mind, these are just the cabinets over the stove, and grease is always building up on these cabinets. I wipe down my cabinets frequently, since they are white and show any dirt, but I do tend to "overlook" these top cabinets because I never could seem to get the grime off with much success. I have those god-awful therma-foil and for lack of a better term the surface is "pockey". That means there is a little texture that allows dirt and grease to accumulate. The picture shows best how greasy these cabinets were. I've tried many products before, but today I decided to go for some simple soft scrub and a warm dish rag. I love the lemon scent and use this for a lot of my cleaning. I poured it on my dishcloth and just rubbed it on the grease, and just like that, all of the grease and grime came off. I've tried many other cleaners and de-greasers and seriously never got such great results with barely any elbow grease at all. I might suggest if you are working over your head that you wear some protective eyewear, because trust me when I say, you don't want your break from cleaning to involve trying to get soap out of your eye! Just sayin. Check out the before and afters. It's really pretty amazing!

Easy
Diane Kaul
Diane Kaul Commerce Township, MI
65 Comments | Post Comment | 45049 Views
  • Melissa K
    Liked on Apr 23, 2013
  • Share 2.6K
  • Like 94
  • Clip 129
Clipped to:
  • Home Repairs
  • TERRIFIC TIPS !
  • Before:  you can actually see how greasy and dirty the cabinets had become 1
Clipped a photo from:

How to easily remove grease build-up from your cabinets

Diane Kaul
Diane Kaul Commerce Township, MI
1 Comment | Comment on this photo
  • Melissa K
    Clipped on Apr 23, 2013 to diy
  • Share 4
  • Like 10
  • Clip 3
Clipped to:
  • Home Repairs
  • TERRIFIC TIPS !
  • Make sure everything is off the deck & protect everything you don't want sealer on. We simply used painters tape around the post - for the vinyl we used a paper masker (not shown) 2
  • As a rule of thumb for our area - as the decking has to be butted together when installing it generally, when the gaps are like this we know it is dry enough & can be sealed - still best to check moisture content with a meter 2
  • Got to love builders that leave those grade stamps facing up... we got a few tricks to help eliminate them linked above - in this case the homeowner decided to simply leave them
  • All finished & steps blocked off so pets & people wouldn't hop up there 3
  • Just another finished shot 2
  • See 2 more photos

Sealing your wood deck for years of enjoyment

As a professional deck builder it is amazing looking back at how much things have changed & yet how many things are still the same. One of those items unfortunately revolves around ...»
longevity... Unlike traditional wood decks made 20+ years ago where one could allow them to weather naturally, you would be lucky to get a few year's worth out of a regular wood deck if you tried that now.

In order to enjoy a typical wood deck now it is important that you seal it. No matter if you are a pro or a DIYer, there are two simple rules that I have & hope you will keep in mind no matter what the project is; prepare it properly and follow the manufacturer's directions.

Choosing a sealer:

There are 4 main choices of sealers on the market, each with their own pros & cons. If you are tossing around two or more options, choose the lower tiered item as one can always move up the list but you can't move down it. For example if you are debating between paint & a stain – while you can paint over stain, you can't stain over a painted deck.

· Paint – while many people like the look of paint, this is one of the hardest items to maintain and can easily hide water damaged areas

· Solid Color Stain – while this can look like a paint,it is a stain that gets absorbed into the wood and is easier to maintain, depending on your application some wood grain maybe still visible and it is known to wear unevenly

· Semi-Transparent Stain – For a more natural look with some color, this is the most popular choice, it generally wears more even than solid color, but doesn't protect as well

· Waterproofing or transparent coatings – this will give you the most natural look, but do not hide stains or protect as well

For more on Oil vs. Water Based & other additives: http://bit.ly/DeckSealer

Prepare it properly:

If you ask any professional painter, they will say that on average 80% of their time is spent on properly preparing the surfaces, while only 20% is actually spent applying the product. While this number maybe inflated for decks, just remember that the amount of time spent getting it ready up front, is time well spent.

Getting Ready:

· Gather all the tools, safety equipment and materials that you will need. Take time to read the directions.

· Check the weather forecasts as most products are very specific on minimum temperatures & when it can be exposed to water

· Make sure the wood is dry enough to accept the stain, sealer, or paint of your choice

· Remove everything located not only on the deck, but around it like furniture, potted plants, wind chimes, etc...

· Cover any plants near the deck to protect them from the overspray & any chemicals you may use.

· Removing any large debris by hand and sweep the deck off, paying particular attention to the area's between the deck boards.

Applying your choice of Sealants:

Do you remember the second rule above? That's right; it's as simple as reading and following the manufacturer's directions. I will give you a few tips though that may or may not be located on the can.

· Apply plastic to any area's that you do not want stain or paint to get on, because once you get started, you do not want to stop to try to clean up an oopsie

· For all stains and sealers, do one complete board at a time – if the you only do half a board or work in sections, you will end up with obvious streaks where the two area's overlap

· Do not over apply the product – in most cases it will result in a flaky or splotchy finish

· Make sure the moisture level of the wood is low enough for work to commence – you do not want to trap all the moisture inside the wood

· Stain or seal all six sides if it is at all possible unless you live by the ocean. This will help prevent moisture from getting into the wood and accelerating the degradation of the finish.

· Let it rest – most paints, stains and sealers take at least a day or more to cure

For more Preparation Tips & other Decking Options; http://bit.ly/HTRC-Decks

SLS Construction Solutions
SLS Construction Solutions Cullman, AL
46 Comments | Post Comment | 11617 Views
  • Melissa K
    Commented on Apr 22, 2013
    Awesome! Thanks KMS. Proud of you!
  • Share 521
  • Like 52
  • Clip 94
Clipped to:
  • Home Repairs
  • Home Maintenance
  • The old cabinet (in the old bathroom)
  • Barnwood wonderfulness!
  • Chippy red paint. :)
  • See 1 more photo

Barnwood Bathroom Cabinet

The boards for this came from an old barn behind our house and all the hardware came from our ugly old laminate bathroom cabinet!
CreekLineHouse .
CreekLineHouse . Algonac, MI
7 Comments | Post Comment | 2466 Views
  • Melissa K
    Liked on Apr 19, 2013
  • Share 84
  • Like 48
  • Clip 62
Clipped to:
  • Repurposed
  • Decor Ideas
Loading
Back
to top
Feedback