


Moroccan Tile "look" Backsplash Upgrade in Rental Kitchen - Removeable

by
Lbr24389409
7 Materials
$50
2 Hours
Easy
I just relocated to Phoenix and decided to rent a house until I decide where to buy a project house to fix up. I haven't rented a place in 20+ years so it was pretty tough to find something I could live with for the next year. I picked a nice house with a good floor plan, but the entire place was painted various shades of Orange and green, ugh!! Mix that with my own dark wood furniture and the lovely golden oak cabinets and I felt like I was living in a dungeon in the late 80's.
The great room is painted two tones of terracotta with a orangish brown tile floor. In the adjacent kitchen you have golden oak cabinets and a dark tone of orange where a normal backsplash would be. The counters are a neutral peach toned beige Formica and are in good condition. It all matches, but definitely not my taste for décor.
My goal was to lighten up the kitchen and get rid of the dark orange backsplash area which was darkening the kitchen and accentuating the orange aspect of the cabinets and counter. I also like the funky look of the Moroccan Tile backsplash photos I have seen online. Any changes I make need to be easily put back to it's original condition because it is a rental.
I looked at removable wallpaper and the stick on tile look vinyl for the backsplash area, but wanted to keep the project under $50 as a challenge. I scoured the web for options and came up with a modern upgrade that is fully removeable, and it took less that 2 hours to complete installation.
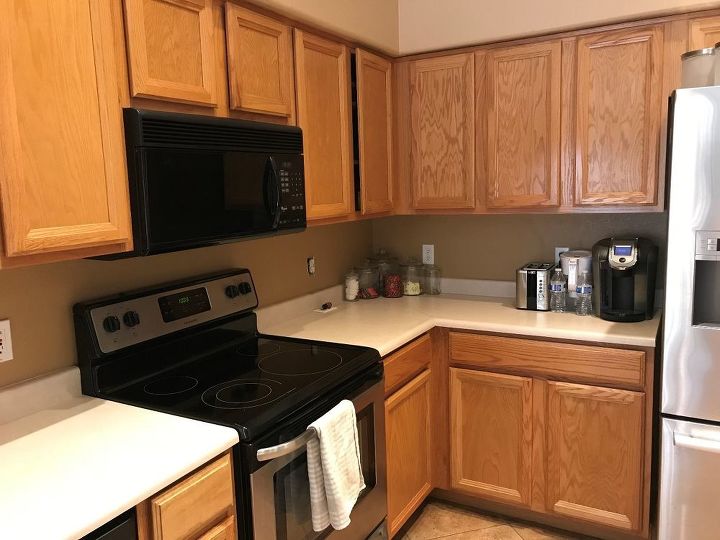
Kitchen before photo dark and orange !
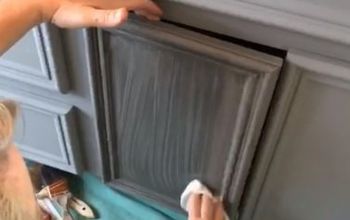
I began by cleaning the backsplash area with Windex to remove any residual oils. The paint that was on the wall was a latex semi-gloss finish over a textured wall. I removed all the outlet covers and switch plates and moved all items from the counter top and pulled the range out slightly.
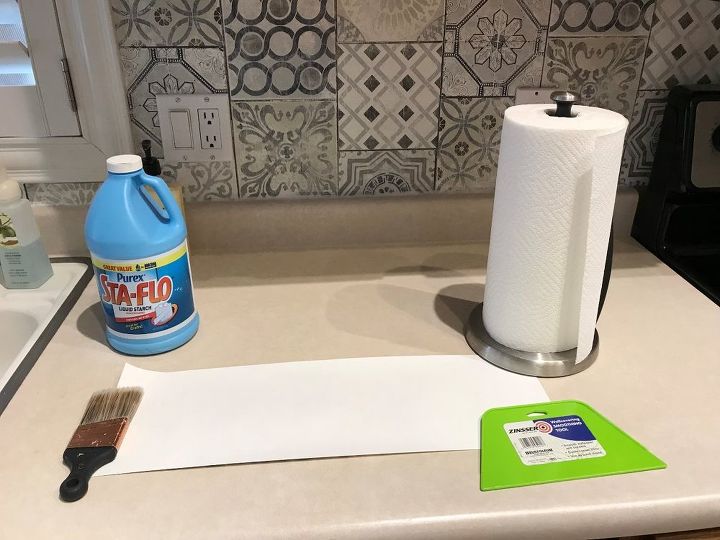
Supplies
I found articles online that talked about installing wallpaper without using wallpaper paste. This renter friendly option seemed like a great way to upgrade with little long term commitment.
I found a wallpaper that gave me the look I wanted that was available to purchase that was NOT pre-pasted. I used liquid starch to hang the paper instead of wallpaper paste. I applied the paste with a paint brush, and smoothed the paper with a smoothing tool. For cuts I used a pair of sharp scissors, a new razor blade and a metal ruler. My only purchase for this project was the wallpaper $39.95, the liquid starch $2.97. I had everything else on hand so this was well within my budget.
The first step was to measure the space I was going to cover, and determine how much wallpaper to order. I had about 23 square feet to cover and the roll of wallpaper was 20.5 inches wide by 33 feet, so 1 roll would complete the project. There was a little waste, and I finished the project with almost half a roll left over.
After I received the materials, I tested the removability of the wallpaper by installing a small piece, letting it dry and removing it. After removal and a quick wipe of the area to remove any residual starch you couldn't tell anything had been there.
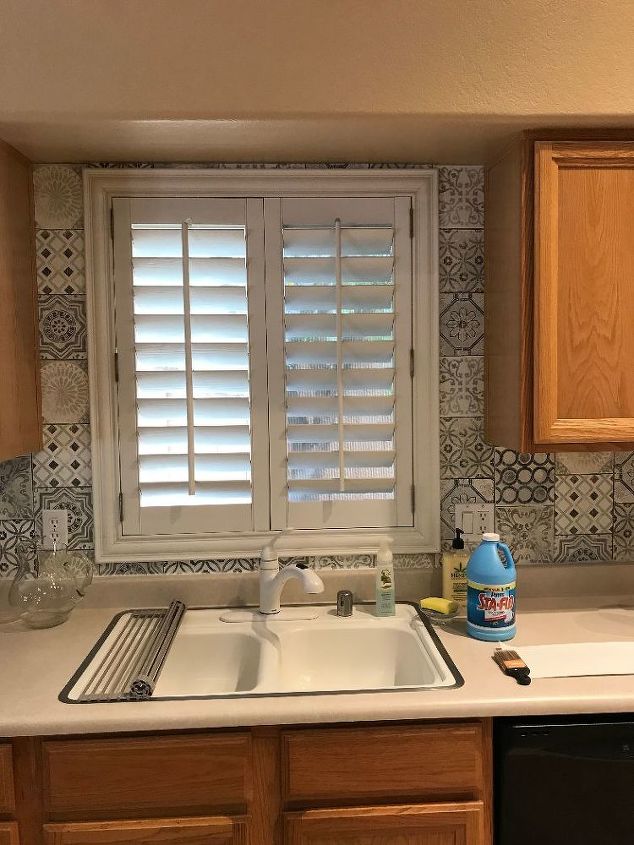
Focal point of kitchen
The next step was to determine where to start, the kitchen has a window and I wanted the "tile" to look like it framed the window evenly. I have a thing about symmetry so if it wasn't symmetrical it would bother me . . . yes I'm a little OCD 
I cut one piece of wallpaper long enough to go from the top of the window to about 1/2 an inch past the existing counter backsplash. Each piece of wallpaper had 3 rows of "tile" printed, so I cut 1 full row of "tile" for each side of window.
I painted the back of the wallpaper liberally with starch and the wall with roughly the same amount. It should look shiny but not be dripping. I let the paper sit a few minutes to let the starch to soften it a bit, and then placed my first strip up on the wall working from the top down. The straight edge of the wallpaper went against the cabinet trim and the area I needed to trim against the shutters around the window. I made a small snip with the scissors in place for the top of the window and the same at the bottom to fit it in place.
I used the smoothing tool to remove any air bubbles for a smooth application. The paper was thick enough that you couldn't see the texture of the wall after application.
I used my finger to make sure the edge was well affixed to the wall. After hanging the first piece, there were a few spots where there was not enough starch to hold the paper in place well, so I lifted the area carefully and I painted some more starch on the wall and then smoothed it down again with my finger. I also pushed the edge of the paper tight against the window frame and folded it tight with the smoothing tool. I trimmed the edge adjacent to the window with a metal ruler and a sharp razor blade held against the wall. You don't want to see the cut so I made sure the cut edge was on the side of the shutters and not the wall. I cut it while it was wet and went back over it with my finger to make sure it was well affixed. I used a damp paper towed to remove any excess starch on the face of the paper and counter top, but stayed away from the edges of the paper.
I continued around the rest of the kitchen, rough cutting the paper for outlets and for size. I used the grout line on the paper for the seams, you cant see any seaming at all. I was also careful to keep a pattern that did not put matching tiles next to each other and that mimicked the pattern that existed on the paper with a full tile next to half a tile at the bottom of the backsplash. This is the most visible area, so if it wasn't consistent it would be super noticeable.
It felt just like hanging regular wallpaper, I didn't notice any difference with the starch being used as paste.
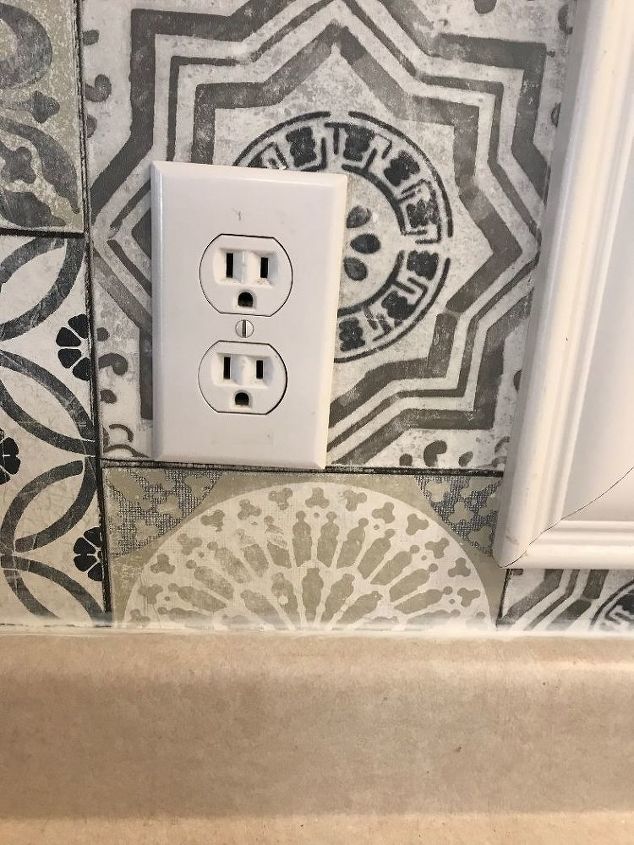
Edges and seams
This is a close up picture of the seams, the edge to the left of the outlet is a seam, and the edge of the tile under the window are both seams. Unless you touch them, you can't tell there are seams at all.
In addition I used some paintable white window sealant to make sure that any water that might get near that edge would not make the paper lift.
I am not an expert caulker, but a relatively light amount applied with my finger. I removed most excess caulk with a damp paper towel which gave me a sheer look that covers the edge.
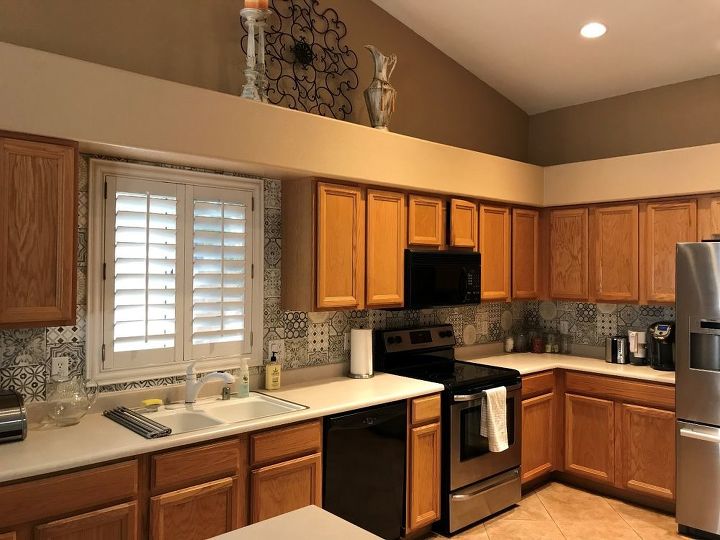
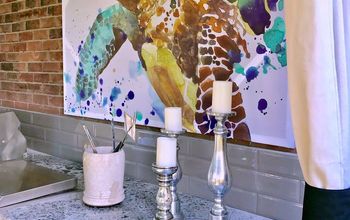
Here is the after photo, the cabinets are still oak, but the dark orange stripe I hated is now gone. You can't tell it isn't installed tile until you walk up close and touch it.
So for $45 and a couple of hours I have a little interest in the kitchen. Next I will install some inexpensive undercabinet LED lighting to brighten it up further, watch for the post in a couple of weeks.
The wallpaper is easily wiped after splashes, and if it picks up a stain, I have half a roll to replace any damage that occurs.
Overall, I would rate this project high for impact on the look of the kitchen. If the cabinets were painted white it would look amazing . . . but it is an upgrade even with the oak.
For those of us with decorating commitment issues, you could change this as your mood shifts, or decorating color pallets change. The time spent is similar to painting the area.
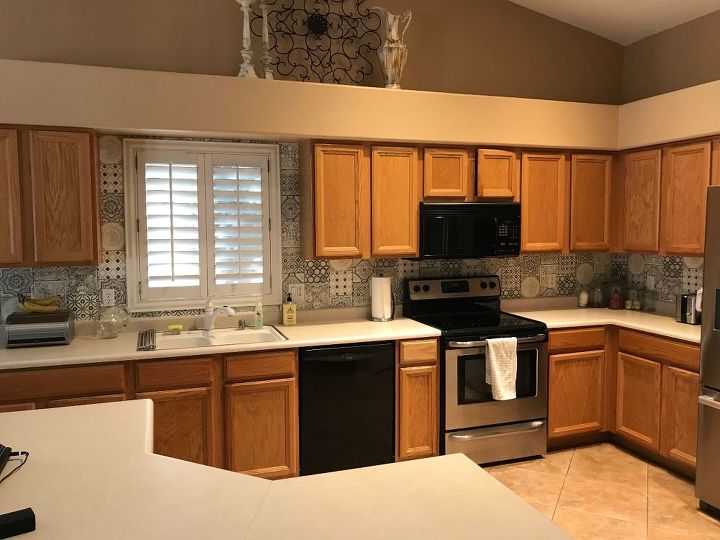
One last look from another angle
Resources for this project:
See all materials


Any price and availability information displayed on [relevant Amazon Site(s), as applicable] at the time of purchase will apply to the purchase of this product.
Hometalk may collect a small share of sales from the links on this page.More info
Comments
Join the conversation
2 of 62 comments
-
I am a wallpaper junkie. Yup showing my age. Glad to see it coming back in style and what a change it made in your kitchen!
-
Love this project. Many of us live in rentals and I suspect many more will. Customizing the place we live, with projects that can be removed with no or minimal damage, turns the “place” into a home. Thank you for this beautiful project and idea.


Frequently asked questions
Have a question about this project?
I just moved into an old house very 60's with wood paneling in kitchen. I would want to do this, but don't want it to leave a stain or residue when I take it down. Will it be safeto use on the paneling
I am one of those people who just comes out and asks....if I was unhappy with the colors from the 80's, I would have asked my landlord if he would mind if I painted the walls in a neutral color like a nice beige, off white or grey. I was a landlord at one time, and I always welcomed it when a tenant wanted to paint....heck, it did nothing but enhance my property. Did you ask if you could paint?
Swallow an elephant and choke on a gnat! That's me! I have a similar situationwith oak cabinets and an unimpressive painted wall as you described. My quandary is with the way the last upper cabinet ends about 4 inches shorter than the lower cabinet. And...There is more wall to the left of all of it.
Would you suggest just taking the paper out to the corner? (about 12 inches) and/or all the way down to the floor