


Painted Wood Clock DIY, by GranArt

by
GranArt
Medium
A friend gave me two pieces of 36" round cut plywood a few years ago. I pulled one out of storage not too long ago and it screamed CLOCK. So here is one of many to come I hope. I really enjoyed working on this project and I just love clocks.
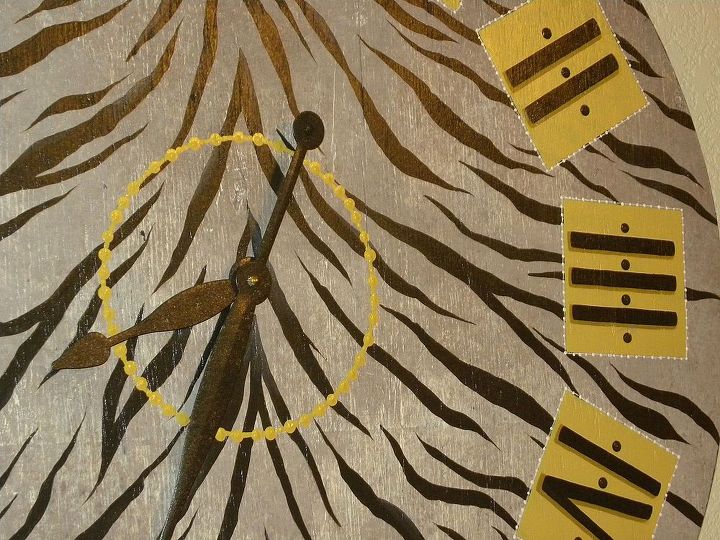
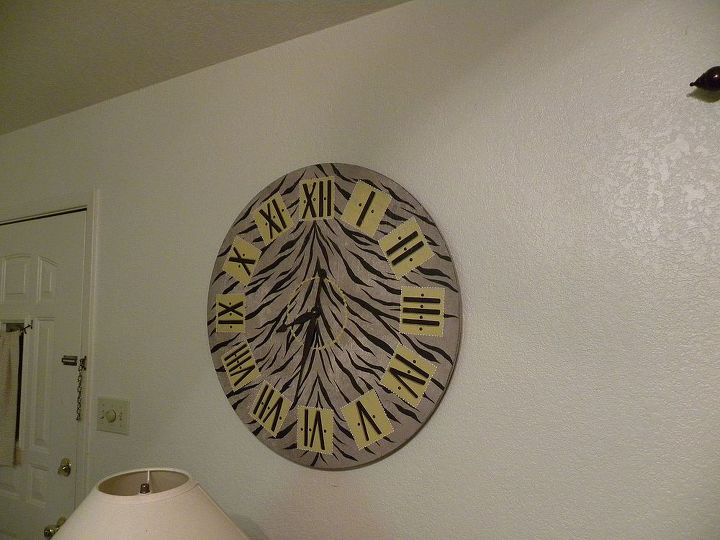
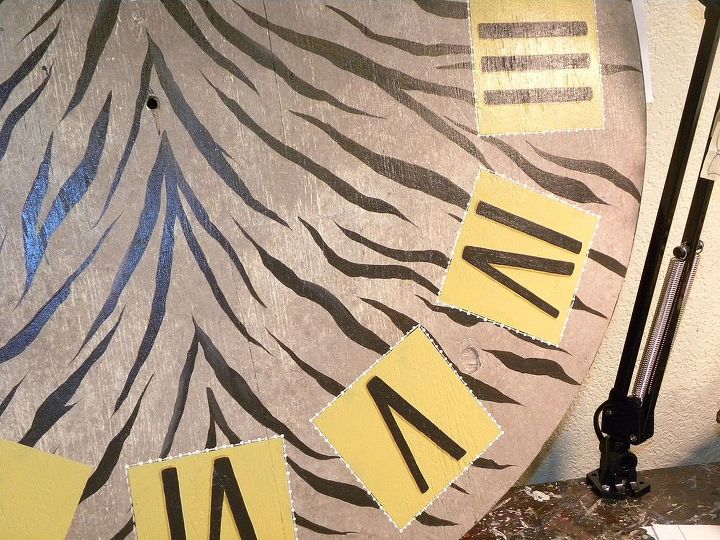
Here's how I did it; get a 33" round piece of wood mark the center and drill your hole using a bit size the same as the stem of the clock stem. I ordered my clock parts on-line but your local craft stores should have what you need. I drilled the center hole to keep the perspective through out the work of the painting. I lightly sanded the wood next, but my desire was to have it rough looking. Background; I used enamel craft paint and an old 4" brush and gave the wood one coat of a medium tan color (cream + chocolate brown), allow to dry 10 minutes or so. Then I mixed up two shades of that tan color. One darker (adding a little more chocolate brown) and one slightly lighter ( adding more of the cream color) and using a large damp sea sponge, I sponged the entire board using those two colors. I pressed hard in some areas so to blend the two colors together. I did not want the background to look splotchy. It should look soft, like clouds. Then I lightly sanded it again to give it a worn look. Then I used a #6 Royal round brush and began painting the Zebra stripes with a dark chocolate brown paint (black + chocolate brown, when mixing your color keep it on the brown side). Start down the center painting stripes for the backbone, an upside down V. Using a large #6 brush the ends of the stripe will not be perfect in the beginning, that is ok, I will address that issue soon. Paint each stripe with two coats. Remember to keep the stripes to the right of the center of the board-- flowing off to the right. And the left side ---flowing off to the left, see pics. Now to finish those edges of each stripe, I used my favorite brush #2 mid liner and went back over the "ends" of each stripe to give them a point. Truth be known it is probably more like a tiger but I like the look. The Yellow Blocks; were made from my pc program MS Publisher but you could draw out a 4" square or use something around the house as a template. Now getting the squares just right on the board was tricky, honestly I tried all the different measuring/math I know and nothing seemed to work and so I made 12- 4" squares out of paper and laid them on the clock until they all seem to line up right to hold the Roman Numerals. I taped each square down (only on one side of the square apply tape) on to the board, I slid a sheet of cream color graphite paper under a square and traced the square on to the board using a stylus. I used antique gold paint (mustard yellow) and painted in the squares two coats. Roman Numerals; I printed off the Roman Numerals that I created using the MS Publisher program. I created a pattern by using the printed numerals and trace paper (transfer the numerals from the copy paper to the trace paper to make a pattern). Lay the pattern of the number XII "in the center" of the very top block (12 o'clock position) and slide the cream color graphite paper under the pattern and transfer the numeral on to the yellow square using a pencil or a stylus. Paint in the numeral two coats using a 2" mid liner brush and the dark chocolate color paint. Now do the same for each numeral all the way around the board. The border around the yellow square; using the mid liner brush and cream paint I did the stitch pattern first on all sides of the square. Stitch pattern is _ _ _ _ _ _. Then go back with the same cream color and do small dots between the stitches using the end of a paint brush handle and dip it into a puddle of cream color paint. If you dip the handle into the puddle of paint after each time you apply a dot, you will get the same size dot each time (usually). Stitch pattern with dots _._._._. Using a large handle paint brush I made the dots next to the numerals in the yellow box (see pics). The Center; I used a clear bowl and placed it in the center of the clock and using a pencil I drew a line around the bowl. Now I used the same stitch and dot border with the antique gold paint (mustard yellow) but I made the stitch a little larger and I used a larger handle of a brush to make my dots a bit bigger than the border on the yellow squares. Follow the instructions on how to assemble the clock parts that comes with it. I also purchased what the clock people call a "hanger". It is to help the weight of the overall clock/wood to hang on the wall. The little hole that is in the clock box movement would not sustain the weight of this clock (the wood) but there is this hanger that you attach to the clock box movement and that hanger is what holds the clock on the wall. The large metal hands of the clock 13" only came in a black color so using a sea sponge, I painted it with the dark chocolate brown two coats to match the stripes and Roman Numerals. No need to seal it the enamel paint cures in 21 days and if the clock is left inside it will be fine. If placed outside then I would paint it with two coats of heavy varnish allow drying time between applications. Now I must go and start the next 36" wall clock. If you have any questions please let me know.
Here's how I did it; get a 33" round piece of wood mark the center and drill your hole using a bit size the same as the stem of the clock stem. I ordered my clock parts on-line but your local craft stores should have what you need. I drilled the center hole to keep the perspective through out the work of the painting. I lightly sanded the wood next, but my desire was to have it rough looking. Background; I used enamel craft paint and an old 4" brush and gave the wood one coat of a medium tan color (cream + chocolate brown), allow to dry 10 minutes or so. Then I mixed up two shades of that tan color. One darker (adding a little more chocolate brown) and one slightly lighter ( adding more of the cream color) and using a large damp sea sponge, I sponged the entire board using those two colors. I pressed hard in some areas so to blend the two colors together. I did not want the background to look splotchy. It should look soft, like clouds. Then I lightly sanded it again to give it a worn look. Then I used a #6 Royal round brush and began painting the Zebra stripes with a dark chocolate brown paint (black + chocolate brown, when mixing your color keep it on the brown side). Start down the center painting stripes for the backbone, an upside down V. Using a large #6 brush the ends of the stripe will not be perfect in the beginning, that is ok, I will address that issue soon. Paint each stripe with two coats. Remember to keep the stripes to the right of the center of the board-- flowing off to the right. And the left side ---flowing off to the left, see pics. Now to finish those edges of each stripe, I used my favorite brush #2 mid liner and went back over the "ends" of each stripe to give them a point. Truth be known it is probably more like a tiger but I like the look. The Yellow Blocks; were made from my pc program MS Publisher but you could draw out a 4" square or use something around the house as a template. Now getting the squares just right on the board was tricky, honestly I tried all the different measuring/math I know and nothing seemed to work and so I made 12- 4" squares out of paper and laid them on the clock until they all seem to line up right to hold the Roman Numerals. I taped each square down (only on one side of the square apply tape) on to the board, I slid a sheet of cream color graphite paper under a square and traced the square on to the board using a stylus. I used antique gold paint (mustard yellow) and painted in the squares two coats. Roman Numerals; I printed off the Roman Numerals that I created using the MS Publisher program. I created a pattern by using the printed numerals and trace paper (transfer the numerals from the copy paper to the trace paper to make a pattern). Lay the pattern of the number XII "in the center" of the very top block (12 o'clock position) and slide the cream color graphite paper under the pattern and transfer the numeral on to the yellow square using a pencil or a stylus. Paint in the numeral two coats using a 2" mid liner brush and the dark chocolate color paint. Now do the same for each numeral all the way around the board. The border around the yellow square; using the mid liner brush and cream paint I did the stitch pattern first on all sides of the square. Stitch pattern is _ _ _ _ _ _. Then go back with the same cream color and do small dots between the stitches using the end of a paint brush handle and dip it into a puddle of cream color paint. If you dip the handle into the puddle of paint after each time you apply a dot, you will get the same size dot each time (usually). Stitch pattern with dots _._._._. Using a large handle paint brush I made the dots next to the numerals in the yellow box (see pics). The Center; I used a clear bowl and placed it in the center of the clock and using a pencil I drew a line around the bowl. Now I used the same stitch and dot border with the antique gold paint (mustard yellow) but I made the stitch a little larger and I used a larger handle of a brush to make my dots a bit bigger than the border on the yellow squares. Follow the instructions on how to assemble the clock parts that comes with it. I also purchased what the clock people call a "hanger". It is to help the weight of the overall clock/wood to hang on the wall. The little hole that is in the clock box movement would not sustain the weight of this clock (the wood) but there is this hanger that you attach to the clock box movement and that hanger is what holds the clock on the wall. The large metal hands of the clock 13" only came in a black color so using a sea sponge, I painted it with the dark chocolate brown two coats to match the stripes and Roman Numerals. No need to seal it the enamel paint cures in 21 days and if the clock is left inside it will be fine. If placed outside then I would paint it with two coats of heavy varnish allow drying time between applications. Now I must go and start the next 36" wall clock. If you have any questions please let me know.
Zebra Clock by GranArt
Zebra Clock by GranArt, plywood cut 36" round.
Zebra Clock by GranArt


Frequently asked questions
Have a question about this project?