I am ready to finally paint my little girls room (the one in the photo<) but i had a few questions based off of my

by
Chezwhick
+23
previous painting attempts. 1. The walls are concrete and the first thing i do is spackle the holes and any cracks in the the paint. what i found last time is that after i sanded it down it had a different texture then the rest of the wall. Also, no matter what i do the when painting over these areas the paint doesn't stick well and bubbles up. What am i missing?
26 answers
-
2. For some reasons occasionally the old paint sticks to the roller or brush and comes off the wall leaving an uneven gap/crack. i then have to let it dry fill it in and deal with the problem i mentioned above. its a vicious cycle and its the main reason why i have been hesitant to start this project. any advice?
 Chezwhick
on Jun 28, 2011
Chezwhick
on Jun 28, 2011
-
It sounds like you have some moisture infiltration and "flaking" issues....is this concrete wall a "poured" wall or Brick?. I would start with freeing up any loose material , brushing scrapping etc. The use a Concrete sealing paint like "drylock"...once that is cured fill gaps and cracks and apply the finish top coat of paint.
 KMS Woodworks
on Jun 28, 2011
KMS Woodworks
on Jun 28, 2011
-
im pretty sure its poured. im pretty confident moisture is not the issue. does drylock need to be sanded? it seems that after any sanding i do it is nearly impossible to completely remove the dust.
Chezwhick
on Jun 28, 2011
-
It sounds like you may need to spend some good quality time doing some more serious prep work....95% of all paint failures are do to crappy prep. All of the old paint that is loose will need to be scraped off...if it is flaking off when you try to paint it is not "bonded" to the wall. Not matter what you do this will continue to be a problem until that part is resolved. A HD metal putty knife scraper may be your best weapon of choice, you may then need to followup with a scrub brush and some TSP and a bucket of water, This will need to dry thoroughly, if you have big holes and gaps they could be filled with drywall compound and sanded smooth, prime then paint. The drywall compound will work as long as there is no moisture trying to get in and "push" it off the wall. Mineral efflorescence can ruin paint jobs too...so the moisture issue is critical. Concrete as a finished wall covering is pretty rare, you could take it up a notch and tile these wall...again doing some good prep.
KMS Woodworks
on Jun 28, 2011
-
More important - what color will you be painting it?
 Liz
on Jun 29, 2011
Liz
on Jun 29, 2011
-
pink? light purple?
Chezwhick
on Jun 29, 2011
-
http://www.materials-world.com/paint-colors/behr/behr-colorsmart/behr-colorsmart-01.htm - foxy pink!
Liz
on Jun 29, 2011
-
it looks pretty dark. i was thinking a lighter color. poetic princess looks nice
Chezwhick
on Jun 29, 2011


-
shes only 9 months. foxy pink might make it kinda dark and dreary. i envision more light and airy. maybe we can do dark on bottom and lighter on top. I will just need some sort of border
Chezwhick
on Jun 29, 2011
-
That sounds nice! how about a mid wall molding?. And Danielle R is right, she's 9 months now but when shes 3...
Liz
on Jun 29, 2011
-
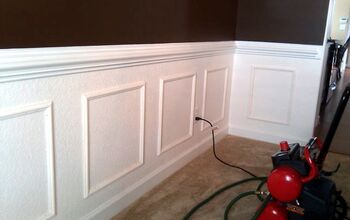
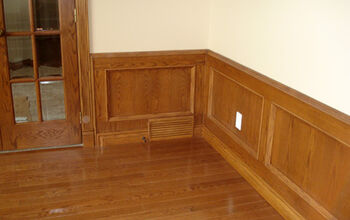
How about a little bead board in the darker color below , with the lighter color above. the bead-board would eliminated the need to patch 1/3 of the wall...and could be set to the wall with panel adhesive.
KMS Woodworks
on Jun 29, 2011
-
@KMS that sounds interesting and almost easier. any idea on what that would cost? for the painting i have all the supplies and would just need to purchase the paint. I would estimate the rooms about 100 SQF
Chezwhick
on Jun 29, 2011
-
i mean the cost of the bead board
Chezwhick
on Jun 29, 2011
-
Chez, you can get a 4 x 8 sheet of "fake" bead board for a bit over 20 bucks http://www.homedepot.com/h_d1/N-5yc1v/R-202090192/h_d2/ProductDisplay?langId=-1&storeId=10051&catalogId=10053 the real stuff is a bit more but still very reasonable. http://www.homedepot.com/h_d1/N-5yc1v/R-202075050/h_d2/ProductDisplay?langId=-1&storeId=10051&catalogId=10053 Both of these would be "topped" with a strip of "chair rail" molding.
KMS Woodworks
on Jun 29, 2011
-
hmmmm. got me thinking here. i like the fact that it will cut out a lot of the patch work. the bottom half of the wall is typically the most banged up.
Chezwhick
on Jun 29, 2011
-
while we are on this: whats the best technique to properly paint the edges of the walls and ceiling? I don't like tape as it tends to get messy and difficult to remove.
Chezwhick
on Jun 29, 2011
-
Chez . I "cut in" with a tapered 1 1/2" brush...a nice PURDY one. With some practice you can get a better faster cleaner line than using tape especially on textured wall...this works better for any corner.. If your painting stripes on a flat surface use tape....In corners this can be a wall to wall corner or a ceiling to wall corner. A short step ladder is a must for the taller areas as you need to be close the "see" well and "drive straight". The tapered brush will allow you to get in to the very corner. After loading about 1/3 of the brush I start in the corner with the brushes tip up and handle to the right. The Sweet spot happens when the brush is angled over slightly to "open" the hollow pocket that holds the paint. Smooth steady pull downward for about a foot...then reload repeat. I use the same methods cutting in window and door trim, baseboards and along cabinet edges. If the walls corner is the same color its a lot easier..and you can just blast away, I Cut -In first then roll...I extend my cut out about 2" then roll in to about 3/4" This gives a more consistent "brush mark" free surface. I just finished painting two bedrooms, the living room and kitchen (and the ceiling in both of these rooms) in our rental these last few days. Today I was painting window exteriors and the front door. I'll get some pics up tomorrow
KMS Woodworks
on Jun 29, 2011
-
Hi there, If you have textured walls then one of those little mini-rollers (sometimes called "hot dog" or "cigar" rollers) can be of great help. Use the brush to do the actual cut line, but fill out/widen the brush line with the mini-roller. Makes it MUCH easier to fill in all the little divots of the texture. If you get the kind of mini-roller that has a fabric tip (as opposed to those with a plastic cap on the end), you can use it to paint the corners of walls where they meet (providing you intend to paint both those walls). Those little rollers are great and one of my most useful painting tools. They only cost around $3 - $5.
 Dan's of Central Florida, Inc.
on Jun 30, 2011
Dan's of Central Florida, Inc.
on Jun 30, 2011
-
started the spackling and scraping. I decided to take my time and really focus on the prep work as suggested by KMS. to accomplish this I am not even buying the paint until the room is 100% ready. i know that once i have the paint im going to get antsy to just finish it as quick as possible.
Chezwhick
on Jul 01, 2011
-
Something that may save you a bit of time (and turn out looking crisper) is painting the trim work first, providing you have things like baseboard. trim I find that it is much easier to do it this way: paint the trim first before you paint the rest of the wall. It is easier to make a nice line on the wall than to paint in the little top lip of many trim boards. Once the trim paint is dry, mask it all off with blue painter's tape (1 1/2 or 2 inches wide). Do a very nice, straight job of laying this tape down. This part is sort of critical. Now paint the rest of the wall. The tape should block any roller spray as well as any paint you get on it from the brush. Once the wall has become mostly dry pull up the tape on the baseboards. If you did a good tape job, it will leave behind a nice straight line. You may need to do just a few touch-ups here and there once the wall paint is totally dry.
Dan's of Central Florida, Inc.
on Jul 01, 2011
-
Just checking up... how's this project coming along??
Liz
on Aug 15, 2011
-
A word in favor of beadboard: my late husband was in a wheelchair the last few years of his life, and he kept ramming the wall in his handicapped bathroom as he angled his chair, leaving tire marks all over the light blue walls. I put up beadboard and painted it a much darker shade of blue -- it worked perfectly! And it looks great.
 Jane B
on Aug 25, 2011
Jane B
on Aug 25, 2011
-
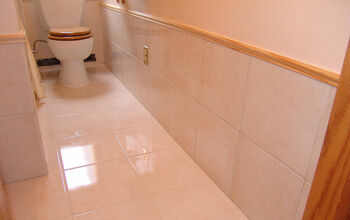
Baths are a great place to use a tile "wainscot" too....very durable and simple to clean.
KMS Woodworks
on Aug 26, 2011
-
KMS, what is the difference between beadboard and wainscot?
 Sherrie S
on Nov 04, 2011
Sherrie S
on Nov 04, 2011
-
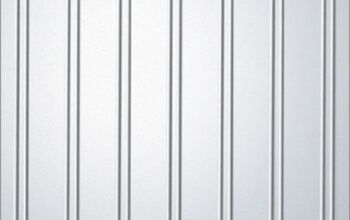
Bead board is a type paneling that has a"bead" profile along one edge. A convex half circle type of bump alternating with a flat panel. ...Wainscot in the normal definition is a covering along the lower portion of a wall...it CAN be of Bead board...or tile or a number of other coverings...Frame and panel is another type of "wainscot"
KMS Woodworks
on Nov 04, 2011
-
We used beadboard for our son's nursery: http://brooksbaby.wordpress.com/category/baby-nursery/
 Michelle B
on Feb 08, 2012
Michelle B
on Feb 08, 2012
Sign Up to Answer

Suggested Project Book
