


Installed a rain water cistern

by
Steve E
Installed a 160-gallon recycled chemical storage barrel to hold rain water diverted from the roof, for use as garden irrigation.
*Options I considered for this project:
Store-bought drums or barrels may be a little more attractive, but I couldn't find any this big.
*Questions and unexpected events that arose during the project:
I had to make sure the barrel was elevated enough to gravity-feed all parts of my garden area. Also, mosquitos are a problem around my property, so I needed to make sure they couldn't breed in the cistern.
*My motivation to do this project:
Water bills in the City of Atlanta are extremly high. Saving my rainwater for garden irrigation has cut my water bills in half.
*Project Steps:
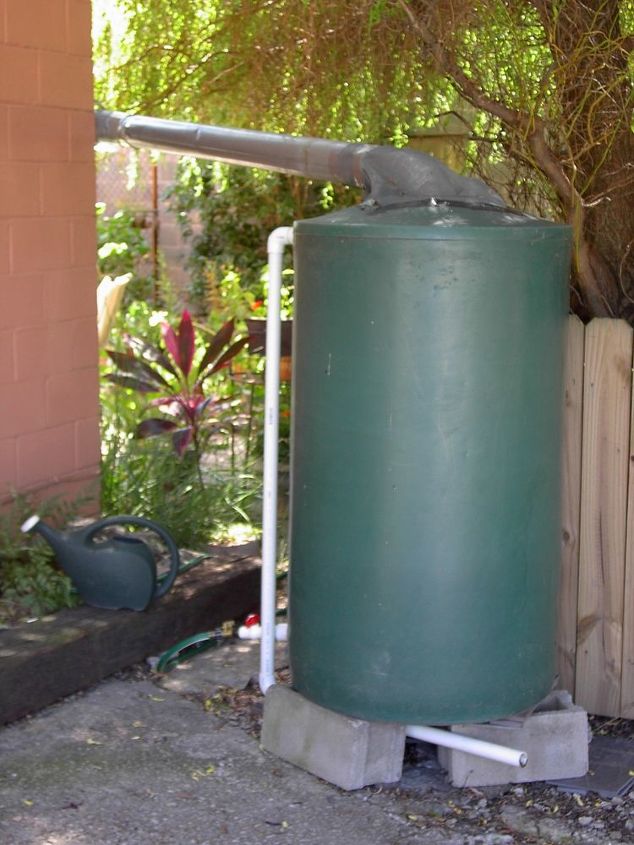
1) Used cinder blocks and slate shims to provide a solid level stand for the barrel.
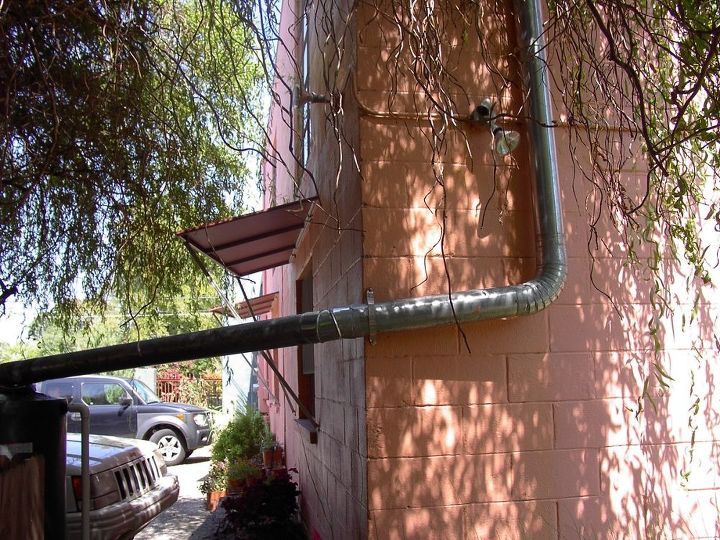
2) Diverted the existing roof drain to the barrel.
3) Installed mosquito netting (fiberglass window screen material) over the drain opening in the top.
4) Installed PVC hose connectors in the existing drain connection at the bottom of the barrel, and a PVC overflow drain (also attached to an existing connection near the top of the barrel).
5) Installed a Y-converter, so I could attach multiple hoses or leave a hose attached and still fill a watering can easily.
6) Attached hose and commenced watering.
Advice:
Do realize that this shouldn't be used for drinking water. Mine drains from a flat rubber roof that has roofing compond repairs made to it, so it surely has some chemical-type stuff in it by the time it gets into the barrel. I have used it to refill a small fish pond, and the fish don't seem to mind, but I wouldn't drink after them, either.
Materials:
Barrel - $100.00
PVC tubing and fittings - $10.00
brass fitting - $9.00
Soaker hose - $9.00
Fiberglass screen - $2.00
*Options I considered for this project:
Store-bought drums or barrels may be a little more attractive, but I couldn't find any this big.
*Questions and unexpected events that arose during the project:
I had to make sure the barrel was elevated enough to gravity-feed all parts of my garden area. Also, mosquitos are a problem around my property, so I needed to make sure they couldn't breed in the cistern.
*My motivation to do this project:
Water bills in the City of Atlanta are extremly high. Saving my rainwater for garden irrigation has cut my water bills in half.
*Project Steps:
1) Used cinder blocks and slate shims to provide a solid level stand for the barrel.
2) Diverted the existing roof drain to the barrel.
3) Installed mosquito netting (fiberglass window screen material) over the drain opening in the top.
4) Installed PVC hose connectors in the existing drain connection at the bottom of the barrel, and a PVC overflow drain (also attached to an existing connection near the top of the barrel).
5) Installed a Y-converter, so I could attach multiple hoses or leave a hose attached and still fill a watering can easily.
6) Attached hose and commenced watering.
Advice:
Do realize that this shouldn't be used for drinking water. Mine drains from a flat rubber roof that has roofing compond repairs made to it, so it surely has some chemical-type stuff in it by the time it gets into the barrel. I have used it to refill a small fish pond, and the fish don't seem to mind, but I wouldn't drink after them, either.
Materials:
Barrel - $100.00
PVC tubing and fittings - $10.00
brass fitting - $9.00
Soaker hose - $9.00
Fiberglass screen - $2.00
Existing drain after diverting
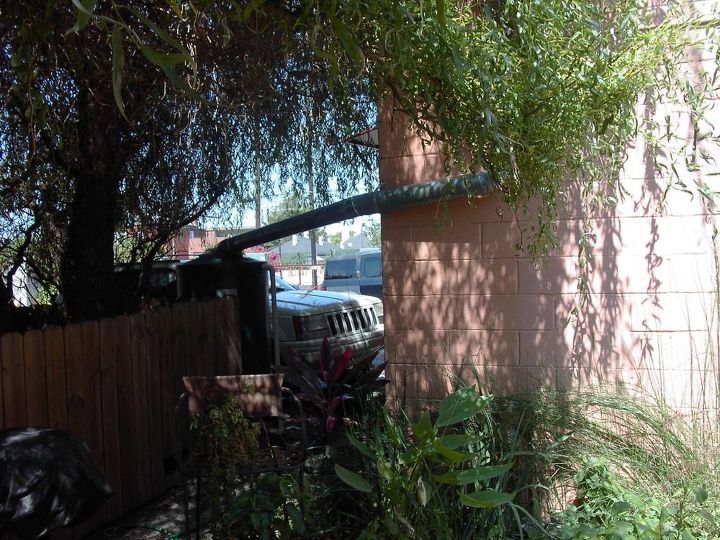
Roof drain diverted to top of cistern
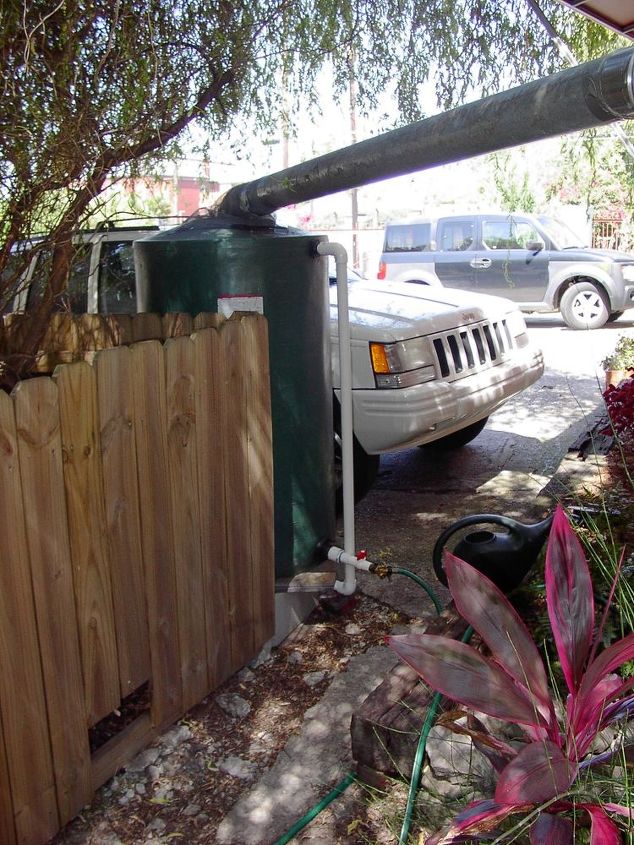
Closer view of cistern- note overflow drain near top that runs down and beneath the cistern
Other side of cistern, shows where the overflow drain comes out below
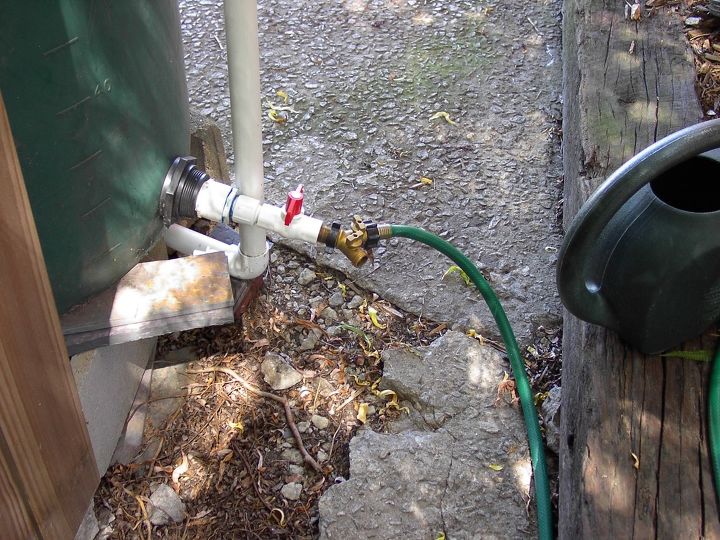
Pvc drains and shut- off with brass Y-diverter and additional shut off valves

"Before" drain can be seen behind these guys- it used to drain directly into the parking and ran out into street, after first flooding the immediate area.
Comments
Join the conversation
4 of 6 comments
-
This is a great idea. You're lucky you can do this. I live in Colorado, and the bizzaro world of Western US water law bans rainwater capture and storage. You don't actually own the water that drips off your roof, so you can't collect it.
-
I do same things for my 8 blue rain barrels but I love ur idea to add pvc drains and shut off w/ brass y-diverter & shut off valves. Plan to get me rain barrels to replace those blue rain barrels to look nice for my house and yard. u are smart to add those. will do that same when I get me some new nice rain barrels. ty for sharing. VR
- See 1 previous


Frequently asked questions
Have a question about this project?