


Water Your Garden, Save Money and Live Green with a Rain Barrel!

by
Wet & Forget
Easy
We all need to water our lawns and gardens sometimes to keep them green and healthy, especially during the dry summer we're experiencing this year. But if you just reach for the garden hose when your lawn and garden are thirsty, you're spending more on your water bill than you need to. Many of your neighbors use rain barrels as an inexpensive, environmentally-friendly way to keep their plants healthy. Read on to find out how to try a rain barrel in your garden--it's easier than you think!
Building Your Rain Barrel
1. Bring your barrel home and flush it out thoroughly with clean water.
2. Drill a hole on the side of the barrel, 1 to 2 inches below the top.
3. Flip the barrel over, and drill a hole on the side of the barrel, near the bottom. Drill a hole that is the same diameter as your spigot, or a slightly smaller diameter.
4. Attach your spigot to the bottom hole on your rain barrel. Better Homes and Gardens has easy instructions for attaching and sealing your rain barrel's spigot. The spigot is where you will attach a hose for watering your garden.
5. Cut a hole in the top of your barrel for the water to enter. You can do this a number of ways. For example, Better Homes and Gardens uses a plastic trash can for their rain barrel. They cut a hole in the trash can's lid that is the right size to fit beneath the home's downspout, cover the top of the uncovered trash can with a sheet of landscaping fabric, and then replace the lid. The landscaping fabric acts as a filter to keep debris from entering the rain barrel, and keeps mosquitoes out. HGTV has a video (below) that shows how to make a sort of funnel out of PVC piping, which fits into a hole in the top of the barrel and receives rain water from the downspout. Some people prefer to attach a downspout extender directly to the barrel (see photo above). While there is more than one way to do this, the important thing is to have a hole in the top of the barrel that can receive water from the downspout, and has a filter to keep out debris and mosquitoes.
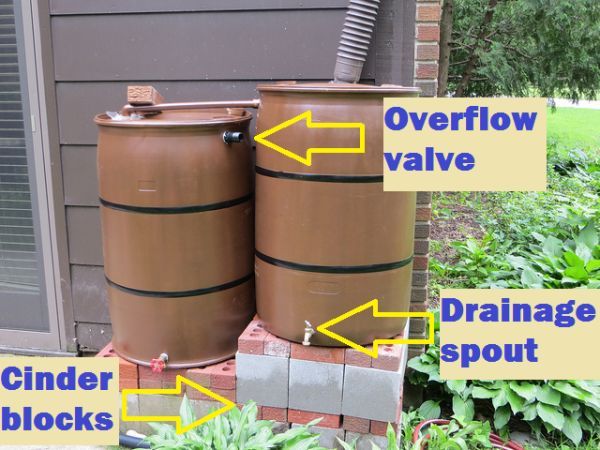
6. Place the rain barrel on an elevated surface, such as up on cinder blocks. The elevation will give you better water pressure for watering your garden. Check that the platform is very strong and level, because a full 55-gallon water barrel will weigh over 400 pounds.
7. Connect hosing to the rain barrel's overflow hole, and place the hose so that it will direct any overflow away from your home's foundation.
8. If you use a lot of water, you can expand your rain collection system by hooking 2 barrels together. To do this, place one barrel at least 6 inches higher than the other, and run a pipe from the overflow valve of the higher barrel to the top of the lower barrel (see photo above). The higher barrel will collect water first, and send its overflow to the lower barrel, and you will attach a garden hose to the lower barrel's spigot for watering your garden. Now you have double the water!
Building Your Rain Barrel
1. Bring your barrel home and flush it out thoroughly with clean water.
2. Drill a hole on the side of the barrel, 1 to 2 inches below the top.
3. Flip the barrel over, and drill a hole on the side of the barrel, near the bottom. Drill a hole that is the same diameter as your spigot, or a slightly smaller diameter.
4. Attach your spigot to the bottom hole on your rain barrel. Better Homes and Gardens has easy instructions for attaching and sealing your rain barrel's spigot. The spigot is where you will attach a hose for watering your garden.
5. Cut a hole in the top of your barrel for the water to enter. You can do this a number of ways. For example, Better Homes and Gardens uses a plastic trash can for their rain barrel. They cut a hole in the trash can's lid that is the right size to fit beneath the home's downspout, cover the top of the uncovered trash can with a sheet of landscaping fabric, and then replace the lid. The landscaping fabric acts as a filter to keep debris from entering the rain barrel, and keeps mosquitoes out. HGTV has a video (below) that shows how to make a sort of funnel out of PVC piping, which fits into a hole in the top of the barrel and receives rain water from the downspout. Some people prefer to attach a downspout extender directly to the barrel (see photo above). While there is more than one way to do this, the important thing is to have a hole in the top of the barrel that can receive water from the downspout, and has a filter to keep out debris and mosquitoes.
6. Place the rain barrel on an elevated surface, such as up on cinder blocks. The elevation will give you better water pressure for watering your garden. Check that the platform is very strong and level, because a full 55-gallon water barrel will weigh over 400 pounds.
7. Connect hosing to the rain barrel's overflow hole, and place the hose so that it will direct any overflow away from your home's foundation.
8. If you use a lot of water, you can expand your rain collection system by hooking 2 barrels together. To do this, place one barrel at least 6 inches higher than the other, and run a pipe from the overflow valve of the higher barrel to the top of the lower barrel (see photo above). The higher barrel will collect water first, and send its overflow to the lower barrel, and you will attach a garden hose to the lower barrel's spigot for watering your garden. Now you have double the water!
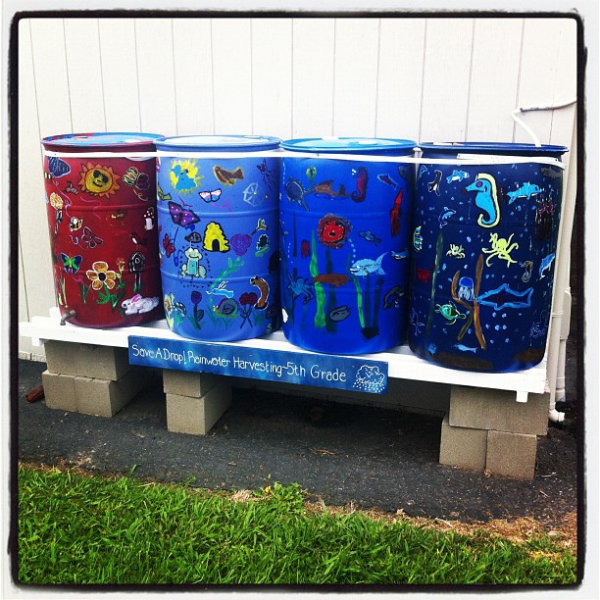
Painted Rain Barrels
Rain Barrel Setup
{
"id": "1483",
"alt": "How To Build a Rain Barrel",
"title": "How To Build a Rain Barrel",
"video_link": "https://www.youtube.com/embed/MGFDlkJOdaM",
"youtube_video_id": "MGFDlkJOdaM"
}
{
"width": 634,
"height": 357,
"showRelated": true
}
Comments
Join the conversation
2 of 10 comments
-
Your instructions are fantastic! This is definitely on my 'to do' list!
-
How creative. It would be fun just to have one in the yard. Someone in Oregon would freak if your collect water from the sky. LOl or build a lake.


Frequently asked questions
Have a question about this project?
I recently had 2 one hundred gallon rain barrels installed with new gutters.
I was unaware that the barrels needed to be elevated in order to get any flow from them other than a trickle.
Any suggestions?