


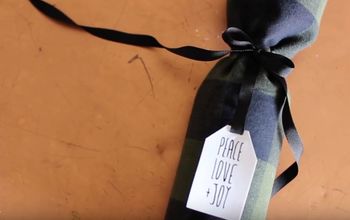
How to Calculate Fabric Dimensions to Make a Drawstring Gift Bag
Making a fabric gift bag is a great way to use up fabric scraps and add a personalized touch to gift giving. The gift bag can then be reused as a gift bag again (the obvious re-use) OR repurposed as a packing cube, travel laundry bag, jewelry pouch, hair brush pouch, makeup brush bag, dust cover (purses or shoes), hobby pouches, and so many more ways.
While this making a drawstring gift bag is a great beginner's sewing project, getting the measurements right can be a little intimidating. I've put together a step-by-step guide to help you get it right! No tough math here, just some easy measurements! Let's take a look ...
By the way, if you like this post, you can see how I make a lined drawstring gift bag and an unlined drawstring gift bag in my other projects! Check them out!
A note ... if you're making a lined gift bag, then you'll need to use your dimensions for both an interior fabric panel and an exterior fabric panel. Same measurements, just cut for both the interior and also the exterior.
If you're making an unlined drawstring bag, then you just need to use your dimensions for ONE piece of fabric. Make sense??
Getting your measurements
FIRST, please get a pen and paper and write down your measurements. Sure you THINK you'll remember them, and some of you just might! But if you're at all like my creative mind, as you're making this you'll also be thinking about other projects to make and you just might forget your measurements (GUILTY)! No judgement, just write down some notes. Easy-peasy solution to a wandering mind!
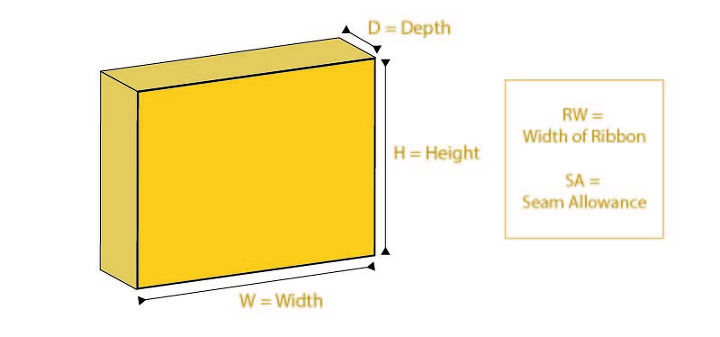
Using a tape measurer or a ruler, you need to get your gift width, height, and depth. If your project is a wacko shape, then set it on a table (replicating how it will sit in the gift bag) and hold a ruler next to it to get an estimate of the measurements.
You'll also need to know the width of your ribbon and the seam allowance you're going to use. I prefer 1/2" but I know others like to use 3/8". Both work well! (1/2" makes for easier math 😉 )
The final figure you need to decide on is the EXTRA ROOM you want for getting your gift in and out of the bag. This is subjective as some people want a slouchy bag while others like more of a fitted look. I recommend, for a starting point, to use 2" Extra Room for the Width and 1" Extra Room for the Height. You can revise these numbers based on your preferences.
Calculating the Drawstring Gift Bags Horizontal Perimeter
There are two ways to make a drawstring gift bag. One is with one piece of fabric that wraps around the entire gift and has 1 seam. This is the easiest way to do it IF you have a large enough piece of fabric.
BUT what if you're trying to use up your fabric scraps and the pieces are smaller? Then you can use two fabric panels, a front and back, that have 2 seams to enclose the gift.
Both work well, it's just you need to calculate them slightly differently.
1 PIECE OF FABRIC AND 1 SEAM
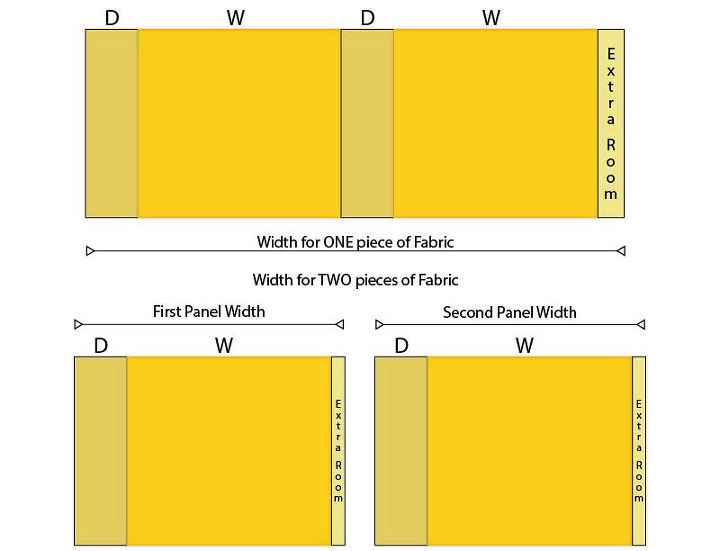
The top illustration is for 1 piece of fabric and 1 seam. You first add together the Depth + Width times 2. Then add the Extra Room for the Width that you decided on.
Horizontal Gift Perimeter = [2 x (W + D)] + Extra Room
2 PIECES OF FABRIC AND 2 SEAMS
The bottom illustration is for 2 pieces of fabric and 2 seams. Here you need to add your Depth + Width + (Half of the Extra Room).
Horizontal Gift Perimeter = W + D+ (.5 x Extra Room)
Calculating the Fabric Width
To the Horizontal Perimeter you calculated in the last step, you need to add your seam allowances.
1 PIECE OF FABRIC AND 1 SEAM
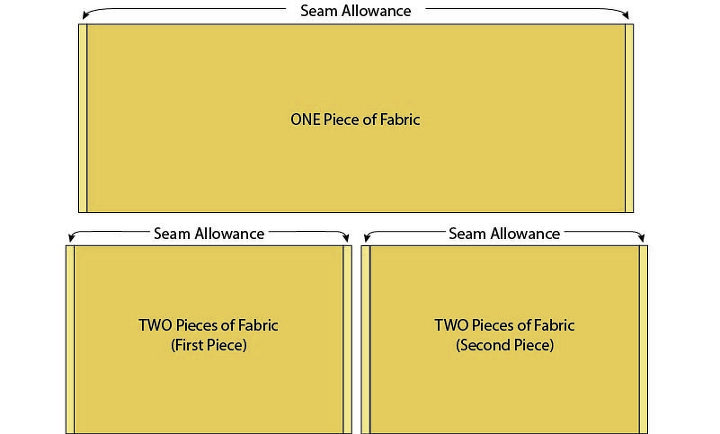
The top illustration shows what you need to add to the Horizontal Perimeter for 1 piece of fabric and 1 seam. Just take the Horizontal Perimeter and add to it 2 x Seam Allowance. This is the WIDTH of your 1 piece of fabric.
Fabric Width = Horizontal Perimeter + (2 x Seam Allowance)
2 PIECES OF FABRIC AND 2 SEAMS
The bottom illustration shows what you need to add to the Horizontal Perimeter for 2 pieces of fabric individually and then the seam allowance to each side of the panels.
Fabric Width = Horizontal Perimeter + (2 x Seam Allowance)
Yes, this IS the same equation BUT you'll have to cut two pieces of fabric to this width so it's the same but isn't all at once. lol.

Do you want a top RUFFLE??
You can choose to add a "ruffle" on the top of the gift bag. This is extra fabric that is above the ribbon or cording channel. In the photo here, you see all of the bags have a ruffle EXCEPT for the tall one in back. The tall one, with the pom-pom trim, doesn't have a ruffle.
The ruffle is completely optional. It can also be any size you want! If you want one, I suggest that you add at least the width of the ribbon. More if you want it to be dramatic.
Whatever you decide, jot down the height of the ruffle on your notes of dimensions.
Height of Fabric Panel for a LINED DRAWSTRING GIFT BAG
If you're making an unlined gift bag, jump down to the next step.
For a lined drawstring gift bag, whether you're using 1 or 2 pieces of fabric, the height is calculated the same way.
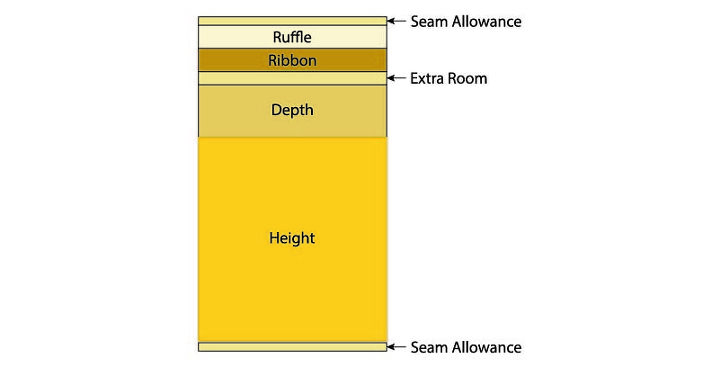
You need to add your height and depth, plus the ribbon and ruffle, then some extra room, and finally the seam allowance on top and bottom. Here's the equation:
Height = H + D + Ribbon Width + Ruffle Height + Extra Room + (2 x Seam Allowance)

Height of Fabric Panel for an UNLINED DRAWSTRING GIFT BAG
The measurement for the height of your fabric is a little different for an unlined fabric gift bag. That's because you'll need to fold down the top to make the ruffle (optional) and channel for the ribbon or cording.
Here's the equation for THIS scenario:
Height = H + D + (2 x Ribbon Width) + (2 x Ruffle Height) + Extra Room + Seam Allowance + 1/2"
DIY home decor using fabric


Frequently asked questions
Have a question about this project?