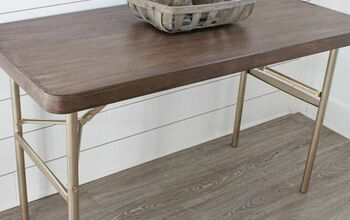
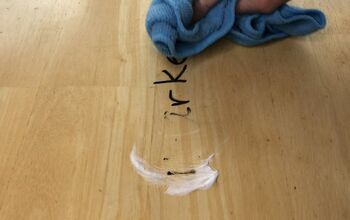
« View Post
Photos

Oops! Leave without saving?

If you leave this page, the information you have entered will not be saved!
Are you sure you want to leave this page?

Leave this page Stay on this page

Hometalk.com

  • Sign Up
  • or
  • Log In
  • Professionals
  • Community
    • All Members
    • Professionals
    • Bloggers
  • About
    • About Hometalk
    • Blog
    • FAQ
    • Guidelines
    • Resources
    • Support
    • Press
    • Contact
    • Terms of Use
    • Privacy Policy
  • Following
  • All Topics
    • Cleaning & Organization
    • Crafts
    • Design & Décor
    • DIY Projects
    • Gardening
    • Home Maintenance & Repairs
    • Outdoor Living
    • Painting
    • Remodeling
    • Repurposing & Upcycling
    See More Topics »
  • Questions
    • All Questions
    • Open Questions
    • Unanswered Questions
  • Clips
Post & Ask
Join Now Log In

Hometalk is where people share and help with everything home & garden

Remodeling

Remodeling

34825 Followers | 1375 Posts

Remodeling projects are hot on Hometalk! From planning a remodel to sharing photos of the finished room, Hometalk members love remodeling. Looking for remodeling ideas? Check out clipped remodeling posts on Hometalk boards, or message remodeling contractors to get advice or a quote for your upcoming remodel. Hometalk contractors are encouraged to post photos of their remodeling work. So whether you're planning a kitchen or bathroom remodel, make sure to consult the experienced members, bloggers and pros on Hometalk.


What's Hot
  • #MayGarden
Popular Topics
  • Gardening
  • Remodeling
  • Repurposing & Upcycling
  • Design & Décor
  • DIY Projects
Related Topics
  • Architecture
  • Basement & Garage
  • Bathroom
  • Bedroom
  • Countertops
  • Flooring
  • Hallways & Entryways
  • Kitchens
  • Walls & Ceilings
Now In Remodeling
  • Liked: "DIY Mason Jar Kitchen O..."
    2 minutes ago
  • Posted: "DIY Mason Jar Kitchen O..."
    6 minutes ago
  • Commented: "They're really su..."
    24 minutes ago
  • Clipped: a photo
    40 minutes ago
  • Posted: "Reclaimed Wood Ceiling..."
    52 minutes ago
  • Commented: "Yes I wanted to..."
    2 hours ago
  • Commented: "Thank you for yo..."
    3 hours ago
  • Liked: "Our Kitchen Makeover"
    3 hours ago
  • Commented: "Great job! Love t..."
    6 hours ago
  • Liked: "All You Need is Paint..."
    7 hours ago

Follow Hometalk on


Recommend us:

Popular
  • Popular
  • Recent
  • See 1 more photo

DIY Mason Jar Kitchen Organizer

I am trying to add some color and organization into our kitchen after we painted it a cream color. I made this mason jar organizer out of a scrap piece of molding, pipe clamp, mason jar, ...»
and hook. It was super simple & added lots of character to our kitchen.

Lizmarieblog.com
Lizmarieblog.com New Bern, NC 6 minutes ago
Post Comment
  • Share 1
  • Like 1
  • Clip 0
  • Dollar store candlestick & tray glue together. This lovely stand only cost $2!

DIY Cake Stand Kitchen Organizer

I don't know about you, but my kitchen counters can not have any clutter on them or I will go insane. It's not easy to keep the counter clean when there is things laying around. I was ...»
getting sick of my dish soap & hand soap lying around so I wanted to make something to clean it all up. I made this stand using a dollar store tray & a candlestick. I simply spray painted the two pieces & glued them together with super glue. I also added a bowl with white rags inside to cut back on our paper towel. They are super handy & great to bleach and keep clean for some "green cleaning". Check the post for all of the photos and info. Hope you guys love this simple DIY :)

Lizmarieblog.com
Lizmarieblog.com New Bern, NC 13 minutes ago
Post Comment | 10 Views
  • Share 0
  • Like 0
  • Clip 0

Reclaimed Wood Ceiling- Tips & Tricks

Our big backyard project is done! We added reclaimed wood to our patio ceiling and it turned out great. Come see how a little 'old wood' transformed our outdoor space.
Crafty Texas Girls
Crafty Texas Girls Grapevine, TX 52 minutes ago
Post Comment | 7 Views
  • Share 0
  • Like 0
  • Clip 0
  • My go-to paints!!
  • Hallway Bathroom Vanity Before

Note:  New handles, but spray painted the hinges
  • Hallway Bathroom After

All You Need is Paint...

Paint can transform just about anything! In our home I've painted kitchen cabinets, hinges/door knobs, vanities, railings, doors and the list goes on and on. ...»

Here are my go-to paints for just about everything in our home.

Lowe's Valspar Latex Enamel Paint - Satin Black

Rust-Oleum Metallic Finish Spray Paint - Aluminum

You can find more before and after pictures of things I've transformed with paint on my blog!

Elisa
Elisa Naperville, IL 8 hours ago
5 Comments | Post Comment | 97 Views
  • Dermot McGingty
    Dermot McGingty 3 hours ago
    I agree we all have different styles, my house is designed in a modern sexy barn style, chunky ...»
    wood and deep shag pile carpets! I hope to upload some pics ;) later this month, I hope you can leave me some honest opinions. This however isn't modern, it what we irish call 'tats'

  • Share 0
  • Like 2
  • Clip 0
  • Beaten up old bucket with a brass eagle on the other side.
  • I decided on a golden wheat color with streaks of barn red and added a whitewash.  I lightly sanded it down to expose some of the wood.
  • Add some buttons and it makes a perfect container for my magazines.

Magazine Bucket

I love to go to garage sales, and something about this bucket called to me.
Chris Ward
Chris Ward Oklahoma City, OK Yesterday
Post Comment | 133 Views
  • Share 0
  • Like 4
  • Clip 0

Remodeling: Building a "Sleep Pod."

Hi Everyone: It's been 5 years since I bought my condo so, I can't quite leave. The elephant, I mean, the gentleman who lives above does nothing but disturb my slumber. I've tried ...»
EVERYTHING to get sleep and nothing works.

SO, I am yearning to build a soundproof sleep pod over/around my bed. Has anyone done it? Do you have any suggestions for wood, soundproof supplies? Anything?I'm a bit stumped but, it will happen!:)Thanks much.

Ripley
Ripley Chicago, IL 3 days ago
5 Comments | Post Comment | 119 Views
  • Ripley
    Ripley Yesterday
    Awesome, THANKS!
  • Share 0
  • Like 1
  • Clip 0
  • We tore out all the old fixtures to lay tile on the floor.
  • The floor was in very bad shape
  • The small window was broken and needed replaced also
  • Backer board all in place.
  • Walls repainted and tile set.
  • New cabinet set in place
  • Sink in
  • Full length window added Sorry the picture is so dark  this is a small bath.
  • Toilet in
  • Decorations put in place.
  • See 7 more photos

Bath Remodel

We took over a small farm and we live in the trailer that came w/ the property. has a large add on and we are working to transform it into a comfortable living space. This is one of the ...»
bath room make overs. We got free a free window and backer board.

3 Days 100.00 Moderate
Emma Dorsey
Emma Dorsey Gainesville, GA on May 13, 2013
3 Comments | Post Comment | 199 Views
  • Dermot McGingty
    Dermot McGingty 24 minutes ago
    They're really super great, I am wanting to get something similar tattooed on my shoulder and ...»
    I was wondering if you might be able to send me a picture through so I can take it in to show them the kind of thing I'm looking for??

  • Share 0
  • Like 1
  • Clip 2
Clipped to:
  • Decor Ideas
  • This is the view from the living room. See is just right there in the middle of everything! Pretty annoying. 1
  • And this is the other side of the wall(inside the kitchen)
  • See 5 more photos

Remodeling: Kitchen Renovation

Hi friends! I need to know if I can tear this wall down? I want to renovate my kitchen to give it more space and take that wall out of the way and have an open floor plan, but that wall, Im just not so sure about it.

Carmen Y. Ocasio-Escobar
Carmen Y. Ocasio-Escobar Clearfield, UT on Apr 24, 2013
8 Comments | Post Comment | 397 Views
  • Dermot McGingty
    Dermot McGingty 3 hours ago
    Truly truly terrible, it is quite amazing how something can look so shoddy!!!
  • Share 5
  • Like 0
  • Clip 0
  • Before....
  • After!!!

Kitchen Revamp!!

I wanted to add some fun accessories and and color to my kitchen! I love how it turned out. For more pictures and details head to my blog!!!

http://startathome.blogspot.com/2013/05/addi...

Brooke L
Brooke L Centerville, UT on May 14, 2013
5 Comments | Post Comment | 602 Views
  • Dermot McGingty
    Dermot McGingty 3 hours ago
    Hats off!!
  • Share 45
  • Like 14
  • Clip 7
Clipped to:
  • create stuff
  • Decor Ideas
  • Kitchens
  • Before.  Granite already existing.
  • primed flowery tile twice. painted once.  used painter's tape judiciously.
  • my helper....
  • Fluting - had measurements - HD cut them for me.  Primed and painted.  Liquid nails and real nails.
  • bar area on other side.  my helpers went a little crazy with the smokey slate and kept painting!
  • a little dark, but buyers liked it....
  • Finished product.  How much fluting and paint can make a difference!
  • wanted to do more with this but didn't have time....
  • See 8 more photos

DIY 80's Kitchen Update

I needed to help sell my Mom's house inexpensively and on my time constraints. A 1980's kitchen never bothered me but buyers were always saying how outdated it was. I did 3 weeks of ...»
fun internet searches and did my research so I was prepared on the day of painting/updating. (I live 5 states away, have crazy hours at work and take care of my toddler, so I needed to be efficient in a wknd.)

Sure, there are things that could use more updating in the pictures, but didn't have time. She also need to get a new fridge - but will let the buyer deal with that!

Overall: Smoky Slate (Green/Gray) paint to walls, painted over flowery tile, and island. Changed cabinetry hardware. Didn't have time or money for overhauling cabinets or changing the overhead light fixture. May have to make a few more trips.

Details: For the tile and island - used bonding primer first (2 coats for tile, 1 coat for island oak). Measured 4 fluting wood at Lowe's - painted both sides with bonding primer, then used Liquid Nails and 4 real nails for each fluting wood to put on island. Then painted island completely in the Smoky Slate.

For the cabinet pulls - they were 80's brass. Sanded lightly while still on cabinets, unscrewed, laid out on flat surface outside (my youngin' helper), spray paint gray primer, spray paint brushed nickel. The brushed nickel looked gray and horrible when on the cabinets and didn't match anything! So re-did spray primer and spray paint - Black Flat - looked much better with existing black appliances. Tedious - since we had to do it twice - but a pink power screwdriver helped!

Total time- 2 people, prepped before, 6 hours. $100.00

Effect - Toned down the formica crème cabinets and all that (good) oak wood!

A quick and inexpensive DIY. More to come on other parts of the house!

SurgChick
SurgChick Rock Hill, SC 3 days ago
1 Comment | Post Comment | 311 Views
  • Mary I.
    Mary I. 2 days ago
    I like the way things turned out. The black handles look so much better.
  • Share 0
  • Like 2
  • Clip 0
Loading
Back
to top
Feedback