Asked on Sep 11, 2017
Carpentry: Strengthening an ill-conceived hack?

+14
I was hoping to execute this kitchen banquette/booth hack more easily, but I'm afraid it may be beyond my skill level. After getting these shelving pieces put together and in place, I realize that they really don't feel strong enough to handle people sitting on them, as I was lead to believe. Does anyone have any recommendations for ways to strengthen them? Perhaps attach them to one another? Also was hoping to creat a low back just as high as window sill. I was hoping not to have to attach them to floor, or harm my floor in any way. I wouldn't mind having to attach to walls. I just don't know exactly how. Please note that I'm not a carpenter so, if you can spell it out for a novice, I'd really appreciate it.
Thanks in advance Hometalk Community!
-Jess
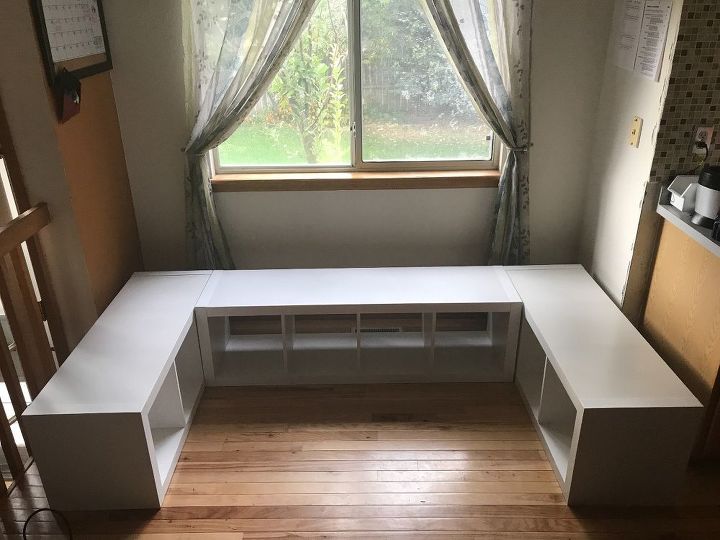


Great concept and so far so good. Don't give up. Yes, I would anchor the units to each other. I don't know about anchoring it to the wall because it looks like there's too much space there. Why do you feel they won't hold weight? They appear sturdy enough. With some custom covered seating (you might even find some end of season cushions) and some big pillows they will look beautiful. Are you going to put a table in there? And how about baskets in those cubbies? Get rid of the long drapes and put up a roman shade or roll-up shade in the window. The lines will be cleaner and more in keeping with the style you're creating. Hope this helps. Love what you're doing!
I would cut three pieces of plywood to fit the three sections ,put foam on them ,and cover and staple your tightly wrapped material . I have used this idea instead of purchasing pillows that usually aren't an exact fit . I use as thick a plywood as I need for support. Also to decorate for various seasons I wrap them with appropriate material and duct tape or tack the material in place .
I would also anchor the units together.
Thank you. They do appear sturdy don't they! The boxes they came in actually stated max weight capacities at 130-150lbs. which scares me, and they do make a creaky noise when sat upon. I was hoping to seat at least 4 people (my family) around this banquette, the lightest of which is 130lbs. *Yes, I intend to make cushions, and pillows, load baskets, etc. I hadn't thought about window treatment yet. Thanks for the tip!
I would attach them together, add a plywood top cut to fit and then add 1x1's in the middle of the 3 "seats" that is the weakest part when on their sides. The weight is not distributed evenly when on the side (most people would sit in the middle, the weak part) that is the sound you hear when you sit. By adding a top that helps even out the weight and by adding 1x1 braces in the middle helps support the middle of the "seat " . I hope this helps you out . Please post when you are finished so we can see how you fixed the problem!
I also meant to address the other part about a back. I think you should add a cushioned back to the wall not the seating. Put velcro strips on the wall (heavy duty type) then add to some flat type of cushions with velcro to that and you will save your walls from scuffs and scrapes. This would also help with the weight on the seats, as in no added weight.
That's my plan. My question is about how to strengthen the pieces though.
THANK YOU!
These shelving units appear to be constructed much like a hoĺlow core door, so that they look beefier than they really are. Once the table is in place folks are gonna have to butt hop/slide in. I think it could be helpful if you put a 1/2 plywood back on each section, that wil make it less likely to wiggle. Then to help with sagging I would install a piece of the same size plywood to cover one side of each shelf/rib top or bottom. You could use liquid nails. If you feel like you need more support for the bum you could always add a plywood top. Plywood can be a little pricy so this project isn't going to be cheap, plus you will have to paint the parts that show. Plywood behaves better if both sides are painted - less cupping. You can usually get your wood cut at the store, just try not to do it when they are busy. You will get better service if you go mid morning on a weekday. It probably would help if you chatted with folks at the store and let them tell you the time that works best. Oh, and have good measurements for them to work with to avoid do overs.
Thank you so much!
You could also add some l-shaped angle iron braces from top to sides. A diagonal cross-brace from one bottom corner to the other top corner on the back will keep it from wobbling (racking) use a 3"x1"
These units seem a little low for seating. You also have issues with them moving individually and feeling not sturdy and unified. You also want to add a chair back for them. Start by creating a toe kick base for them. You can use 2x3's or 2x4's. Depending on how much height you want to add you can set them on any side. Once your boards are cut and fastened together they should sit flush with backside of each unit and leave a 3 inch lip on your visible sides. Now you can cut 1/2 inch or more thick plywood to go floor to however high you want the bench back heights to be. 1rst plywood should be full length of 3 units together 2nd and 3rd would be the length needed to finish the sides. Once the tow kick is built place your units on top and screw down into them. Also add 2 screws to each top and bottom spot where the units meet up. This will give added stability. Place first your back plywood against the whole thing and mark off where the units sits against it. This will tell you where to predrill. Remember you will only be able to screw into the outside edges and the toe kick as your dividers do not seem thick enough. Drill and attach the backside first then repeat and add your sides. If you feel you need a little more stability you can take L brackets or something similar and attach to the outside back corners where they will be hidden. For finishing off why not add a nice molding around the outside edge of the plywood and shoe or quarter molding where the plywood meets the units. You could paint, stain, contact paper or faux finish your plywood.
Looking back at your picture it appears that you have a heating unit under that window. If you will still be using this unit I suggest you do not use that center unit at all. Instead after adding the toe kick to the side units and the plywood. Take the center unit add wheels and add luan or thin plywood to the backside of that unit and a cushion on top for a portable bench for extra seating. You should never block an active heating source. It would be a fire hazard. If your units are laminated melamine everything needs to be pre-drilled otherwise your veneer will chips and crack.
Hi! Before anything else. put a back on the shaving units. The noise and feel are probably about construction, not materials. The backing can be thin but one piece per unit and attached with lots of little brads. It is a perfect job for an electric nail gun/stapler if you have one. If the units are still and quiet, that will make all the difference in how they feel. Good luck! (I'n still thinking about those backs!)
Put a back on them that will make them strong
I thought I'd share an update. Next, walls and curtains. I also made the table from a singer sewing table base and the top is off a coffee table from Goodwill.