Would love to lighten this green up without just painting over it
Making my paint in dining room lighter color
by
The27341990
+8
I paid a lot of money for this paint job but it’s starting to feel too dark can I possibly do some kind of wash over it to maybe keep the green but make it lighter
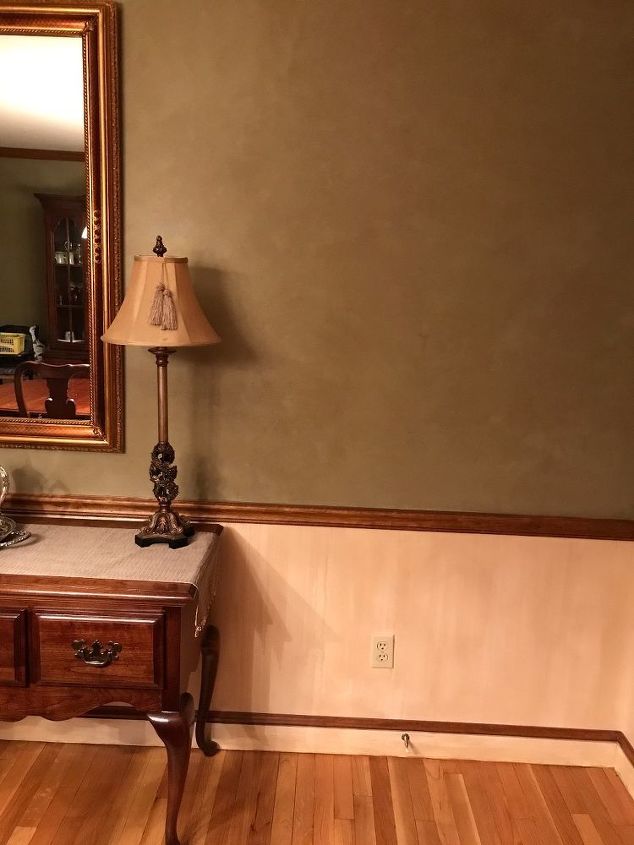

Its a lovely color is there some way to add brighter lighting? Example- floor lamps?
For a paint technique mabe a whitewash overlay application in a striated formation like the linen in the link below?
https://www.homedepot.com/hdus/en_US/DTCCOM/HomePage/Commerce/Building_Supplies/Paint_Sealers_Supplies/Interior_Paint/Docs/MS-LowRes-5-26-final-Eng.pdf
If it is new, live with it for a while. It is very rich and looks really right with the wood trim. The dinning room is the perfect place for a little drama. Plus the wood tones in you furniture will look better next to deeper colors.
I also was going to suggest more lighting, since you already spent money on the paint job. Try that for a while before spending more money. I owned a framing shop for quite a few years. Often things didn't turn out the way people had in their minds. I always suggested to live with it for a bit, try lighting change- led, new bulbs, new lamps or fixtures. Sometimes that works. By then you'll know if you need a more permanent change - like repainting. Good luck.
In the summer it may look brighter. Depending on what is below the trim (we cannot see what that looks like), and your room decor, the wall could look good if you used a lighter shade of the current color(s) to paint some vertical stripes, preferably fairly wide, and wide apart and tastefully located, on the upper portion of the wall. The wall coloring is beautiful, so I would cover up only the minimum necessary to lighten the room. What color is the ceiling? If it is dark I would start there. Have that done first and then take another look at the room. Perhaps the people who did the work would have ideas for how you could lighten the room up a bit.
You could get a small amount (1 quart) depending on the total wall size, of the same color blend but in a lighter shade (by adding more white), then put some of the lighter shade in a paint tray. Use a large sponge or an old towel wound into a wad. Dip the sponge into the paint and wipe off excess. Then take the sponge and dab it onto the wall. Doing this will give the wall lighter highlights and create a softer, sueded look. The more you dab on, the lighter the total effect.
I had the same problem...I ended up up increasing the light bulb wattage in the light fixtures in the room. Made a huge difference and cheap fix. Try it first and it maybe enough to make a difference. Good luck!
You can try Daylight LED lightbulbs. They truly brighten up a room. It may take a day or so to get use to the brightness but, it is like daylight even in the night.
You could use bottom color and do a stencil on the top area,
Consider installing a skylight or solatube to provide more light. If you really want to lighten the color go get paint chips and just paint again a shade or two lighter but stay with the same basic color.
We just change all our light bulbs in dark areas to LED daylight it is a white light not a yellow glow, more like a florescent lighting.
Plan bright white painted ceiling makes a huge difference.
We have tried off whites and light tones but we go back to bright white.
My suggestions are very similar to many previous posters , but all run to the very economical end of the spectrum! Lol 1) time- live with it a while any change takes adjustment and chances are something else is off kilter- Did you change your table linens and draper to coordinate? If not consider choosing a lace or floral in the lighter pallate tones. 2) lighting- increase your wattage, or try a new fixture either bring in a few temporary frestanding floor lamps (before) or hum right in and RE-cap or replace your overhead fixture. ( check out online for massive discounts from companies like house.com for chandeliers way under $200.00!)
3) Texturize/ dimensionalize your upper paint- I have done this before in every house we have ever lived in. Because it is cheaper than wallpaper. And frankly kind of fun.
A- you can start in stages and stop when you like the way the room looks or you can get a piece of poster board , paint it with your base color , and do a “test piece.”
i generally use a base base color and 3 textured color elements. Don’t let that scare you! Most interior maint is latex based- so is most craft paint, you can generally pick at least 2 of your colors from the craft paint section and mix the third from the elements of the leftovers of your wall paint and something else— here it would probably be the lower wall color.
I rarely use a standard wal painting sponge because it will end up leaving, well sponge shapes on your walls unless you practice -a lot! Some if my favorite texture tools are a fringed car washing mitt. You can get at any Dolkar Tree, scrunched up plastic shopping bags, and my VERY favorite- an old fashioned feather duster!
with each of these you will need to use a paint tray , load the paint trayuding s brush, then make sure your painting tool is “loaded evenly” before you begin painting.
My best advice if you decide to try this... pre-prep!!! Prep and seal is wonderful to use to protect wood trim and wainscoting!
Protect your hands by wearing disposable rubber gloves- texturizing is messy in the Artist.
whem using multiple textures, in general paint the heaviest(largest) first) in one color allow to dry completely before continuing to the next most dense texture, which will be a different color or the colors will blend and glob. Lastly you will want to finish with the feather texture. This can be done usilg an individual feather or leaf if that is your chosen motif , but a feather duster allows you to have multiple small wisps you can place simultaneously using a flicking motion.
personally, I thing a simple feather treatmentin gold would be gorgeous on the color you have! Best of luck and please post back whatever you end up doing!