Asked on Sep 23, 2013
Secrets to Painting Cabinet Interiors?

by
Elizabeth
+52
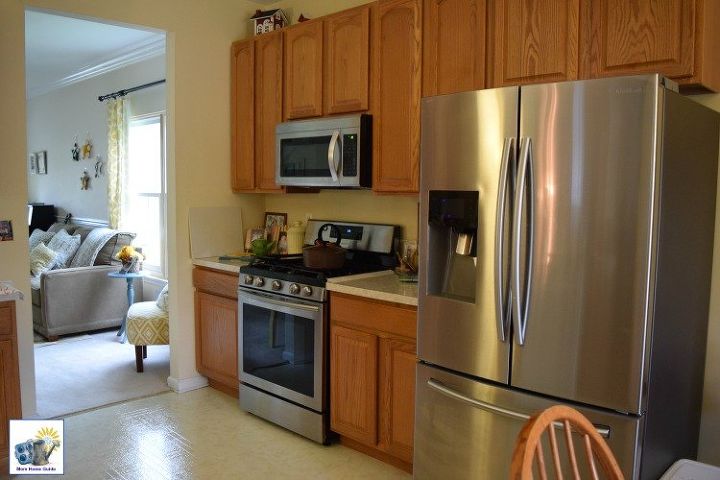
I've finished painting the kitchen walls & have moved on to the next project: painting the cabinets. This will be a slower process, b/c they all need to be sanded b/f painting them. However, I have the first set of upper cabinets sanded & the first coat of paint on them. Question: What's the secret to painting the cabinet interiors? I have tried foam rollers, Shur-line edgers, a paintbrush, and a sponge brush. Not getting the even finish that I am trying to achieve. TY, in advance, for your suggestions & help.
34 answers
-
Personally I wouldn't have painted the interiors, but lined with them vinyl wallpaper. Can you still do that? My concern with painted interiors would be your dishes sticking to them when it's humid.
 Z
on Sep 23, 2013
Z
on Sep 23, 2013
- See 4 previous
-
Thanks for the answers, but I'm still hoping for more ideas.
 Elizabeth
on Sep 23, 2013
Elizabeth
on Sep 23, 2013
-
I painted the inside of my moms using the exact techniques I used on the outside... the key is letting them cure for a few weeks before you put anything back in them.... if you don't have the time to do that, I wouldn't even attempt it.
 KrysFL
on Sep 23, 2013
KrysFL
on Sep 23, 2013
-
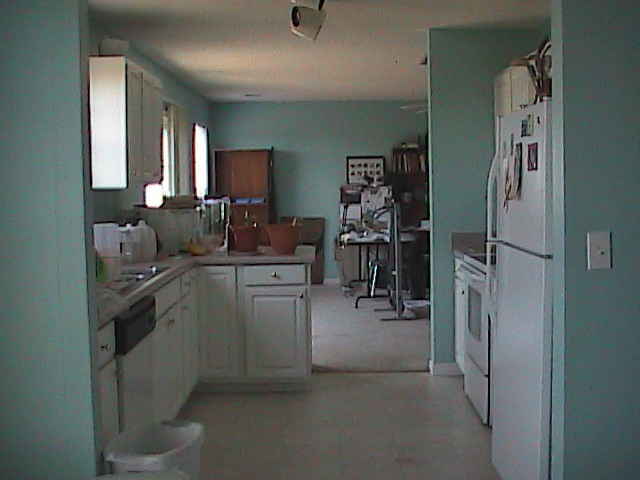
I love the fresh aqua color you have used with white appliances etc! This is so soothing and pretty. I have used those stick on tiles on the bottom inside of my cabinets.
 Bernice H
on Sep 23, 2013
Bernice H
on Sep 23, 2013
-
You can add Floetrol to your paint for a more even finish. And like the others said, let things cure for a good long time before you put stuff back into your cabinets. That foam shelf liner you can buy at the dollar store might be nice to line your cabinets with so things don't stick to the paint.
 Jenny@birdsandsoap
on Sep 24, 2013
Jenny@birdsandsoap
on Sep 24, 2013
-
Curing them takes 30 days. This is the same with painted furniture, or sealers. Some waxes takes 6 months to cure.
 Sherrie
on Sep 24, 2013
Sherrie
on Sep 24, 2013
-
I painted the interior of my cabinets. Because they do have to take abuse, I used a porch and deck paint. My cabinets were so dark inside that I painted them in a light beige. So far nothing has stuck to them and the paint has not peeled off. I did allow 24 hours for the paint to cure before putting the dishes, ect. in them. I would recommend priming them first with a good quality primer. Spend the extra $ on the primer, it will be worth it.
 Lydia Whitehead Torres
on Sep 24, 2013
Lydia Whitehead Torres
on Sep 24, 2013
-
Elizabeth, as far as the interior, we usually only paint the backside of the doors. Everyone has already mentioned the sticking, scratching and drying/curing issues. The exception is when we do lacquers. But, that is all done with sprayers, dries immediately and is the most durable finish for kitchen cabinets. That is the only way I would consider doing the inside of all of the cabinets.
 WallsTreat Studio/ Kass Wilson
on Sep 25, 2013
WallsTreat Studio/ Kass Wilson
on Sep 25, 2013
-
I painted the inside of my mom's cabinets, the same as I did with the outside. I scrubbed them with degreaser first, then primed them with Kilz Original and then painted them and they came out fantastic. And I live in very humid Florida too. With anything like furniture, you do have to let both the outside and the inside dry completely and I painted the insides first, while I had the doors off and then painted the doors and they did take longer to dry than I had thought....... because of the extreme humidity at the time, but I never had one tiny problem with them and they looked fabulous and dishes did NOT stick to the paint at all.
 Sheryll S
on Sep 25, 2013
Sheryll S
on Sep 25, 2013
- See 2 previous
-
Use a spray gun with low pressure - start from the back & move outwards stopping occasionlly to let the overspray dust settle.
 Louis Lieberman
on Sep 25, 2013
Louis Lieberman
on Sep 25, 2013
-
I have painted cabinets four times in the last five years and I have used the same technique as the outside but the inside is usually finished out with a rougher wood, so it is not going to be real smooth. I have painted them just to look good and sometimes I have had to put several coats of paint after my primer to get a complete coverage that doesn't look "splotched". I read in a magazine once that to keep the dishes or anything sticking to the bottom of the cabinets the trick is to put down a coat of latex polyurethane. Let it dry competely and "waalaa" no sticking dishes. I am also used this tip on anything I paint like shelves, mantle and table tops. You will be glad for the fresh coat of paint in your cabinets. I always hesitate to paint the inside, but I always do it and I am so glad after I am finished.
 Cyndi Moore Tippett
on Sep 25, 2013
Cyndi Moore Tippett
on Sep 25, 2013
- See 2 previous
-
I painted my exact same cabinets 15 yrs ago with an industrial off white Enron paint (sprayed). I never thought of waxing. They now need some touching up and I'm wondering how and exactly what wax I should use. I assume the waxing will create a more professional, durable and antique looking finish. ?
 Patty A
on Sep 25, 2013
Patty A
on Sep 25, 2013
-
I paint all surfaces of the inside with white or the lightest color, except for the bottom where everything sets. On those surfaces I use vinyl walpaper, or sometimes peel and stick floor tile. I need to do something with the exterior of my kitchen cabinets. Love the color you have used on yours.
 Peggy
on Sep 26, 2013
Peggy
on Sep 26, 2013
- See 1 previous
-
I used a paint sprayer for the inside. The shelves,being removable,I took them out and sprayed them black. Oh,my cabinets are otherwise white.
 Diane Arnold
on Sep 26, 2013
Diane Arnold
on Sep 26, 2013
-
I thought about wall paper , but not seal it . I thought about pretty thum tack
 Matty Watts
on Sep 27, 2013
Matty Watts
on Sep 27, 2013
-
I thought about wall paper , but not seal it . I thought about pretty thum tack
Matty Watts
on Sep 27, 2013
-
epoxy or polyethurane paint takes 24 hr. to set &1 week to dry completely, but it is still scratchable, so wait 30 days before putting anything in the cabinetsp-then it will be rock hard. of the two, polyethurane paint is stronger but it takes slightly longer to dry-good luck.
Louis Lieberman
on Sep 28, 2013
-
Thanks so much for all the suggestions. I had already started painting one set of upper cabinets b/f posting my question. I also chatted w/my sister in Montreal, Can. It's very humid there, too. She recently has repainted all her kitchen cabinets, inside & out, & agrees that the secret is to allow sufficient drying & curing time. She has also used one of the ideas suggested here re: the shelf liners (that waffle weave stuff) to prevent any concerns re: dishes sticking to the shelves. I'm going to pin this now, too, b/c I'm sure there are lots of other folks who will be faced w/making similar choices. Again--thanks! & have a great day!
Elizabeth
on Sep 28, 2013
-
Yes Elizabeth, I had so many and one wall of very tall doors. You have to take the doors off to get the hinges and hardware clean (less you can afford to purchase all new. which I personally do NOT recommend cause it is too difficult to match up the new to the old holes). Oh yes, mark every knob and hinge as to where it goes when you take them off, so you know where they go back on to each door. I soaked the hardware in degreaser and used a vegetable type brush to scrub them after they soaked for a day. I had the doors out in a very large garage and that year the sun did not shine through till NOON. It was so seriously overcast every morning and humid. So if you can paint one side (wrong side first is what I recommend) and wait many days for them to dry completely (use an old sheet over an old, soft blanket to turn them over to paint the outside). It is a good idea to be very gentle with them for a few weeks afterward to make sure the paint is cured well and this should last a very, very long time for you. I think I have made this sound hard, but it is NOT.
Sheryll S
on Oct 09, 2013
-
Oh yes, I love the color of your walls and the white cabinets too. I need to paint my kitchen walls and am having an awful time of deciding to paint them what looks like the exact same color that you have used or just paint them white again..... I have the tiniest galley kitchen that could be.... and my fake wood cabinets are already white..... please do not ask me about these awful fake, PLASTIC coated cabinets... UGH!!! They melt!!!!! My coffee maker actually melted these crappy things or I guess I should say the fake coating on them. NIGHTMARE is what I call them.
Sheryll S
on Oct 09, 2013
-
thank you, Sherrie...what kinds of wax do you recommend? I ve been refinishing old chests,etc, too, but have never used wax as the final product. I have beeswax and shoe polish....could any of these be used to "age" the finish a bit?
Patty A
on Oct 10, 2013
-
Patty I have bought and made my own wax. I have bought Plaster Paints, Johnson's, CeCe's, Anne Sloan. Have made mine and made my aging wax. I have a simple recipe for making my own wax https://www.earthpigments.com/white-beeswax/ they also have a recipe for aging wax. I buy pure pigment from them but....when it can't get here fast enough I buy chalk from the art store, don't laugh they have a pure pigment chalk for artists. My Mother is a artist and I was desperate I bought one piece of chalk and used a little of it and crushed it up a little at a time to get the color I want and stirred it in the mixture. I use the microwave at 15 seconds a time until it was melted. If you can't find chalk you can use a artist tube, professional paint. Some people also use regular paint to make a aging wax. Things you can also do. You can also use half car wax which is a harder wax it's called carnauba wax it will make a harder wax. If you use regular turpentine it will stink to high heaven! The smell will dissipate so leave it out in the garage. It will also very soupy. Always stir it before use. I use a piece if card board box and scoop some out and leave it to absorb the oil. I hope this helps. Aging if you can't buy some kind of pigment you can water down some brown paint working in small sections paint on then wipe off. It will leave the paint in the cracks and do it until you get the results you want. One more thing, if you are aging a piece with aging wax, wax first then use the aging wax, the pigment grabs if you use the aging wax first making it to dark. If you wax first then use the aging wax you can control it better, if you get to much aging wax on it you can use regular wax to take it off. 4 oz Beeswax1 cup Iso-Pure Safe Solvent, Citrus Solvent or turpentine
Sherrie
on Oct 11, 2013
-
Am I reading your recipe correctly Sherrie? 4 oz of beeswax to one cup of turpentine? Sounds a tadge dangerous to make and I would have never thought turpentine would work..... hummm, I have small amounts of beeswax that I use in sewing. I will look for larger blocks now. I also thought of using carnauba but chickened out. I looked so many times in WM and several departments for the Johnsons paste wax, finally have decided to just get it at Home Depot. Was finally told WM just does not carry Johnsons Paste Wax at all.
Sheryll S
on Oct 12, 2013
-
Some people use Citrus Sol I have never used it. I always use pure turpentine. Places like Lowes, Home Depot or builders stores should sell Johnson's Paste wax. There are also waxes CeCe's, Plaster Paints, Shabby Paints. These are environmentally safe. You can buy them online. And you can mix them with mica, pure color, some people use stain, some use paint. It is what you prefer play around with it and experiment.
Sherrie
on Oct 12, 2013
-
I re-do furniture. I have had my own pieces leave rings, or chip because I didn't cure them. So I have learned any piece of furniture I do and that includes painting inside cabinets and drawers I cure everything and seal it. I never ever sell a piece of furniture without it being sealed or cured properly. It takes way more time and I have several pieces in my home in various stages of being cured. I don't want hair, dust or anything else like a cat jumping on it. That would be my cat, I even had her fur shaved so she doesn't drop hair everywhere
Sherrie
on Oct 15, 2013
-
Thanks for the answers, but I'm still hoping for more ideas.
Elizabeth
on Nov 04, 2013
-
Actually, I need a little more feedback regarding how to paint the inside of a cabinet w/a tiny opening (8.50 ")? I had a hard time cleaning it, b/c my arms aren't long enough to reach the back. So, I have no idea how I'm going to get the back of this little lower cabinet sanded, which I need to do b/f painting. I'm thinking I may have to use a small roller on an extension bar, but not sure how I will be able to cut in w/a paintbrush. Any ideas? Thanks!
Elizabeth
on Nov 04, 2013
-
Thanks for the answers, but I'm still hoping for more ideas re: sanding & painting the cabinet w/the tiny opening.
Elizabeth
on Nov 08, 2013
-
I do not like the color blue very much...but I love the color of these walls. Lovely.
 Carolyn Vick
on Mar 25, 2014
Carolyn Vick
on Mar 25, 2014
-
Tape everything off and spray paint with another color?
 LindaChaney2
on Mar 25, 2014
LindaChaney2
on Mar 25, 2014
-
I used foam rollers with oil based enamel paint and a one inch brush for the corners and with several coats of the oil base, it smoothed out the wood on my 30 yr old oak cabinets that got messed up when I pulled out 30 yr old contact paper the previous owner put in. The best part of oil based enamel paint....no sanding required. Just use a degreaser (I use TSP from Home Depot) and then paint. I painted my interiors in turquoise and now I've added crown moulding and am going to paint the exteriors white.
 Laura Fursdon
on Feb 29, 2016
Laura Fursdon
on Feb 29, 2016
-
I have a finishing sprayer and spray them. It is actually made to use on cabinets to give a professional finish. Also remember to wait 30 days for the paint to cure or you will have everything sticking to your paint,
Sherrie
on Mar 02, 2016
Sign Up to Answer