Asked on Oct 03, 2014

Plastic clock

Polly Zieper
by Polly Zieper
I bought this plastic clock at Target. It was not expensive, but I 'd love to remove the plastic cover and decorate the face to go with the colors on my daughter's dorm room. Has anyone successfully removed the cover without cracking it?I want to be able to put the cover back on when I've personalized the clock a bit. It looks too generic right now.
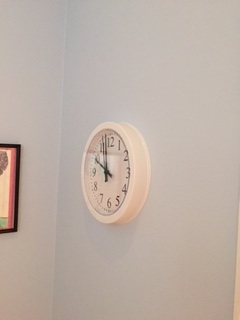
just a basic plastic clock I got at Target,I have one in each kid's bedroom.
  16 answers
  • Marilyn Sargent Marilyn Sargent on Oct 03, 2014
    I think you can access it by going through the back of the clock.
  • Polly Zieper Polly Zieper on Oct 03, 2014
    @Marilyn Sargent I'll try that.I hadn't looked.
  • Reba Reba on Oct 03, 2014
    the front cover pops off
    • See 1 previous
    • Carolyn Webb Creasy Carolyn Webb Creasy on Jan 28, 2019

      Thanks so much. I just fixed my Mickey Mouse wall clock. So happy I didn’t throw it away.

  • Brandi Brandi on Oct 04, 2014
    It pops off easily. Just did the same thing myself a couple months ago. It's only held on by tabs that slide into notches on the outside part.
  • Anny Palanzi Anny Palanzi on Oct 04, 2014
    such a coincidence...I just did that this week with a clock from a junk pile. It's plastic and tacky sooo....I used a narrow screwdriver (or anything narrow) to slip in between the plastic cover and the clock frame, just loosen the clear plastic piece, going around the circumference, and lift it up gently. At '12:00' there may be a little notch so you can work with that. Then I took off the clock works and covered the face with posterboard and stenciled 12,3,6,9, and filled in the spaces for the other numbers with random cutouts from the stencil, and put it back together. I also decoupaged the frame as well because it was a very dated design. But I don't think you intended to do that. It looks fine the way it is.
  • Sheila V Sheila V on Oct 04, 2014
    Look for tiny tabs around the edge of the cover. Use a small, flathead screwdriver to gently press at the tabs and it will pop off. Next pull off the hands of the clock. Gently (again!) you might find that the paper face is just attached to the clock with a couple of dabs if glue. If so, remove it and use it as a template for whatever new face you want. I have done two clicks this way. Used an image of a golf ball surface for one, and had everybody sign it at my husbands birthday party. It hangs over his workbench now. The other one I covered with scrapbook paper and it's in my studio.
  • Slgibbs1 Slgibbs1 on Oct 04, 2014
    I have done this several times. I have a black and white bathroon and I reprinted the face with zebras and numbers. No problems. Also, if you want to paint rim, I suggest Krylon paint for plastic
  • LeeAnna Ruch LeeAnna Ruch on Oct 04, 2014
    I had one like this and I found tiny little sunken screws that I used a small screwdriver to remove. The rest of it came apart very easy with the screws were removed. I did the changes I wanted and put the screws back in and it has worked find ever since.
  • Bard Judith Bard Judith on Oct 04, 2014
    Check the back for screws first. If there are two 'rings' or groups of screws, the outer ring usually holds the face and frame, while the inner ring may hold the standard cheap square pop-in clock mechanism (two AA batteries, slim plastic ridged 'gears' to set the time, black plastic, you know the drill...). When you have the face and back separate from the frame and glass (or plastic dome), you can also gently pop the hands off. They are thin metal, so hold them very close to the clock stem and pull straight upwards - do not twist or bend. Note the order in which you remove them - each hand has a different size of centre hole which fits onto the 'steps' on the stem. Now you can also remove or replace the face. There may be a thin nut which goes around the clock stem to hold it on, or just a bit of adhesive here and there on the face.
  • Bard Judith Bard Judith on Oct 04, 2014
    I have successfully printed my own clock faces (any clock with a diameter of less than eight inches will of course fit on A4 paper), handpainted, spraypainted and used stick-on numbers, scrapbook sticker numerals, etc. to personalize clocks for my decor, office space, and children's rooms. You can also paint the hands to make sure they contrast well with the background (light on dark, or dark on light - otherwise your clock isn't readily readable!) When everything is dry, put the hands back by pressing gently down, and test with batteries in to make sure they are moving and not bent (in which case they interlock and seize up!) BEFORE you pop or screw the cover back on. Enjoy your custom timepiece!
  • Deb Deb on Oct 04, 2014
    Be careful not to mess with the hands! When you fool with them even a little bit of a bend will screw them up, especially a cheap clock. I did this with sixth grade gals and had to buy extra clocks.
  • Swan Road Designs Swan Road Designs on Oct 04, 2014
    Once you've disassembled the clock, you could "glam" it up by gluing all sorts of glittery stones from the hobby store on the face near the numbers. Just be sure none of them are big enough for the hands to scrape across them, or position them out of the range of the hands. Spray paint the outside frame with some sort of chrome paint and glue a band of rhinestone-like trim around it.
    • Polly Zieper Polly Zieper on Nov 18, 2015
      @Swan Road Designs I like all the ideas,I'm just afraid of breaking the clear plastic cover and hoped someone had taken it off successfully and could give sdvice.I'll have to try with a knife or screwdriver, or I'll never know.
  • Marci N Marci N on Oct 05, 2014
    I actually painting multicolor stripes around mine. I love it now. You could simply glue things to the sides too, or to simply wrap with some jute rope would look pretty. If you open the screws on the back you could take out the face and even do something interesting to it too. Glam it up or dress it down, or even make your own face on the computer then print it out. Have fun.
  • Polly Zieper Polly Zieper on Oct 05, 2014
    Thank you, everyone!I didn't even think about keeping the 'bling' flat enough so the hands can smoothy go around, thank you!ButI was planning on dressing it up with stickers and small, abstractdesigns painted by my 6 yr old. My college girl loves showing off her baby brother's artwork!
  • Carol P Carol P on Oct 08, 2014
    I too have decorated the faces of many clocks for inexpensive keepsakes. I like to blow up a picture on my computer/printer and cut it to fit. My most recent was a picture of two grand-kids playing. I have put funny, light-weight things on the pointer ends of the hands to tie in. I've never had trouble with clocks working but some faces are a bear to remove. I put down an old towel so nothing gets scratched and use a thin kitchen knife to pry away the face. I write down the order of the hands so I re-assemble correctly.
  • Deb K Deb K on Apr 14, 2023

    Hi Amanda, hope this helps you out.

    https://www.youtube.com/watch?v=l0_a5PEnbwE