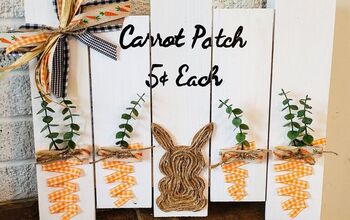
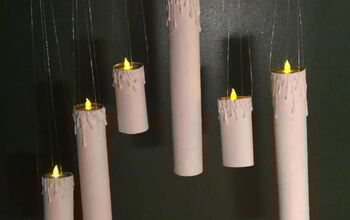
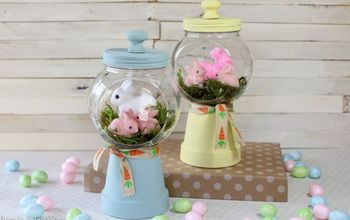
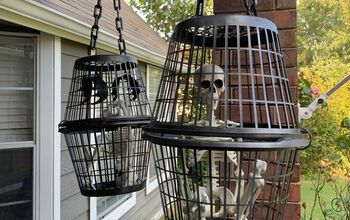
« View Post
Photos

Oops! Leave without saving?

If you leave this page, the information you have entered will not be saved!
Are you sure you want to leave this page?

Leave this page Stay on this page

Hometalk.com

  • Sign Up
  • or
  • Log In
  • Professionals
  • Community
    • All Members
    • Professionals
    • Bloggers
  • About
    • About Hometalk
    • Blog
    • FAQ
    • Guidelines
    • Resources
    • Support
    • Press
    • Contact
    • Terms of Use
    • Privacy Policy
  • Following
  • All Topics
    • Cleaning & Organization
    • Crafts
    • Design & Décor
    • DIY Projects
    • Gardening
    • Home Maintenance & Repairs
    • Outdoor Living
    • Painting
    • Remodeling
    • Repurposing & Upcycling
    See More Topics »
  • Questions
    • All Questions
    • Open Questions
    • Unanswered Questions
  • Clips
Post & Ask
Join Now

Hometalk is where people share and help with everything home & garden

Crafts

Crafts

47876 Followers | 4346 Posts

Share photos of your crafts, or find inspiration for craft projects on Hometalk. Crafts on Hometalk are not just ideas for crafts, but are real projects by crafty people who you can communicate with. Hometalk members are posting photos of all kinds of crafts, especially crafts made with recycled and repurposed materials. Hometalk has a community of crafters making and sharing crafts like mason jar ideas and seasonal and holiday craft ideas. Next time you have a craft project to share, post it on Hometalk and get feedback from the community.


What's Hot
  • #SummerStyle
Popular Topics
  • Gardening
  • Remodeling
  • Repurposing & Upcycling
  • Design & Décor
  • DIY Projects
Related Topics
  • Craft Room & Workspaces
  • Design & Décor
  • Painting
  • Pallet Projects
  • Seasonal/Holiday Décor
Now In Crafts
  • Commented: "You can get a la..."
    10 minutes ago
  • Clipped: "Mason Jar..."
    13 minutes ago
  • Liked: "mason jar drink cups"
    25 minutes ago
  • Clipped: "My Silverw..."
    31 minutes ago
  • Liked: "My Silverware St..."
    42 minutes ago
  • Clipped: "Hubcap Fl..."
    50 minutes ago
  • Clipped: "Mason Jar..."
    2 hours ago
  • Clipped: "Garden He..."
    2 hours ago
  • Clipped: "Make a DI..."
    2 hours ago
  • Posted: "Chalk Board Message Bo..."
    3 hours ago

Follow Hometalk on


Recommend us:

Popular
  • Popular
  • Recent
  • This is the piece of silverware that started this odd addiction.
  • First you need to find some silverware suitable for stamping. In my experience it seems like silverplated silverware is easier to stamp than stainless steel.  Vintage silverplate can be found at thrift stores, estate sales, etc. 1
  • I bought my 36 piece 1/8" steel stamping set at Harbor Freight.  The regular price is around $10, but is frequently on sale for around $5.  The stamps are long pieces of steel with a letter or number on the end.
  • Supplies needed
  • I drew a line down the middle of the knife so I could somewhat keep the letters lined up. BTW, I don't go for perfection, to me it's more of a handmade look.
  • I figured out the middle letter of the word I was going to stamp and stamped that letter first. Just give the stamp a good old whack with the hammer.  And then work out from there.
  • When I was done, I rubbed some marker onto the letters and then wiped the excess off with a paper towel. You don't have to do this step, but I found it made the letters pop out visually a little more.
  • Great for plant markers
  • Perfect for holding photos
  • See 6 more photos

My Silverware Stamping Addiction

Stamped silverware can be used for all sorts of things. From plant markers to wedding gifts for the bride and groom to labeling cheeses for a fancy schamcy party. And it's super easy to ...»
do!

You'll need the stamps, a piece of silverware, a hammer of some kind - I prefer a larger metal mallet type hammer (better to smash your fingers with), a magic marker, something to stamp onto (I used a small brass block that I found in the garage) and for safety you should wear gloves and safety glasses.

Instructions are below the photos and a much more detailed tutorial is on my blog post.

Oh, and I've had quite a few people asking on my blog about using them for weddings (stamping Mr. and Mrs. on forks or wedding dates, etc). Avery cute idea, BTW. I would say if you are expecting people to eat with them, I would skip the steps about using a magic marker, because that could be toxic. And you certainly don't want to start the marriage off on a bad note. If you still want to do the last step where you "color" them in a little, you could use liquid food coloring and wipe it into the letters a little.

Have fun stamping. Watch out for your thumbs and please wear you safety gear!

House Of Hawthornes
House Of Hawthornes Columbus, OH 2 days ago
2 Comments | Post Comment | 672 Views
  • Linda Keesee
    Linda Keesee 38 minutes ago
    Love these! This is such a great idea. I need to make some of these for my herbs. Thanks for ...»
    sharing.

  • Share 24
  • Like 20
  • Clip 15
Clipped to:
  • Crafty Love
  • Cool Projects
  • Garden Art
  • Meet Miss April Rose, She's a Garden head planter created from a foam head.

Garden Head Planter

Thanks to a fellow blogger ( Miss Jessica Cramer ) I now have one too! come see how it's done...
24 Hours 30.00 Easy
Vetsy
Vetsy Spartanburg, SC 14 hours ago
1 Comment | Post Comment | 133 Views
  • Sia@South 47th
    Sia@South 47th 2 hours ago
    Nice job! These always sold like hotcakes at my store, folks never get tired of them!
  • Share 10
  • Like 5
  • Clip 4
Clipped to:
  • Garden Inspiration
  • GARDEN
  • Flower power
  • Now my baskets look like treasured family hierlooms that have been around for decades.
  • These are simple "Indian Style" baskets from an import store.
  • I used 2 different stains, a light one (gunstock) and a darker one (Jacobean)...they could be any colors that you might have on hand.
  • I started with the Gunstock stain to darken all my basket area...it made the most impact on the cream areas.
  • Be sure to wear protective rubber gloves...or you will have stained finger tips. Be sure to work the stain into the cracks of the weave. These dry baskets will soak up quite a bit of stain in the begining.
  • After the first stain dried, I skimmed the surface with the darker, Jacobean stain.
  • Here's a close-up of how the darker stain looks a little smudged and time-worn.
  • Perfect place to drop the remotes in our den.
  • See 5 more photos

Aging "New" Indian Baskets to Look Old

I'm a fanatic for vintage Indian baskets...but who can afford them? I find similar baskets made in Mexico and India at import shops almost daily, so I thought I'd try my hand at making ...»
them "look" like the vintage ones. I started with 2 colors of wood stain, and applied each to created a layered/aged look. Now I'm passing this VERY easy process on to y'all.

15 Minutes 8.00 Easy
James@TheCavenderDiary
James@TheCavenderDiary Dallas, TX 12 hours ago
2 Comments | Post Comment | 76 Views
  • Sia@South 47th
    Sia@South 47th 2 hours ago
    I'm VERY impressed!!!
  • Share 1
  • Like 5
  • Clip 2
Clipped to:
  • paint and repurpose
  • Decor TIps & Tricks
  • See 2 more photos

Chalk Board Message Boards

fun ways to use chalk board message boards in the home
Christine @ Little Brags
Christine @ Little Brags Olympia, WA 3 hours ago
Post Comment | 13 Views
  • Share 0
  • Like 0
  • Clip 0
  • Picture of all of the Collages throughout the years...
  • Finished Frame
  • Completing the mat

Picture Collage

This is a great way to capture the memories and events my husband and I have done within a year. I started this for us our first year together. You can also complete this per vacation as ...»
I have also done.

Collection of Memories over the year: You have to be good about taking business cards, menus, programs, coasters, napkins, wrist bands, ticket stubs, anything that has a restaurant name or activity, that will remind you of what you've done or where you have been.

Parts & Pieces:

Frame with an over sized mat to place all of your memories.

Double Stick Tape & Scissors

Black & White Photo

You can find more information about the collage on my blog:

Elisa
Elisa Naperville, IL 18 hours ago
3 Comments | Post Comment | 105 Views
  • Annie Ann Del Rio
    Annie Ann Del Rio 5 hours ago
    love this so different and I love it
  • Share 3
  • Like 3
  • Clip 2
Clipped to:
  • Home Decor
  • See 3 more photos

15 Spring Wreaths With Tutorials

Check out my post on 15 Spring Wreaths for inspiration, plus links to the tutorial for each one. A lot of these will work for summer too...
Katie Murphy
Katie Murphy Alpharetta, GA 20 hours ago
2 Comments | Post Comment | 193 Views
  • Katie Murphy
    Katie Murphy 11 hours ago
    Awesome, I can't wait to see how yours turns out!
  • Share 4
  • Like 4
  • Clip 6
Clipped to:
  • Wreaths
  • DIY

Crafts: I need a reliable outdoor glue for my projects-any ideas

I have tried e6000, and hot glue as directions say but once outside for one rainy/cold/hot day and it a done deal. please help
Karen Kelly-Philbrick
Karen Kelly-Philbrick Belgrade, ME 23 hours ago
5 Comments | Post Comment | 84 Views
  • Sam Schaefer
    Sam Schaefer 5 hours ago
    I always use Kwik Seal Clear Caulk. Holds up to weather, can be painted, and since it's ...»
    silicone, it will give with the weather changes. Good luck!

  • Share 0
  • Like 0
  • Clip 0
  • See 1 more photo

Original Art Print....easy and Cheap DIY

I've created these art prints for under £2....they are really easy to make and would be a great project to do with the kids.... please visit my blog to find out how I did it!
30 Minutes 2 Easy
June Walker
June Walker United Kingdom 16 hours ago
Post Comment | 67 Views
  • Share 0
  • Like 1
  • Clip 0
  • For incoming UVA students!  The pillow shams are bordered with orange and navy ribbons, the back features an envelope closure.

Custom Made Pillow Shams

Hi, I just created this set of pillow shams for a customer in California. The fabric I used was for the University of Virginia, and - you guessed it - her daughter was recently accepted to UVA. I am happy to purchase fabric designs for any college, and stitch up a set for you!
Anne Martin for TeaLadyPillows&Aprons
Anne Martin for TeaLadyPi... Mc Lean, VA 16 hours ago
Post Comment | 26 Views
  • Share 1
  • Like 1
  • Clip 0
  • This is an easy to make yard decoration that sparkles in the sunlight
  • These are the Plastic Mirror Stars, found at Michaels, that inspired the project
  • 3 different sized Terracotta pots
  • Base coat the pots, inside & out, with white acrylic paint to ensure that the paint color used is true
  • 2 coats of paint, inside & out, on each pot
  • Spray with 2 light coats of Krylon clear coat so that the 'chime' can be used outdoors.
  • Using Kwik Seal Clear Caulk to 'glue' on rhinestone stars makes them hold up to summer showers
  • Use nylon cord, tri-beads, & wooden beads to space the 3 pots
  • Tie the cord to an 'S' hook to hang outside
  • See 6 more photos

Terra Cotta Wind Chime

An easy to make garden decoration, just in time for Memorial Day! Full instructions can be found at:
2 Hours 5.00 Easy
Sam Schaefer
Sam Schaefer Harmony, PA 2 days ago
10 Comments | Post Comment | 2695 Views
  • Norma Rodgers
    Norma Rodgers 18 hours ago
    I'm going to Wally World today to see what I can find. Make some of these for gifts.
  • Share 974
  • Like 39
  • Clip 63
Clipped to:
  • Gardening/cu...
  • Crafty Love
  • Cool Projects
Loading
Back
to top
Feedback