Wanting to know how to make ur own knotty pine hardwood flooring.

+9
I need to know what grooves and tools I need to make knotty pine hardwood flooring. I have a sawmill and I cut the wood on make the lumber, just need to get a little more info on how to make the hardwood flooring.
9 answers
-
Try researching Duragrove.com installation, familyhabdyman.com or I found theres a video on u tube.
 Janet Pizaro
on Sep 25, 2015
Janet Pizaro
on Sep 25, 2015
-
I'm assuming that you are asking what you need to make the lumber tong and groove? If so, you'll need a router, a table for it and tong and groove bits that will work for the thickness of the wood you'll be using.
 Z
on Sep 25, 2015
Z
on Sep 25, 2015
-
Here's a few more ideas I was able to find for you. http://www.diynetwork.com/how-to/skills-and-know-how/carpentry-and-woodworking/how-to-cut-tongue-and-groove-joints You can also do them on a table saw, which I have personally done before, but it takes more time. I was only doing a small job so time wasn't a problem. I figured I'd go ahead and share just in case that's how you want to do yours. http://www.woodworkersjournal.com/cutting-tongue-groove-joints-table-saw/
Z
on Sep 25, 2015
-
I kept looking and found an "almost" excellent visual on how to use a table saw to make the tong and groove. He forgot to add that the when making the groove you need to turn the piece around to do the cut from both sides of the wood to get the thickness you need. You'll noticed he switched view in the middle of the cut where he started doing the first and ended showing the second cut, but didn't mention he'd turned the wood. https://www.youtube.com/watch?v=kei_h3rYv9E
Z
on Sep 25, 2015
-
You can make it with a tablesaw. I've made my own pine tongue and groove, not for flooring but for the back of cabinets.
 Follow your H
on Sep 26, 2015
Follow your H
on Sep 26, 2015
-
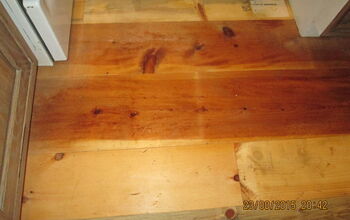
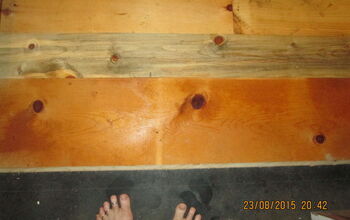
Christina, I am just finishing up my own knotty pine kitchen floor. I've collected the lumber pieces from all over: reuse centers, packing crates, pallets, etc. anywhere from a 16" wide piece to beautiful bug-kill 6" pieces, but mostly anything with interesting grain or knots. I didn't even try to tongue and groove it. Reused and self-milled wood can be tough. I beveled the edges. I didn't want a crack between them to show up in the colder weather, so I overlaid it. I did face nail with a 2" finishing nail. They're virtually invisible, which pleased me to no end. I might actually decoratively "peg" them -- or not. I'm loving the way they've turned out and am very, very pleased with the bevel.
 Christine
on Sep 27, 2015
Christine
on Sep 27, 2015
-
Here are some of my boards down, squirted with water to show the grain. Oh - good news. Pine is soft. Before you sand or do any finishing, squirt the whole thing down. Any dents from installation, dropped hand tools (don't ask me how I know) etc., will pop back up as long as the dent doesn't cut the wood. I keep moving my fridge which makes bad sliding marks. Squirt. All gone!
Christine
on Sep 27, 2015
-
I hope it lasts, Christine, because in my house the wood would shrink and grow depending on the humidity. Our humidity is not constant. If yours is, you may be okay. The tongues and grooves are to allow for changes in the width of the wood.
Follow your H
on Sep 28, 2015
-
We found a post by another HomeTalk user that shared how she made her wood floors. You can find the info at the end of this post: http://goo.gl/ZULyTz
 HouseLogic.com
on Sep 30, 2015
HouseLogic.com
on Sep 30, 2015
Sign Up to Answer
Related Discussions

Suggested Project Book
