DIY Brick Walkway

+12
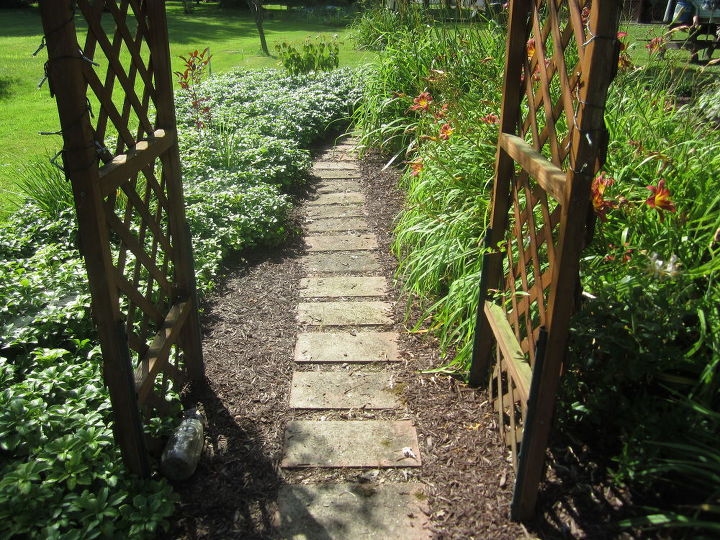
I would like to lay a brick walkway. Any suggestions on leveling the ground or laying the walkway?
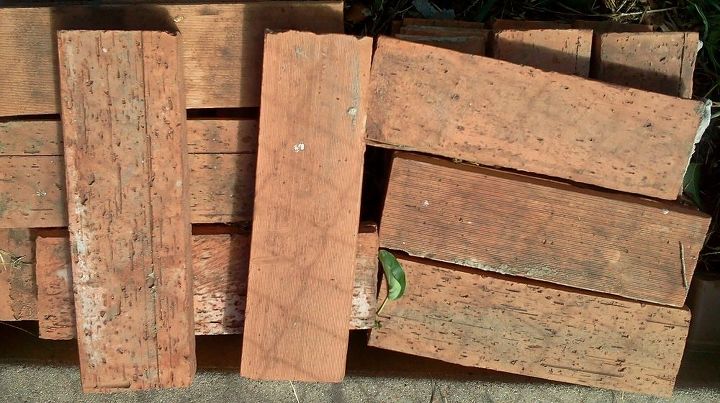
This is the brick I would like to use.
15 answers
-
my dad & husband used a 'level' ( the thing with a bubble in it) to make sure footings, everything,were level. Can't live without a level. It tells you when to take a little more off or a little more in. I even have a level in my kitchen.....crafts
 Betsy Bodrero
on Jun 09, 2013
Betsy Bodrero
on Jun 09, 2013
-
Thank you Betsy Bodrero. That will definitely help. I don't wan't any water that might accumulate from rain to run under the house so a level is a great tool for me to make sure I have. I appreciate your answer.
 Sicilian Rose
on Jun 09, 2013
Sicilian Rose
on Jun 09, 2013
-
I think once I had the ground a level as possible I would make a bed of sand, level it by placing a board on either side and "screeing" it (scraping with a straight edge between the side boards) then laying the bricks.
 Donna Shipley
on Jun 10, 2013
Donna Shipley
on Jun 10, 2013
-
That's how I've always seen it done.
 Robin Layton
on Jun 10, 2013
Robin Layton
on Jun 10, 2013
-
You may also want to use a compactor on the sand also. Usually you can rent one from a hardware store, etc. It is used to compact the sand so you there isn't any settling of the sand thus making the walkway unlevel.
 Sara
on Jun 10, 2013
Sara
on Jun 10, 2013
-
To properly set brick into a patio or walkway you need to be prepared to work a bit hard. 1st off you need to dig out any top soil that is there. This may require digging out several inches up to a foot in some cases. Top soil is soft and can be easily compressed causing the top coatings to settle and making the bricks move. You should dig at least six inches plus the thickness of the bricks and remove soil. If your planning to make a curve or rounded turn in the walkway use a garden hose to lay out the pattern your after. Once that is exactly where you want the sidewalk or patio to be, use landscape paint and mark the grass where to cut out with the shovel. Next you need to place stone dust down. This is tiny stones that compact like cement. Put down at least four inches to create a solid base to work with. It is at this point you will level your walk or patio, or pitch is slightly to one side or another. Take a few wood stakes and hammer them into the ground at each end past the walk or patio. Using a mason line and a string level Level or slightly pitch the string lengthwise the entire length of the walk or patio. Do this twice both sides of the patio or walk. Keep the string about 12 inches above the finished walkway. Then at that point you begin to place the stone dust. Using a ruler measure down from the string after building the stone up about four inches and level the stone based upon the measurements off of the string. You can use a hand held compactor plate or on a really large project rent a gas powered compactor. This will take two people as those things are heavy. Once the stone dust is down you want to place two PVC pipes about 2 inches in size about six inches in from the edges of the walkway on the compacted stone dust. Then place course damp sand down to cover over the pipes. Using a straight board that is just about the same width of the walk drag it on the top of the pipes leveling out the sand. Once the sand is level pull the pipes up and slightly fill the spaces where they once were. At that point you lay down your bricks on the pattern you want to see. Place the bricks tightly against each other. Continue with this until all the bricks are placed. Then using Polymeric sand mix http://www.sakrete.com/products/detail.cfm/prod_alias/Paver-Set-Polymeric-Sand place this down between the bricks using a broom to work it in. For a really long lasting walk, I would then suggest using a compactor plate to force the bricks into the underlying sand making them level on the surface. The vibration will allow the sand mix to fill in any gaps between each brick so the walk or patio will be hard like a cement walk way and will not move. This is a heavy project that requires several hands to get done properly. With enough people you should be able to get this done in about a single long weekend if not to large of a walk. You can go to the Sakrete web site for calculators in determining how much material you will need to be delivered. Nothing is worse then running out of material halfway though the project.
 Woodbridge Environmental Tiptophouse.com
on Jun 10, 2013
Woodbridge Environmental Tiptophouse.com
on Jun 10, 2013
-
so wish I had used a stamper before I did mine. A lot of digging and re- doing.
 Karen Smith
on Jun 11, 2013
Karen Smith
on Jun 11, 2013
-
If you live where you get winter heaving (the soil freezes in winter) the best thing to do is to is to lay down at least 12" of gravel dust, levelling and compacting as suggested, in the fall and then leaving it over winter. In the spring re-tamp and level again and then lay the bricks or stones. This does take patience but it will stay level for years and avoids the use of sand which attracts ants. We have done this with patio stones, flag stones and bricks. Just noticed that you're in Texas where temperatures of 10'F are not an issue so you can ignore this so you can ignore the bit about letting it settle over the winter. But do re-level it and re-tamp if necessary after its first rainy season. Mother Nature will do the best jobs of compacting.
 Colette
on Jun 11, 2013
Colette
on Jun 11, 2013
-
When you finish laying the brick, buy concrete mix and pour over the bricks. Take a broom and sweep between the bricks until it is level with the bricks. Use your garden hose with a mister on the end and spray until saturated. Let set!
 D Burton
on Jun 11, 2013
D Burton
on Jun 11, 2013
-
I don't think I would use the concrete mix. I would want it to be pervious and drain water. Just used the sand as discussed by Woodbridge Environmental discussed above.
 Nancy Green
on Jun 11, 2013
Nancy Green
on Jun 11, 2013
-
The ground has been tilled, next step is to remove some of the top soil. Thank you everyone.
Sicilian Rose
on Jun 11, 2013
-
Actually Nancy, the sand mix I suggested it not to far off from what D Burton suggested. While using concrete mix really is a wast of material as it contains stone aggregate that will not fall between the bricks, the sand mix I suggested does contain a bit of cement of sorts. It will harden like cement over time as it becomes damp from rain and moisture and when it is washed down to remove the excess dust on the top of the bricks. Ideally you want a solid surface and the spaces between the bricks to be solid as well. This prevents water from getting between the bricks that can cause additional settlement and in the colder climates prevent the ice from pushing the bricks apart loosening them over time. The product I suggested was designed just for this type of project.
Woodbridge Environmental Tiptophouse.com
on Jun 12, 2013
-
Actually, you use concrete in the powder form and then mist. It does work as I have seen it done im a friend's yard.
D Burton
on Jun 12, 2013
-
Thank you all for this wonderful information. I appreciate all of your helpful advice.
Sicilian Rose
on Jun 25, 2013
-
Wow, I was going to try this, but it seems to be more than I can properly take on. :( Thanks for the handy knowledge, at least I will know what to look for when I hire someone to do it.
 Tonya
on Mar 10, 2015
Tonya
on Mar 10, 2015
Sign Up to Answer