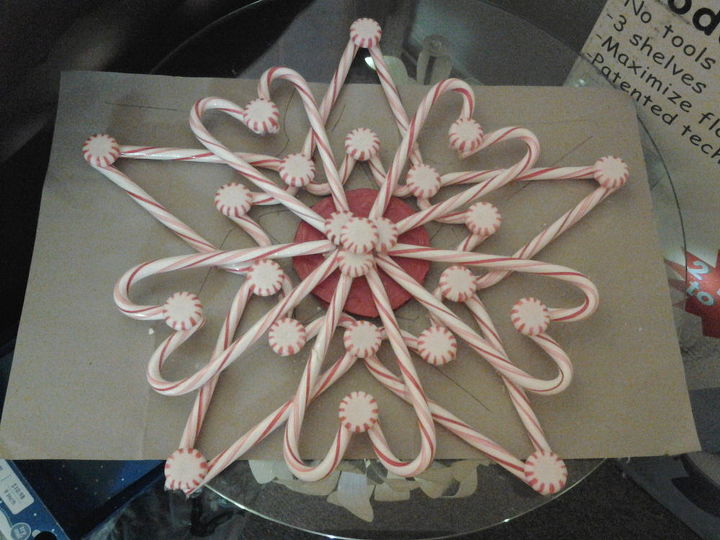
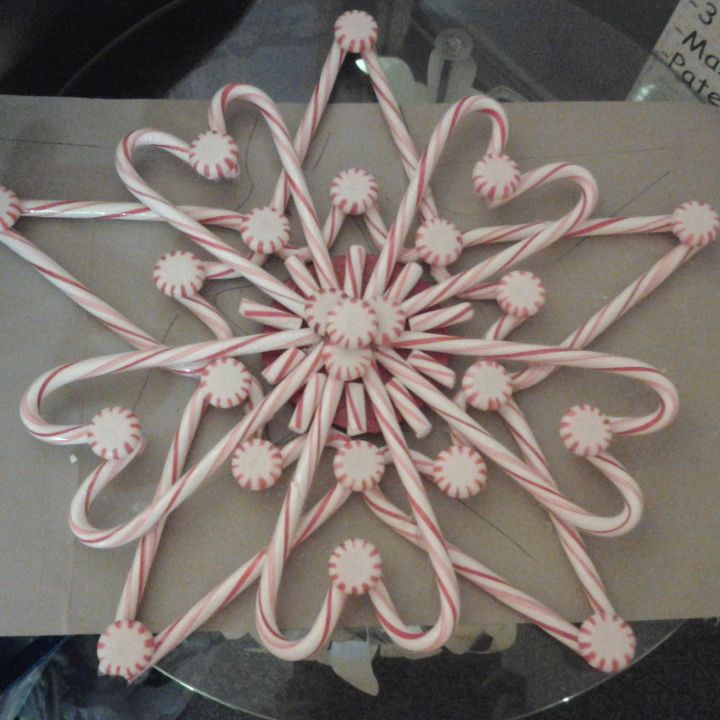
I finally got the E6000 to hold my candy canes. I needed something stable in the middle so I glued 2 pieces of cardboard together and painted it red and glued to the back. The color is cherry red and a little darker than the canes so I thought about placing extra pieces of candy around it so I took a pic of one with and one without. So tell me what looks better please. Also where should I tie a ribbon to hang it with. It's going to be a little fragile but if it's not man handled I think it will work? Thank you.
Cute, cute, cute! I like the extra pieces in the center and I would place the hanger in the middle of the back where it's the most stable. You could tie a long ribbon from there to hang it.
Thank you all. It's my second crafty thing I've done. The first one was for my 8yr old niece for school. That one turned out pretty darn good. I'm more partial to the top one. I was just a little leery about the cardboard pieces and the paint. I was thinking about trying to sell it. What do you think and what would I ask. Candy canes are cheap and I'm not worried too much about my time,I'm disabled now and at home a lot.
On the center instead of mints I glued a glittery, plastic snowflake. I left the cardboard on the back white. Then put the hanging ribbon around two canes at top to hang. Hung well and this is the second year I've used it.
@Kathy McDaniel it took me awhile to get it right. I finally ended up laying the candy canes out on a piece of cardboard and marking where I wanted them with a pen.LOl..
A really cool idea. I like the 2nd one best, but I would end up eating the ornament after the holidays, as well. I would figure up how much the canes and glue cost, and then figure a cost for your time. People don't value something too cheap, but of course they don't like anything too expensive, either. We're not real easy to please. LOL @Maria, yours is cool, too. I love the way the canes made hearts.
Really a cute project. I think they both look terrific. If you need to add a stabilizer like you did here I would consider using glittered chipboard and/or a snowflake shape rather than a circle just to keep it festive. You could use a cheap plastic snowflake ornament from any store or cut a chipboard snowflake with with any of the hundreds of dies or an electronic cutter. You may have to sandwich several layers of chipboard to make it thick enough to provide support, especially if you cut it on a Silhouette or Cricut. As for hanging I would recommend monofilament aka fishing line. A bow would overpower the design entirely and only the thinest ribbon will look right. A few of these in a big window- especially with a few small ones added- would be so adorable.
I attempted this project and the canes would NOT stick to the cardboard for some reason. Mine wasn't as pretty as yours are either. Maybe my cardboard wasn't large enough-I don't know. I put small chipboard letters on mine for "hoho". It looked pretty, but it wouldn't hold a bow either!! Happy Holidays to all.
I like the top photo with the cardboard showing. The extra cane pieces spoil the simplicity of this pretty design. As for hanging ideas, I would hot glue a picture hanger to the back of the cardboard if you think it's strong enough. If not, you could hot glue a string to both sides of the cardboard to create a centered ribbon.
First one, less complicated design. Second cluttered, loses the delicate intricacy of #1.
Ribbon, depends on strength of bonding. As close to center as possible. Maybe even thin wire or nylon string instead of ribbon.
I like the first one~ but I LOVE hearts so both are special~
Why won't the glue stick easily? Must be anothe type that would work better for simplicity sake! Use trilene (fish line) on the cardboard to hang! Sweet gift!
I tend to agree with @Joseph Karsok, that the first one looks better, although I like them both. Ideas from@Danee Kaplan appeal to me also, but the red anchors the center of the design and I would not change the color. If hanging is a problem due to the weight of the candy you might want to use a picture hanger type of thing, like maybe a paper clip (?) glued to the back of the center. But you may need a more stable center or heavier cardboard to make that work. I have had some projects tip forward when I tried to attach fishing line to the center back because of weight above that point. this is a very cute item. Good luck! Sorry! Had not seen @MaryStLouis comment. Sorry for duplication!
I Like them both----from one crafter and artist to another---I think if you could trace the middle star shape and cut your cardboard to that shape and not the circle--and have it red or white---it would make them look much more attractive---Very creative
A hot glue gun will keep the candies together easier---If you do the star shape in a thick cardboard---you could put a tab off a soda can and hot glue it to the back--or poke wire through and move over and inch and poke back through and twist together and make it where that is the place to hang it---or you could cut two stars---and make a ribbon loop by glueing the ribbon strip on one side of the point and glue the other side on the other side of a point---make the ribbon showing or not showing---then glue the other cardboard star to the side-----or cut some stars out of wood to the shape in the middle and attach a picture hanger bar on them---hope one of these ideas will help
I love the first one- that being said, I made one this year and had a very hard time hanging it. It finally fell off the wall and broke into a "million pieces". Good luck!
I vote for #2. The complexity of the center lends itself to actual snowflake patterns. Also, having been the recipient of unwrapped peppermint crafts, I hope you finished yours with a sealant. Spray poly, perhaps?
@Carole I'll try to give you some instructions. I used 10 canes on the bottom and 10 on the top. make each one into 5 hearts. I ended up leaving the wrappers on and hot glued the canes together. It took me some practice to get a shape and I ended up laying the canes out how I wanted them and drew a line to go by. I did the same thing on the top only turning them the opposite way and hot glue them together and to the bottom ones. Once you lay them out you can tell where to glue them. I just hot glued the peppermints around where I thought they looked good and I had already unwrapped them so used them that way. After I was done with it,it wasn't very stable so all I could think to do,at the time,was cut the cardboard and paint it. I used 2 pieces of cardboard and hot glued them together then painted it. I used E6000 to glue the top ones to the circle so it would be more sturdy. I decided to bling it up a little with red and white fake pearl necklaces that I cut apart and hot glued on,alternating the colors. There are several other good ideas posted by others too. Thank you. You could always use E6000 on the whole thing.
Thank to everyone who likes it and commented on it.Means a lot to me since I'm not a crafty person but trying to learn. I tried and tried to put a ribbon on but it just wouldn't hold it. It's sturdy but not enough to hang. So I blinged it up a little and here is the final product. Hope you like it too. Just felt like I needed to do something with the red piece so i bought those red and white cheap string necklaces and used those.
I love it and can see several other ideas you could do. Could even try making with the small candy canes, that would be lighter. A comment about glue...I have used numerous types of glues with different craft projects and I think hot glue would be the way to go.
I think it is perfect in EVERY way---I would think a drink tab glued with the E6000 would be the best hanger---if you use a hot glue gun---the weight of the glue stick/ornament---it could pop off----also gorilla glue would be an extra expense to glue a hanger---but it is thinner than the others and it holds everything. It does not dry clear however so it would not be good to make the ornament with. It is a good purchase tho for just abt everything just like E6000. Please post your instructions----I am impressed and sometimes not so easily!!!!!!!!
@Karen Wright . I used 10 canes on the bottom and 10 on the top. make each one into 5 hearts. I ended up leaving the wrappers on and hot glued the canes together. It took me some practice to get a shape and I ended up laying the canes out how I wanted them and drew a line to go by. I did the same thing on the top only turning them the opposite way and
hot glue them together and to the bottom ones. Once you lay them out you can tell where to glue them. I just hot glued the peppermints around where I thought they looked good and I had already unwrapped them so used them that way. After I was done with it,it wasn't very stable so all I could think to do,at the time,was cut the cardboard and paint it. I used 2 pieces of cardboard and hot glued them together then painted it. I used E6000 to glue the top ones to the circle so it would be more sturdy. I decided to bling it up a little with red and white fake pearl necklaces that I cut apart and hot glued on,alternating the colors. There are several other good ideas posted by others too. Thank you. You could always use E6000 on the whole thing.
#2 is my favorite. I think a ribbon would hide your creativity, but if you must have one put a small or medium sized ribbon at the top. Please post a final picture!
Whichever design you choose--I really like your bllinged up version--this is adorable! Success for a beginning crafter, for sure. I have seen packages of artificial candy canes that might be lighter and stayed glued together better.
All three are beautiful and for a beginning crafter--FANTASTIC! Use the 1/4 or 1/8 inch red ribbon fastened with hot glue. I would NOT hang it on a door unless you put it on a door that stays open or closed most of the time. It's too fragile. See, you ARE creative!
I made one. similar to this. I used hot glue to put 9 hearts together then I put a sparkley snowflake in the center and some small round plastic flat sided red jewls at the points of a few of the harts and one in the center of the snow flake.then I turned it over and hot glued some little round magnets on the back side of 3 of the little red jewels so I could put it on the refrig. I think it is beautiful.
Here's how I finished it. i bought 2 cheap fake red and white pearl necklaces and cut them..Then glued them around the star,alternating the colors.. i never could get a hanger on it. what do you think? I'll make some more next year and change it up so a ribbon can be used for a hanger. Thanks everyone.
@Kletta That is nice too---now if you want to keep the price down and stay with the candy theme---change the beads to per say---red hots cinnamon candy and white Tic Tacks for the white---or any red and white hard candy
I love this, if you just hang on the wall I think it should be ok, as a wreath on the door I think it would break the first time someone shuts the door. It is very pretty.
Looks very nice!=== candy canes in all colors are on sale now @ Walmart, you gave me an idea I think I'll get the yellow ones, and the blue ones for wreaths that I can hang year 'round!
That is so clever! I really like the use of the peppermint candy instead of the pom poms. The cut candy cane in the center is pure genius! Thanks for sharing.
Wow that's a lot of work and very pretty! Like the second one best! I would attach a wide ribbon to the cardboard and to the canes it would be behind to hang it. I think it might give it a little more stability.
I like the first pic best. it's less cluttered. I would jazz up the red backing with glitter trim in a frosty white color to make it pop... hand the hanger from it as well.
It's a beautiful piece of work!! I would love to see it stuck in place with Command hangers or something "invisible" but a pretty red ribbon would be nice, too. I love it best without the extra pieces in the center; I'd put sparkles on the center piece. Maybe I'll try one next year!
Love the top one, the red circle underneath stands it out. I would even think about green background, drop for the underneath of it, or sparkly (pearly) white.
I like the top one. I made one of these for my friend this year for the holidays. She loved it. I should have put s red ribbon or bow on it. If I make another one, I probably will.
I used my oven to "glue" pieces together. Line a cookie or sheet pan with parchment paper and lay out your design. Place in pre-heated 350 degree oven. Leave only a few minutes for the candy to become tacky. Take out and shape. I love the peppermint bowls. Using parchment paper, lay candies touching and move out from the center to the size bowl you want. When tacky, remove from oven and drape over glass or bowl and let dry.
They are adorable. We use to use hot glue on the candy cane wreaths we make but we may have to try the E6000 glue. We found that a CD on the back of the candy canes is another good way to help stabilize the wreath. You can either spray paint them silver or what ever color the candy canes are. One with no label also works!! Happy crafting!!
I have an old brass floor lamp, it doesn't stand straight up but has a bit of a curve at the top and it has an old teeny tiny pleated lampshade and I'd sure like to... See more
We have a huge pumpkin that we want to preserve and use as a prop in a show that will be on for several nights in a month's time. Only one problem: It's a real... See more
I found this cute lamp on sale at Home Goods and love it on my new office desk. The lamp shade just seems to white and blah to me though. The lamp is not used for... See more
my garage extends well past the entrance to my house. I would like to be able to look out of my kitchen and see my driveway without going outside. peepholes are way... See more
I bought a white Christmas tree a couple years ago and when I went to remove it from the box to set it up for Christmas, it had yellow spots all over. Any hope in... See more
I want to make this room more comfortable and am fine with removing everything but TV and curtains, but keep the neutral colors (i.e. no brown, green, pink, etc.). I... See more
I have a fountain that's going in my kitchen but I don't like the way they designed it so I would love to know how I can make fake water draining from pot to pot... See more
Hello I'm entrenched in a farmhouse door project with hubs and I'm convinced faux wood wallpaper to be used instead of real wood he's a carpenter so he's obsessed... See more
How do I decorate over the cathedral ceiling? The two hangers are from before. We are trying to have a Mew Orleans look.Thought of iron gates, picture....
Would love your sweet opinions...do you think adding a speakeasy or a Door Knocker to our entry door would be too much? And if not...which one? thanks friends xo
I have this old sewing machine, and I was wondering if anyone possibly knows who the maker is. I use it as my laptop holder. It closes the laptop when the mechanism... See more
I had to hang my dining room chandelier with a hook because it had a long chain. I do not like the look of the hook in the ceiling. I want to put something... See more
I am making a photo collage for a Family Reunion we are having in June. The photos will be attached to the fabric on this room divider. I do not want to use pins... See more
Cute, cute, cute! I like the extra pieces in the center and I would place the hanger in the middle of the back where it's the most stable. You could tie a long ribbon from there to hang it.
I love it, anything holiday.. I think a ribbon or Giant Bow to make it festive but wonderful job!
super cute
Love both but maybe the top one just a little bit more! I agree with Gail and her idea of hanger position. So sweet (no pun intended) and pretty! ;-)
Thank you all. It's my second crafty thing I've done. The first one was for my 8yr old niece for school. That one turned out pretty darn good. I'm more partial to the top one. I was just a little leery about the cardboard pieces and the paint. I was thinking about trying to sell it. What do you think and what would I ask. Candy canes are cheap and I'm not worried too much about my time,I'm disabled now and at home a lot.
I liked the second one best. I don't think a bow would look right on it. Hanging it with a ribbon would be my choice.
Really nice job! They are both excellent!!!
Thank you. I hope the next one goes a lot faster than this one.LOL.. practice makes perfect,so I hear.
Not sure how it would look but you could also use the green and white peppermint rounds too. Just a thought!!
I like the second one better. Maybe add a few more starlite mints to the center also. great job!
On the center instead of mints I glued a glittery, plastic snowflake. I left the cardboard on the back white. Then put the hanging ribbon around two canes at top to hang. Hung well and this is the second year I've used it.
Both are cute, but I like the second one best.
Wonderful, how did you get them evenly spaced for a 5pt star.
@Kathy McDaniel it took me awhile to get it right. I finally ended up laying the candy canes out on a piece of cardboard and marking where I wanted them with a pen.LOl..
Made one with my grand-daughter, such a cute and easy Christmas project!
@Maria I like your's too.Next year I'll make one with these.
I love them. What a simple way to use candy canes. I'll have to try one next year. Thanks for sharing!
That is so cute and creative.
I like both
A really cool idea. I like the 2nd one best, but I would end up eating the ornament after the holidays, as well. I would figure up how much the canes and glue cost, and then figure a cost for your time. People don't value something too cheap, but of course they don't like anything too expensive, either. We're not real easy to please. LOL @Maria, yours is cool, too. I love the way the canes made hearts.
Very cute. I like the second one better too.
Really a cute project. I think they both look terrific. If you need to add a stabilizer like you did here I would consider using glittered chipboard and/or a snowflake shape rather than a circle just to keep it festive. You could use a cheap plastic snowflake ornament from any store or cut a chipboard snowflake with with any of the hundreds of dies or an electronic cutter. You may have to sandwich several layers of chipboard to make it thick enough to provide support, especially if you cut it on a Silhouette or Cricut. As for hanging I would recommend monofilament aka fishing line. A bow would overpower the design entirely and only the thinest ribbon will look right. A few of these in a big window- especially with a few small ones added- would be so adorable.
When I first saw this, the WOW factor hit me! Keep them up until Valentines!!!!
I attempted this project and the canes would NOT stick to the cardboard for some reason. Mine wasn't as pretty as yours are either. Maybe my cardboard wasn't large enough-I don't know. I put small chipboard letters on mine for "hoho". It looked pretty, but it wouldn't hold a bow either!! Happy Holidays to all.
@Colleen I ended up using E6000 on the ones I glued to the cardboard.
This is a beautiful Star you have made,I like it!
funny but, I like the first one...I'm an artist
really cool project.
I like the top photo with the cardboard showing. The extra cane pieces spoil the simplicity of this pretty design. As for hanging ideas, I would hot glue a picture hanger to the back of the cardboard if you think it's strong enough. If not, you could hot glue a string to both sides of the cardboard to create a centered ribbon.
Gosh, they are both a neat idea. But I aim more for the all candy cane look.
First one, less complicated design. Second cluttered, loses the delicate intricacy of #1. Ribbon, depends on strength of bonding. As close to center as possible. Maybe even thin wire or nylon string instead of ribbon.
Like these. Tried doing this last year using the glue gun...disaster.
I like the first one~ but I LOVE hearts so both are special~ Why won't the glue stick easily? Must be anothe type that would work better for simplicity sake! Use trilene (fish line) on the cardboard to hang! Sweet gift!
I tend to agree with @Joseph Karsok, that the first one looks better, although I like them both. Ideas from@Danee Kaplan appeal to me also, but the red anchors the center of the design and I would not change the color. If hanging is a problem due to the weight of the candy you might want to use a picture hanger type of thing, like maybe a paper clip (?) glued to the back of the center. But you may need a more stable center or heavier cardboard to make that work. I have had some projects tip forward when I tried to attach fishing line to the center back because of weight above that point. this is a very cute item. Good luck! Sorry! Had not seen @MaryStLouis comment. Sorry for duplication!
I like them both but the simplicity of the first one is striking. Great job!
I Like them both----from one crafter and artist to another---I think if you could trace the middle star shape and cut your cardboard to that shape and not the circle--and have it red or white---it would make them look much more attractive---Very creative
A hot glue gun will keep the candies together easier---If you do the star shape in a thick cardboard---you could put a tab off a soda can and hot glue it to the back--or poke wire through and move over and inch and poke back through and twist together and make it where that is the place to hang it---or you could cut two stars---and make a ribbon loop by glueing the ribbon strip on one side of the point and glue the other side on the other side of a point---make the ribbon showing or not showing---then glue the other cardboard star to the side-----or cut some stars out of wood to the shape in the middle and attach a picture hanger bar on them---hope one of these ideas will help
@Pam Potter Thank you for the idea. I'm going to try that next year.
Hard as both look great. Another idea for the backing - trivets.
Use a peppermint lollypop for the center?
I love the first one- that being said, I made one this year and had a very hard time hanging it. It finally fell off the wall and broke into a "million pieces". Good luck!
@Nancy Shaw I never could get a hanger to work on it so I just blinged it up some more.
I may try this this with clay just for an ornament.
I like the first one. could the ribbon be attached to the back of the cardboard or in between the layers of cardboard
I like the first one the best but the second is pretty nice too.
I vote for #2. The complexity of the center lends itself to actual snowflake patterns. Also, having been the recipient of unwrapped peppermint crafts, I hope you finished yours with a sealant. Spray poly, perhaps?
Please send me instructions? How do you get candy to stick together ? How would you hang this without breaking? Love them both! Awesome!
@Carole I'll try to give you some instructions. I used 10 canes on the bottom and 10 on the top. make each one into 5 hearts. I ended up leaving the wrappers on and hot glued the canes together. It took me some practice to get a shape and I ended up laying the canes out how I wanted them and drew a line to go by. I did the same thing on the top only turning them the opposite way and hot glue them together and to the bottom ones. Once you lay them out you can tell where to glue them. I just hot glued the peppermints around where I thought they looked good and I had already unwrapped them so used them that way. After I was done with it,it wasn't very stable so all I could think to do,at the time,was cut the cardboard and paint it. I used 2 pieces of cardboard and hot glued them together then painted it. I used E6000 to glue the top ones to the circle so it would be more sturdy. I decided to bling it up a little with red and white fake pearl necklaces that I cut apart and hot glued on,alternating the colors. There are several other good ideas posted by others too. Thank you. You could always use E6000 on the whole thing.
I like them both but the second one is better and I thought using something that's not candy so it can be up all year on the wall.
Saw this in a picture where people had started a tribute to the Slain New York police officers. Soooooo Sad.
Thank to everyone who likes it and commented on it.Means a lot to me since I'm not a crafty person but trying to learn. I tried and tried to put a ribbon on but it just wouldn't hold it. It's sturdy but not enough to hang. So I blinged it up a little and here is the final product. Hope you like it too. Just felt like I needed to do something with the red piece so i bought those red and white cheap string necklaces and used those.
went to Walmart yesterday and they have light weight wooden stars in the craft section and the star points are circles--perfect for this to be made on
I love it and can see several other ideas you could do. Could even try making with the small candy canes, that would be lighter. A comment about glue...I have used numerous types of glues with different craft projects and I think hot glue would be the way to go.
I think it is perfect in EVERY way---I would think a drink tab glued with the E6000 would be the best hanger---if you use a hot glue gun---the weight of the glue stick/ornament---it could pop off----also gorilla glue would be an extra expense to glue a hanger---but it is thinner than the others and it holds everything. It does not dry clear however so it would not be good to make the ornament with. It is a good purchase tho for just abt everything just like E6000. Please post your instructions----I am impressed and sometimes not so easily!!!!!!!!
@Karen Wright . I used 10 canes on the bottom and 10 on the top. make each one into 5 hearts. I ended up leaving the wrappers on and hot glued the canes together. It took me some practice to get a shape and I ended up laying the canes out how I wanted them and drew a line to go by. I did the same thing on the top only turning them the opposite way and hot glue them together and to the bottom ones. Once you lay them out you can tell where to glue them. I just hot glued the peppermints around where I thought they looked good and I had already unwrapped them so used them that way. After I was done with it,it wasn't very stable so all I could think to do,at the time,was cut the cardboard and paint it. I used 2 pieces of cardboard and hot glued them together then painted it. I used E6000 to glue the top ones to the circle so it would be more sturdy. I decided to bling it up a little with red and white fake pearl necklaces that I cut apart and hot glued on,alternating the colors. There are several other good ideas posted by others too. Thank you. You could always use E6000 on the whole thing.
love the second one I would use hot glue an wire an attach at top hide it with a small bow that matches the ribbon wrapped around the wile to hide it
#2 is my favorite. I think a ribbon would hide your creativity, but if you must have one put a small or medium sized ribbon at the top. Please post a final picture!
I thinks it's simply adorable! What a creative star you made. That would be a beautiful star for a Christmas tree or to hang on the door!
Whichever design you choose--I really like your bllinged up version--this is adorable! Success for a beginning crafter, for sure. I have seen packages of artificial candy canes that might be lighter and stayed glued together better.
All three are beautiful and for a beginning crafter--FANTASTIC! Use the 1/4 or 1/8 inch red ribbon fastened with hot glue. I would NOT hang it on a door unless you put it on a door that stays open or closed most of the time. It's too fragile. See, you ARE creative!
I love it!
Love the blinged up version too. Also you could paint the center white instead of red and glue some lace on it. Like a doily.
I really love # 1 it looks cleaner, but 2 is also cute.
Note to Florida people making this, don't use hot glue because of our 80* + weather. !Dollar Tree had the plastic ones at the beginning of this year.
Pretty cool!
I would use fake candy so you have no bugs, it would look good as a clock..
I made one. similar to this. I used hot glue to put 9 hearts together then I put a sparkley snowflake in the center and some small round plastic flat sided red jewls at the points of a few of the harts and one in the center of the snow flake.then I turned it over and hot glued some little round magnets on the back side of 3 of the little red jewels so I could put it on the refrig. I think it is beautiful.
Here's how I finished it. i bought 2 cheap fake red and white pearl necklaces and cut them..Then glued them around the star,alternating the colors.. i never could get a hanger on it. what do you think? I'll make some more next year and change it up so a ribbon can be used for a hanger. Thanks everyone.
@Kletta That is nice too---now if you want to keep the price down and stay with the candy theme---change the beads to per say---red hots cinnamon candy and white Tic Tacks for the white---or any red and white hard candy
I love this, if you just hang on the wall I think it should be ok, as a wreath on the door I think it would break the first time someone shuts the door. It is very pretty.
beautiful and creative.
so adorable!
Looks very nice!=== candy canes in all colors are on sale now @ Walmart, you gave me an idea I think I'll get the yellow ones, and the blue ones for wreaths that I can hang year 'round!
@Kletta I absolutely Love This! I'll be giving it a try using plastic candy canes! Thanks for sharing!
Love this idea. So new
That is so clever! I really like the use of the peppermint candy instead of the pom poms. The cut candy cane in the center is pure genius! Thanks for sharing.
pretty but I think breakable, but then you eat them LOL
cute idea,but too much work, to break so easy
Wow that's a lot of work and very pretty! Like the second one best! I would attach a wide ribbon to the cardboard and to the canes it would be behind to hang it. I think it might give it a little more stability.
I like both of them but the first one is my favorite.
I love the one with the beads ... they give the wreath a very finished and professional look. Thanks for the great idea!
@Susan I have looked at both pictures and I don't see any beads, just candy canes and peppermint discs.
Love the one with the beads.....try painting the red discs silver. Celestial comes to mind.
That's lovely and creative. What's the problem?
Love it!!! --- Very Creative!!!
Toooo cute!
I love both of them! You did a great job! :-)
love this idea, always love something unique
I do these every year and everyone looks forward to getting one now
Looks very nice, thanks for the helpful hints, I gathered all my supplies, and the season flew by, and NO wreath! Maybe next year. HNY to everyone!
I absolutely love this!! May I have your permission to copycat your wreath.
I like the extra candy pieces.
Extra candy pieces!!
Thank you ladies..
I love this and I am actually going to make this . So unique.
This is so unique! I prefer it without the extra pieces. Instead of using cardboard, would a plastic lid also work?
@Diane F Yes I'm sure it would. Anything to make it sturdy would probably work.
Wonderful either way - my grandchildren would me nuts for this so I think I will wait till they are a bit older to try it but it is just wonderful.
I would add a big red bow on to the center. Hot glue it to the extra candy (or a cardboard circle)
So cute.
Could glue a old CD to back for stability. Sparkle might be fun.
one might add themed scrap book paper to the CD if you don't prefer sparkle (I like the sparkle idea though)
This is beautiful! I agree that sparkle could be fun--a sugary sparkle. Love the graphic nature of this piece-- so tradional yet modern.
I liked the bottom one with the small pieces in the middle, gives it more ump!! If you know what I mean. Very nice idea
I think it is a fantastic idea and it looks great.
Love this! Without the extra pieces though, makes it to busy!
Awesome! I like the one without the extra pieces and I think the CD idea sounds great. Not a fan of seeing the red disc on behind.
Beautiful
I love both!!
107
They are adorable. We use to use hot glue on the candy cane wreaths we make but we may have to try the E6000 glue. We found that a CD on the back of the candy canes is another good way to help stabilize the wreath. You can either spray paint them silver or what ever color the candy canes are. One with no label also works!! Happy crafting!!