How do I remove a bathroom divider?
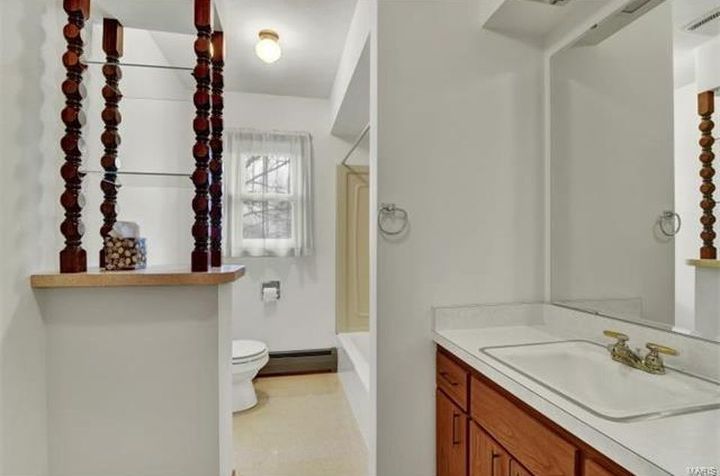
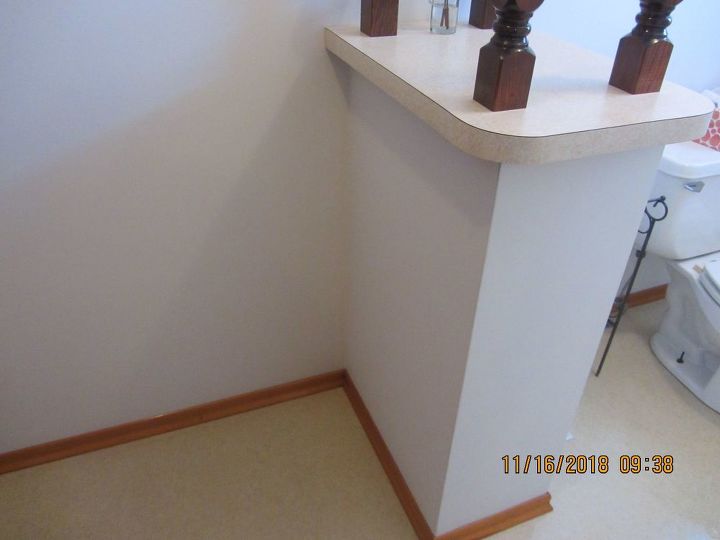
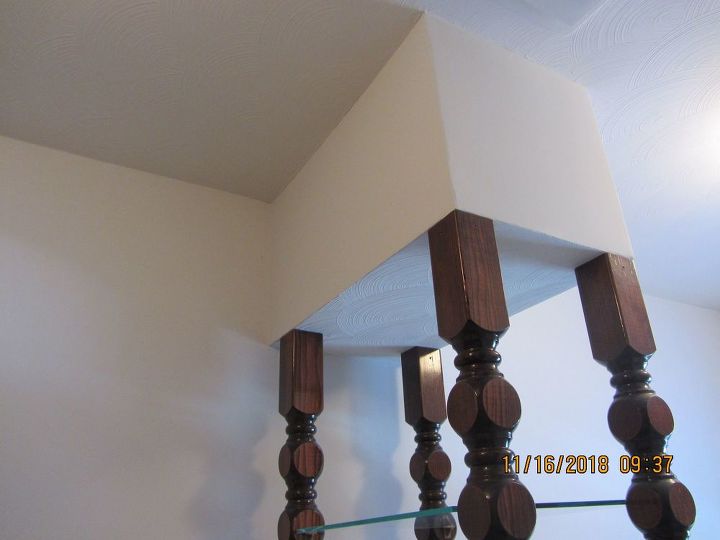
In this bathroom is a divider between the bathroom door entrance and the toilet. When the house was built, this was originally supposed to be a clothes shute to the basement laundry, however the homeowner changed his mind and left it like this. You can see it on the left in the first picture, 4 wooden spindles (they do not move or turn) from counter top to a soffit above, below the counter is just an enclosed box that has been plastered over. There are 2 glass shelves up top that are removable. We know for a fact there is nothing inside the box, no plumbing, wiring, or duct work. It is attached in some unknown manner to the plaster wall on the left. How do we begin to remove this, step by step where do we start and how to proceed in order to get this out? We need to keep the left wall as intact as possible but realize it may need some re plastering once we get the divider out, we'll cross that bridge when we get to it. Thanks in advance for any professional advice.
bottom
- top

Hi TM
First put blue tape over your tub and sink drains to protect plumbing and a tarp or sheet on your floor for easier cleanup. Remove glass shelving. Use a saw to cut spindles in half and then you should be able to pull the bottom piece over to the side and remove it. Repeat with the remaining 7 pieces trying to do as little damage to the soffit as possible. (Unless you’re removing the soffit).
Use a hammer under the lip of the countertop to pound it up. Once loosened you should be able to lift off carefully so as to not damage the wall.
Next, use your hammer to punch a hole in the front of the base so that you can see in. Start pulling the drywall off the framing and when you are comfortable that you can remove the framing with minimal damage, go for it.
You will have some wall and soffit damage to repair and you may find that your floor does not go across that area.
I hope that helps
😊
Before Step by step, what are you going to use to patch the flooring?
This is a solid three days of work for a beginner and if this is your only bathroom then, it will take longer than that, as you’ll have to do this project in increments & clean up in between.
If you’re entertaining for the holidays, I would schedule this for January.
Since ive no idea on how they actually built it and then they modified it, I will advise you based on Conventional Wood Framing Methodology.
There will aleays be Unforeseen Conditions and you’ll have to address them as you “open Pandora’s Box”, lol.
Ready? 💁♀️
1.) Tarp the floors, counter tops, remove the towels, toilet paper and anything that dust will ruin.
2.) Put a box fan in the window, exhausting the dust outside. Wear a very good dust mask when doing the demo. Wear eye protection in the event the wood splinters unexpectedly during the demo.
3.) Take a sharp utility knife and score/cut the drywall joints at the corners, and any painted trim at the base of the wall.
3.) If you’re going to use the old baseboard to patch the gap, then prying it off, must be done carefully & slowly. Use a putty knives & a part bar.
4.) Cut the spindles top & bottom with a saw.
Personally, I would go out and buy a Saws-All and demo blades, if you can’t borrow one & buy demo blades.
(now the app is refusing to let me type in my own numbers, so it’s going to force me to continue with their numbering, sorry)
The only tough part is the finished flooring patch and I can advise you on that after we know what you have.
The rest is just observing what’s there and adjusting your work accordingly.
First: Remove the floor molding around the pillar, and the shelves. Score the paint where the pillar meets the wall, floor, and ceiling so that there is as little damage as possible when the framing is ripped out. Put down tarps or blankets to catch debris, and protect floor and fixtures, if desired.
Second: Using an electric or cordless saw, cut out the center of the spindles, just above/below square portions.
Third: using that same saw, cut vertically down through the pillar box to about 5" above the floor, parallel to the wall, just in front of the spindles, not between the spindles and the wall, but the other side of the spindles. We're trying to avoid the wall for now. Then cut horizontally from the front side of the pillar about 5" off the floor untill you reach your verticle cut. Remove this section. Repeat procedure with top portion of pillar, BUT you must have a second person on a second ladder to help hold the portion that will be cut out so that it doesn't crash to the floor. Plus, having a second person with you while you rip out the remainder of the upper portion is a good idea.
Forth: Now you can see how the walls of the pillar were attached to the back wall. I can't see anything at this point, but a crowbar, hammer, and a block of wood to put between those items and the wall to prevent damage would definitely be part of it.
Fifth: wait for other posts for other suggestions that may suit you better, or will add to mine. Blessings.