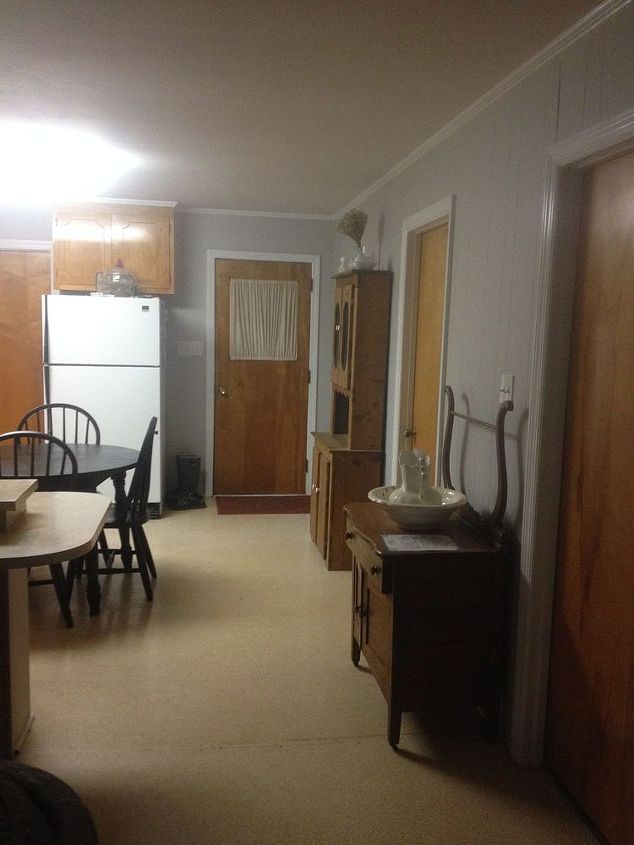
I would like to get rid of this ceiling light without having to renew

+28
How to change this ceiling light.
28 answers
-
I don't know if this will really help you but you could do this ( see photo) or paint the whole thing, replace the opaque panels and replace them with faux stained glass. Good luck!
 Teresa
on Nov 03, 2016
Teresa
on Nov 03, 2016
-
We are putting up an old wooden gate with a light made out of wine staves hanging from the middle. I hope to find old hinges & lock to finish the effect.
 Alice
on Nov 03, 2016
Alice
on Nov 03, 2016
-
Take it all down if you are replacing the light. Then get a piece of MDF or bead board to fit the space and trim with a nice molding. You can do a hexagon, rectangle etc. Then you can hand any type of fixture you want to.
 Dee
on Nov 03, 2016
Dee
on Nov 03, 2016
-
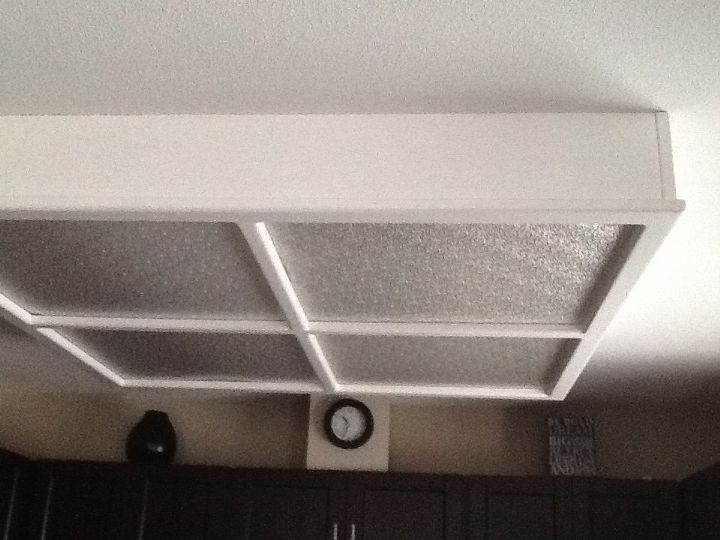
Start by taking off the plastic panels to see how it's constructed (and how it can be removed. And how many flourescents are in it and how they are wired. Decide if you still want flourescents. They do have them that are dimmable.
 Jcraw
on Nov 03, 2016
Jcraw
on Nov 03, 2016
-
All sorts of creative options (painting or silvering the box then hanging multiple pendants inside it, or making a "glass bead" mesh for it. You can also cut interesting openings in the sides of the box to update and increase the light. Google square ceiling fixture". There are all sorts of ideas to adapt from very expensive lighting modern lighting stores. Most importantly find out if and how taking it down is going to impact your ceiling and if you need an electrician.
Jcraw
on Nov 03, 2016
-
Take it apart to take down. Remove the glass panels to get a look at how it's connected to the ceiling. I expect it may be a box light that is screwed or nailed to the ceiling joists. There will still be some repairs that depend on how it's attached. Screw holes can be filled with putty/sheet rock mud. Nails will have to be loosened to pull out and may have to have head of nail sawed off or drilled out. If you can get rid of the heads you can drive the rest back into the beams after you remove the box. If you have to use a pry bar on it, put a piece of wood under it where bar touches the ceiling and push upward. It helps spread the pressure instead of gouging one place. Once down if you plan some other light fixture you can use the wires that are already there(unless they show signs of being very worn). If you don't replace the fixture use a wire nut to connect the two wires together and push back up into ceiling. REMINDER! CUT POWER BEFORE WORKING ON THIS!
 Deanna Nassar
on Nov 03, 2016
Deanna Nassar
on Nov 03, 2016
-
I'd definitely take the plastic panels out and look at it. My guess is that it's surface mounted and with a little drywall patch your ceiling will be fine. It looks like a florescent fixture that was surrounded by some wood. I would try to work with what's there, maybe more of a project than replacing it would be.
 Linda Santo
on Nov 03, 2016
Linda Santo
on Nov 03, 2016
-
What are wine staves?
 Janice Murray
on Nov 03, 2016
Janice Murray
on Nov 03, 2016
-
If you like a farmhouse look, you could do this: remove the plastic/glass lens covers. Tape off carefully so you don't get paint on your ceiling. Home Depot sells kits by Rustoleum called either Cabinet or Furniture Transformations. It will work great to make this look like barn wood even though it is metal! For the lens covers, I would take them to a home center and get new ones cut of plain plexiglass the same size. When you get them home, measure to see how much of their edges sit "inside" the rails...probably about 1/4" all around. Cut squares/rectangles of chicken wire and attach with clear adhesive, then put the new chicken wire lens covers in place. Voila! A farmhouse style, unique light fixture without even having to take it down!
 Lori Verni-Fogarsi
on Nov 04, 2016
Lori Verni-Fogarsi
on Nov 04, 2016
-
We had the same look in our 1970's house! We took out the paneling and the wooden box, used baseboard where the paneling was, flush to the ceiling, then put in track lighting, pointing the lights to our advantage. It was fabulous!
 Mce7843633
on Nov 04, 2016
Mce7843633
on Nov 04, 2016
-
I'd replace the frosted panels with etched glass style ones ...but in all honesty I can see the idea in my head completed but I wouldn't know where to purchase them ...I d have to google it or ask at my local hardware store ....but the effect would be very pretty I think : ) ..Good luck : )
 Kim Salmi
on Nov 04, 2016
Kim Salmi
on Nov 04, 2016
-
We removed the bulkhead over our island range that contained can lights. We then covered the area ( about 4' x 6') with faux tin ceiling panels ( plastic, cut w/scissors, washable-easy!) and "picture-framed" it to match the woodwork. I hung a stainless steel pot rack with 2 down lights from old existing electrical connectors. Looks likes it's always been there & works well with our stainless appliances.
 Mary Hefleng
on Nov 04, 2016
Mary Hefleng
on Nov 04, 2016
-
Take it down, patch the holes and paint
 Jpy11082745
on Nov 04, 2016
Jpy11082745
on Nov 04, 2016
-
Get rid of it, patch holes and paint then install pot lights or just a modern plain chandelier
 Moni Batthish
on Nov 04, 2016
Moni Batthish
on Nov 04, 2016
-
We removed the plexiglass and cross piece. There were 4 light fixtures contained within - we bought simple , but pretty light fixtures to replace them. We painted the inside of the wood to match our kitchen and added molding.
 MEs6781002
on Nov 04, 2016
MEs6781002
on Nov 04, 2016
-
Start by taking out the plexiglass in order to see what you have. If you can and want a regular fixture, you're well on your way. Just remove all the wood, patch and install what you want.
 Dixie
on Nov 04, 2016
Dixie
on Nov 04, 2016
-
Change the plexi on it. They have a bunch of different patterns.
 Lucy Marie Bernier
on Nov 04, 2016
Lucy Marie Bernier
on Nov 04, 2016
-
I don't know the electrical codes for Canada but I'm sure they are similar to the US codes. You CAN NOT cover an outlet, box or switch from access if there is power in the wire inside that item. So, you either have to use the location for another light, leave it exposed with a removable cover, or disconnect the wire at the power source and mark it "Un-powered and Abandoned in Place" before you permanently cover it with drywall or such. If you do abandon the wire, tie the ends together with a wire nut. That way, if someone comes along and tries to hook up the power, it would just trip the breaker immediately. Remember, if you do the wrong thing and there is ever a fire, your insurance company can refuse to cover any damages if it's not done to code. IMHO Phil7782
 Phil a
on Nov 04, 2016
Phil a
on Nov 04, 2016
-
Remove the plastic, weave a beautiful fabric through the cross pieces and let it sag. Paint it black
 Vlm13179061
on Nov 04, 2016
Vlm13179061
on Nov 04, 2016
-
sorry for the typo that is supposed to say you can hang any type of fixture you want to.
Dee
on Nov 04, 2016
-
I would just bit the bullet and replace it. I can't see how anything you do would make it any less obnoxious. Pick a new fixture and call around and get quotes from electricians. You may be surprised that it won't cost as much as you think.
 Marilyn
on Nov 04, 2016
Marilyn
on Nov 04, 2016
-
Why don't you put a projector in there and stream all your movies on the wall and that way you will have a theatre room without the big screen tv.
 Robby Adams
on Nov 05, 2016
Robby Adams
on Nov 05, 2016
-
Once you remove the plastic panels you should be able to see how the woodenbox frame is fastened to the ceiling. With some extra hands you should be a able to remove the box frame. There usually is a flourecent light fixture inside. Hopefully the installer used an electrical box in the ceiling to connect the fixture, which if the box is.fastened securely it can be used for a different light fixture. Be sure that the weight capacity of the new fixture does not exceed the electrical Box limit. Sheetrock texture may also come into play here.http://www.hometalk.com/b/1252283/doors-galoreeed the
 Galen W. Yoder
on Nov 05, 2016
Galen W. Yoder
on Nov 05, 2016
-
Galen nailed it, get rid of it but replace it with a surface mount LED flat panel fixture. It's clearly in your kitchen, once removed it may be easier to just apply new texture by skim coat and repaint the ceiling depending on the ceiling damage. I used several Costco panels lights to replace bendable track lights which offered little lighting, just looked nice. Had to add a second ceiling box so I could have two in my kitchen. Here's a link to some panels, they're available from Amazon and many others. Low profile, bright, get dimmable LED's so you can lower your kitchen lighting as needed. https://www.amazon.com/LEDwholesalers-40-Watt...
 Robert V
on Nov 05, 2016
Robert V
on Nov 05, 2016
-
Remove panels, remove screws holding up the box, turn off power remove flourescent fixtures, install new fixtures. You may have to to a wee bit of ceiling repair, sanding. Paint ceiling. Very easy. Even I can change a light fixture so anyone can, just match the wire colours.
 Cwh6899259
on Nov 05, 2016
Cwh6899259
on Nov 05, 2016
-
You could disguise it with some artificial grape vine and grapes hanging from it? I saw this done years ago and it looked so nice. Embedded in my brain all these years :0)
 Mary Hill
on Nov 06, 2016
Mary Hill
on Nov 06, 2016
-
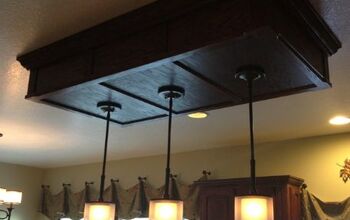
Take out the light guts and install a hanging lights. Could leave the outer box and hang pots or trim with molding and paint for a nice trimming.
 NancyMaria
on Nov 06, 2016
NancyMaria
on Nov 06, 2016
-
ES MUY SIMPLE PINTA UN VITRAL DE ACUERDO AL ESPÁCIO EN Q´SE HUBICA Y PREFERENTEMENTE Q´EL DISEÑO SÉA PARTE DE TI!/DESDE EL MUNDO ANDES
 Cob12059785
on Nov 17, 2016
Cob12059785
on Nov 17, 2016
Sign Up to Answer