


Dollar Store DIY Modern Planter
Would you believe that dollar store bowls and necklaces can be transformed into adorable modern planters for indoor or outdoor use?
You'll love making AND displaying these!

Supplies I Used For This Project
Please note that this post contains affiliate links! If you'd like to read my disclosure policy on what that means, you can click that link to view. But in short, I earn a small commission at no added cost to you if you purchase through these links. Thank you!
- RapidFuse Fast Curing Gel Glue
- Plastic serving bowls in a variety of sizes. For each planter you will need two plastic bowls: one larger than the other. I used a large plastic bowl, these medium plastic bowls, and this fluted serving bowl.
- Masking tape
- Electric drill
- Plastic beaded necklaces
- Gloves
- Spray paint (I used a base color spray paint, stone finish spray paint, and matte finish spray sealer)
- Multi-surface acrylic craft paint in gray
- Artist paint brush
How to Make Dollar Store Planters
Ready to begin? Here we go!
Step One: Drill Drainage Holes in the Plastic Bowls
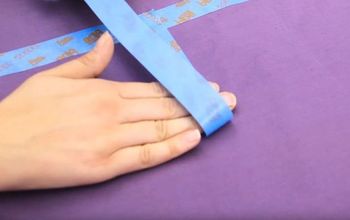
To help drill through plastic without cracking it, put a piece of masking tape on the spot where you want to drill, and then put another piece on the opposite side.

Slowly drill through the tape with a small drill bit.

Repeat this drilling process on the other bowl that you’re using for the planter, and make sure to drill in the same spot(s) as the first planter so that the holes line up and water can flow through from the top bowl to the bottom bowl.
Step Two: Glue the Bowls Together
To create the pedestal planter look, glue the bottoms of the bowls together. For this step, it’s extremely important to use the right adhesive. Otherwise your planters will look messy or quickly fall apart.

Run a thin band of clear plastic glue around the base of one bowl. Carefully press the bottom of the other bowl on top, making sure to line up the drainage holes you drilled in step one.

Gently apply pressure to the top bowl, pressing it onto the bottom bowl, and hold it in place for a few moments.
Step Three: Add Detailing
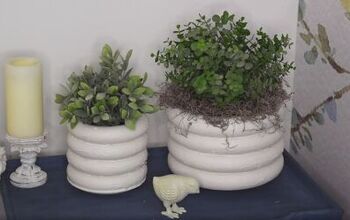
To up the style quotient on your DIY planter, consider adding some decorative detailing. I glued plastic bead necklaces around the middle of one planter, and around the top of the other.

Step Four: Paint the Planters
Once the adhesive has dried on the decorative details, it’s time to add the finishing touch to the DIY modern planter – the color.
First, I sprayed the planters with two coats of spray paint formulated for use on plastic, and also for use indoors or outside.
After that layer of spray paint dried, I top coated the planters with a stone texture spray paint.

To really make the fluted detailing and the beaded elements pop, I brushed on a light coat of soft gray multi-surface acrylic craft paint. I was careful to touch just those raised areas in order to accentuate them a bit.
After that paint dried, I sealed the planters with spray sealer in a matte finish. This is important to make sure that the planters’ finish will hold up if used outdoors.
Dollar Store DIY Planters: The Finished Product
After filling them with potting soil and a beautiful sedum sod mix, these planters are ready to be the star of my patio!

Can you believe they were made with serving bowls from the dollar store?
If you loved this project, please subscribe to my blog and follow me on Instagram or Facebook!

Comments
Join the conversation
-
Very clever. Will definitely try this!



















Frequently asked questions
Have a question about this project?