DIY Lantern With Bamboo Skewers

I’ve wanted to make a bamboo lantern for a while. Ever since the sun made its first tentative appearance a few months back. It took me some time to come up with a DIY lantern that anyone could recreate at home without having to visit Japan to learn how to split bamboo.
So no fancy materials. Just… Bamboo skewers! Grab a bunch of natural raffia and you’re half of the way there. This makes for a pretty cheap lantern since I must have used less than $10 worth of material. The CANDLE was actually more expensive…!
Find the detailed step-by-step here!
Hometalk Recommends!
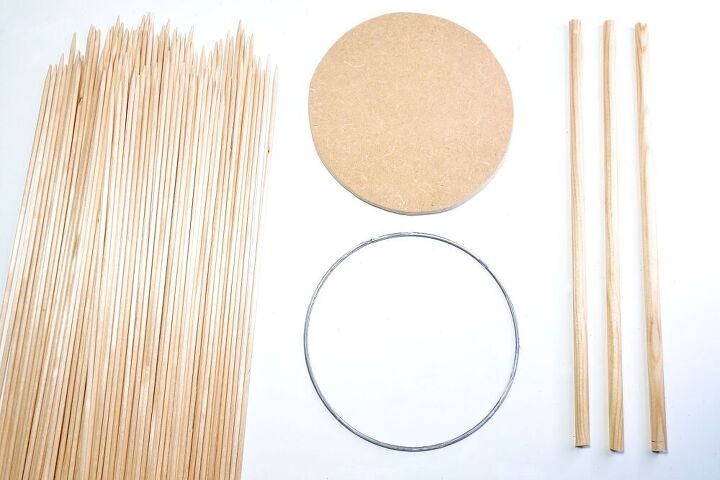
Before you start, cut a wooden disk the same diameter as your metal hoop. Mine are around 6″, but you can use this tutorial to create a DIY lantern of whatever size you wish!
To create the structure for the DIY Lantern, cut the dowel rod into 3 pieces that are 1″ (2.5cm) shorter than the bamboo skewers. Next, nail the dowels to the side of the wooden board, making sure that they’re spread apart evenly around the edge of the board.
Then, glue the metal ring so that it rests on top of the dowel rods.
Before you glue the skewers, create some marks around the edge of the wooden board to make sure the skewers are spaced evenly.
Next, glue the skewers around the lantern structure.
To hide the metal ring, insert a strand of raffia under the hoop between the 2 skewers. The weaving pattern is very simple: cross the raffia over a skewer then bring it down to cross it under the metal hoop. Repeat this pattern around the hoop then tie raffia and apply some glue to secure it in place.
To hide the edge of the wooden board, take a strand of raffia and wrap it around one end of the bamboo skewer. Move onto the next skewer and wrap the raffia around the opposite end. Continue this zig-zag pattern until you have gone around the whole lantern. Then, take a new piece of raffia and repeat this weaving pattern by wrapping it on the opposite side.
To strengthen your DIY lantern, weave through the bamboo skewers. I chose a simple braiding pattern but anything goes, so if you want to try out fancy weaving patterns, go for it!
To finish the DIY lantern, glue some feet under the wooden board (I used some large wooden beads because I’m a bit obsessed with ball feet!)
Next, create a handle. Use any material you want: rattan, like I did, a thick raffia braid or even some jute rope.
Cut a 10 to 12″ length (25 to 30cm) and glue the end onto the top of the DIY lantern and wrap the tail of raffia around both the skewers and the handle to secure the handle.
Finally, if you want, brush some wood stain over the whole lantern.
And voila, place a large glass into the lantern and insert a pillar candle. This lantern is right on time for balmy summer nights on the terrace!
Find me on Pinterest for more easy DIY ideas!
Enjoyed the project?
Resources for this project:
See all materials
Comments
Join the conversation
-
 Julie Brodie
on Aug 30, 2022
Beautiful!
-
-
 Miss Daisy
on May 11, 2023
Beautiful
-













Frequently asked questions
Have a question about this project?
Cute craft idea. I don't see anything in the glass jar you put inside the cage. Is this literally functioning for uses or just for decoration?
With the bottom braided and the middle too how do you get the raffia from the inside to the outside easily? My fingers are not that thin to go through the uprights plus I would be worried to knock them off!
How did you go from skewers with pointed tips to blunt? If hand broken, how did you avoid splintering? If sawed, what did you use?
Thanks