Asked on Jun 12, 2014
I have about 20 old metal loaf pans, looking for ideas?

by
Susan Bowles
+65
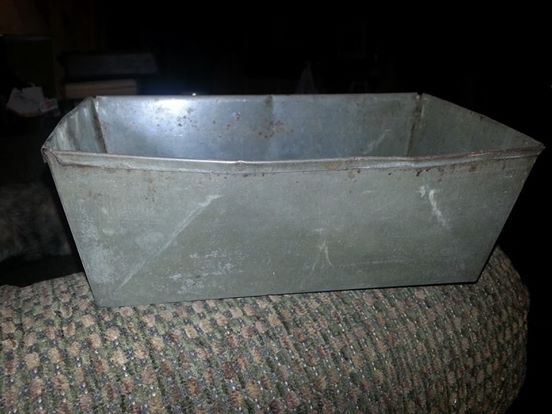
I have about 20 old metal loaf pans and I am looking for some ideas. I did paint some for Christmas. I had thought about lights...Husband wants me to get rid of them. Any ideas?
56 answers
-
They would make great pots. Decorated/painted of course.
 MARY ANN
on Jun 12, 2014
MARY ANN
on Jun 12, 2014
-
Found on Pinterest while typing in upcycled loaf pans. I would probably mount several to a board and use in the garage for parts or tools. Or maybe somehow in the kitchen pantry. One could be for say, gravy packets and sauce mixes.
 Christa Francis
on Jun 12, 2014
Christa Francis
on Jun 12, 2014
-
This is really cute too. From mamie janes blog spot.
Christa Francis
on Jun 12, 2014
-
Oooo or save them for later in the summer and make lots of zucchini bread, lol.
Christa Francis
on Jun 12, 2014
-
Attach them to the side of the house or a large board by the house and stagger them in rows and plant flowers in them....drill holes in the bottoms for drainage and decorate the pans. Bet it would be pretty!!
 Chris Moore
on Jun 12, 2014
Chris Moore
on Jun 12, 2014
-
Planters!! Drill holes in them, grow lettuce, flowers etc!! Oh the possibilities!!! Or you can send some my way!! Lol
 Robin Miller Cresci
on Jun 12, 2014
Robin Miller Cresci
on Jun 12, 2014
- See 1 previous
-
Fairy garden?
 Vicky K
on Jun 12, 2014
Vicky K
on Jun 12, 2014
-
My first thought was to use them for storage in a pantry. You might want to put felt pads on the bottom so they won't scrape your shelves.
 Z
on Jun 12, 2014
Z
on Jun 12, 2014
-
Stack them up and don't get in a hurry because the minute you toss them...ideas with what you should have done will haunt you! You can screw these onto pallets and lean them against a tree, a fence and have a nice garden; or attach 2 pallets together at the top in tepee fashion and make gardens for squash, tomatoes, etc.
 Jeanette S
on Jun 12, 2014
Jeanette S
on Jun 12, 2014
-
If you don't want to keep them but do want to use them, how about decorating them and filling them with things for gifts for people at Christmas or Birthdays? For gardeners, you could put some sphagnam moss in the bottom and put some packets of seeds and some of that gardeners hand cream and a pair of cotton gardening gloves. For foodies, some small pots of jams, tea bags, coffee beans or spices or whatever. For anyone who loves their scented toiletries, some fancy soaps, face flannel, body cream etc. For teenage girls, some manicure stuff like emery boards, nail polish remover and nail polish in different colour and some coloured cotton wool balls - you get the idea. That way you are spreading the love with your bread tins and getting them out of the house and giving someone else the opportunity to decide what to do with one! Who knows - they might even use them to bake bread!
 Carole
on Jun 12, 2014
Carole
on Jun 12, 2014
-
Make a rain chain, will be a bit larger but oh well, in up cycle everything is colored out of the lines.
 Anna Ibarra
on Jun 12, 2014
Anna Ibarra
on Jun 12, 2014
-
Got it...thank you all for your help...I found some old weathered wood and I am going to make planters. I will post a photo when I am done. Thank you again..
 Susan Bowles
on Jun 12, 2014
Susan Bowles
on Jun 12, 2014
-
If you have a good size garden take and turn them upside down and make a cho-cho train out of them with wooden wheels and pea gravel for the tracks
 Bab337567
on Jun 12, 2014
Bab337567
on Jun 12, 2014
-
You can drill holes in a pattern and put candles inside. It will keep the wax out of harms way and the light will reflex through the pin holes.
 Patty Morgan
on Jun 13, 2014
Patty Morgan
on Jun 13, 2014
-
These are all great ideas. But I especially like Carole's list of possibilities.
 Liliana Wells
on Jun 13, 2014
Liliana Wells
on Jun 13, 2014
-
Drill the bottoms to a wall, then cover the bottom with pretty paper And then display things in them. Use can even stick a battery operated puck light from the dollar store in to light the item on display
 Jackie
on Jun 13, 2014
Jackie
on Jun 13, 2014
-
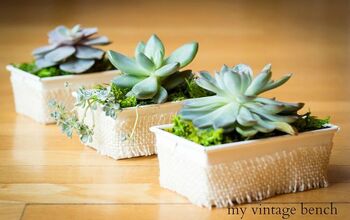
I had some and painted them with chalk paint, added burlap and planted with succulents. They don't need much space for roots! I had to paint because they were going in a more modern kitchen. You could also leave them unpainted.
 My Vintage Bench
on Jun 13, 2014
My Vintage Bench
on Jun 13, 2014
-
Put in a bookcase for storage. Hang ID tags off end or chalkboard paint on end.
 Donna coronado
on Jun 13, 2014
Donna coronado
on Jun 13, 2014
-
Planters!
 JoAnn Ziifle
on Jun 13, 2014
JoAnn Ziifle
on Jun 13, 2014
-
Make a wreath!
 Nicole Mahoney
on Jun 13, 2014
Nicole Mahoney
on Jun 13, 2014
-
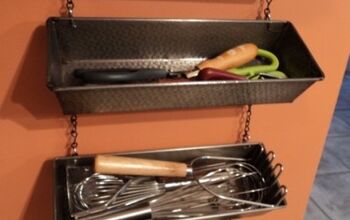
If you have a craft area you could paint them with chalkboard paint in a color to compliment your room and hang them on the wall, an old door, or end of bookcase for organizing supplies. Then write on them so you can see what is in them. I can imagine yarn color coordinated in them, books leaning up organized by subject, sewing patterns, paint, clay, art supplies with jars in them holding brushes, scissors, or just collections of things. If used in a playroom you could paint with primary colors and attach to chalkboard and label on the chalkboard. They could organize crayons, chalk, small toys, play dough, etc. in a kitchen pantry to organize pasta, rices, packaged items, napkins etc. my mind won't shut off so I will stop with these ideas. Have fun with them. My husband would have grabbed them for the garage to organize all my project stuff. www.lifeatthecottage
 Mary
on Jun 13, 2014
Mary
on Jun 13, 2014
-
Those pans are the perfect size for herbs. I love the idea of chalk paint and writing the name of the herb on them. I would attach them to boards, drill holes in the bottom and attach them to my back porch railing.
 Lydia Whitehead Torres
on Jun 13, 2014
Lydia Whitehead Torres
on Jun 13, 2014
-
My first thought was little planters for herbs...but I love Carole's idea of using them to hold gifts.
 Cate Murphy
on Jun 13, 2014
Cate Murphy
on Jun 13, 2014
-
would be great painted or unpainted, gift baskets, organizing makeup in the bathroom, sorting and organizing craft supplies on a shelf or table or vanity, planters, in the workshop for organizing pieces and parts, etc..... The point is, they're stackable so they don't take up much space and there are endless possibilities for their uses and soooo handy to have around as you need them or feel the inspiration to use them. Don't just throw them out!
 Cathy C
on Jun 13, 2014
Cathy C
on Jun 13, 2014
-
Screw them to a wall for organization.
 Tris Smith
on Jun 13, 2014
Tris Smith
on Jun 13, 2014
-
You could screw them on the ceiling in a pattern with some lighting
Tris Smith
on Jun 13, 2014
-
Everyone had very good ideas..if you have a fence attach them to it staggered for planters or to a ladder. Please post again with your decision.
 Dee
on Jun 13, 2014
Dee
on Jun 13, 2014
-
These are great planter boxes - if you really want to blow your friends minds, use them to plant up some carnivorous plants - drill two holes in each side (near the top of the pan) and use carnivorous plant mix (sold at any nursery) and plant them up - the dirt must remain moist at all times so use a smaller clay pot with some window screening material to cover the bottom hole and place inside the planter - keep that pot filled with water at all times and you will have an interesting planter - (and no house flies for that matter either) good luck and have fun!
 Jim Lambert
on Jun 13, 2014
Jim Lambert
on Jun 13, 2014
-
Paint each a color of the rainbow then line them up and attach them to a board. What for, you ask? Find a spot in your craft/sewing room to use at a 'catcher' for your fabric scraps. Each color has it's own pan or you could double up with red/orange, yellow/green .....etc having their own pan. When the pan is full, put the scraps in a baggie and start saving again. I save some ridiculously small scraps as I like to make mini scrap quilts. Just an idea!.
 DottieK,
on Jun 13, 2014
DottieK,
on Jun 13, 2014
-
Decoupoge them
 Cathy
on Jun 13, 2014
Cathy
on Jun 13, 2014
-
Pass them along to a young wife, along with your bread recipe. My mom was going to toss her old bread making pan, looks like a washtub. I took it because I remember her making bread with it. It is beat up but still makes darn good bread!
 Shari Veater
on Jun 13, 2014
Shari Veater
on Jun 13, 2014
-
Drill holes the size of mini Christmas lights. Use for lighting outdoors. Could be hung from porch, pergola, tree, or other location to fit your need.
 Denise Jones
on Jun 13, 2014
Denise Jones
on Jun 13, 2014
-
If you have old candle holders of different sizes..glue or epoxy the candle holders to the loaf pan..making a three tired stand. Use for so many things in any room of the house.
 Terra Gazelle
on Jun 13, 2014
Terra Gazelle
on Jun 13, 2014
-
A fountain, several layers with some bamboo between. It would be spectacular!
 Kelley M
on Jun 13, 2014
Kelley M
on Jun 13, 2014
-
Fill them will water. Freeze it. Tape a pic on the outside after it is frozen then take a nail and outline the pic. Take a hammer nd tap the nail round the pic to make little holes. When done let it thaw put candles in it and then you have illuminaries. We made these for Christmas out of metal pails in Girl Scouts. The moms loved them.
 Lois
on Jun 13, 2014
Lois
on Jun 13, 2014
-
I would glue several together and hang them for small shelves.
 Terri Mayfield
on Jun 13, 2014
Terri Mayfield
on Jun 13, 2014
-
Also, use them with magnetics to put up favorite photos or pictures. (unframed)
Terri Mayfield
on Jun 13, 2014
-
I know you said you were going to use them as planters, but in case you don't use them all and want to use a few for some extra storage http://www.brit.co/clip-on-organizers/
 Becky Wood
on Jun 13, 2014
Becky Wood
on Jun 13, 2014
-
A water feature in your backyard. Buy a small water pump, link the pans together with short chains, and have the water pour from one down to the next, etc.
 Dorth
on Jun 13, 2014
Dorth
on Jun 13, 2014
- See 2 previous
-
Pass them on to me! My husband was a baker I am sure they will come in handy :)
 Sharon Lemke
on Jun 13, 2014
Sharon Lemke
on Jun 13, 2014
-
Paint them different color and start a herb garden.
 Rozanne M
on Jun 14, 2014
Rozanne M
on Jun 14, 2014
-
I like the idea of painting them and using them as planters, but I like the idea of painting them with Krylon and using them as lamp/light shades too - instead of putting the "hole" for the light fixture from the bottom, put it on a short side and use an Edison bulb, or one of the long narrow ones (although you might want to 'punch' a couple small holes in the bottom for heat escape since those bulbs tend to get pretty hot!
 Robin H
on Jun 15, 2014
Robin H
on Jun 15, 2014
-
I'll take 7 if you feel like selling them :)
 Amy Ogden-Paparone
on Jun 15, 2014
Amy Ogden-Paparone
on Jun 15, 2014
-
How about painting a "label" on end or side with blackboard paint and use in pantry or craft area?
 Sheila D
on Jun 15, 2014
Sheila D
on Jun 15, 2014
-
Nail several to an old door and use as vertical storage, would be great in a craft room, work shop or garage. Anywhere there are lots of bits an pieces to keep track of.
 Kate Chatterton
on Jun 15, 2014
Kate Chatterton
on Jun 15, 2014
-
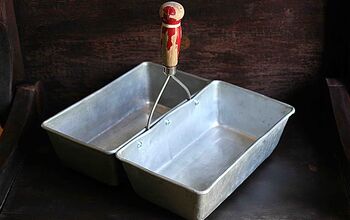
Glue a tall candlestick (either wooden, wooden and painted, or glass) in the middle of one, place another one on top of that one and glue it down. Add another tall candlestick and top it with a third pan. Voila! Great for storing little items in a bathroom, bedroom, kitchen, or any other room in the house. I personally wouldn't paint them, but if you want it to fit a color scheme then definitely paint them to fit. I'm currently scouring my local flea markets, yard sales, and thrift stores for pans like that.
 Trudy Hibler
on Jun 16, 2014
Trudy Hibler
on Jun 16, 2014
-
You can glue beads on the outside of the pan,and if you can use the ones that have color but are clear. Then you can use the pan as a flower pot and plant the flowers in it. Finally you can put it on a windowsill. The beads will reflect the light and the flowers will grow
 Lanie
on Jun 16, 2014
Lanie
on Jun 16, 2014
-
succulent gardens
 Brenda R
on Jun 17, 2014
Brenda R
on Jun 17, 2014
-
How about using them as planters for herbs and flowers on a painted pallet as a wall garden.
 Francine C
on Jun 18, 2014
Francine C
on Jun 18, 2014
-
Find some awesome spray paint colors from Rustoleum and make them into planters... Use nails to hammer holes or drill holes for drainage...
 Tim D. (The Retro Den)
on Jun 18, 2014
Tim D. (The Retro Den)
on Jun 18, 2014
-
I would use them for storage, or paint them and use them for making baskets, I would love to get something like this with say a bunch of those small kitchen utensils, potato peeler etc.
 Gina Gardner
on Jun 19, 2014
Gina Gardner
on Jun 19, 2014
-
If you can paint, paint a few Patriotic ones, (flag, stars, etc), put red, white, and blue colored rice in them, add white tea lights, set on deck or patio for July 4th.... Supplies for 4th of July Colored Rice:white uncooked ricerubbing alcoholfood coloring, red and bluepaper towels and a trayclear vase 1. Divide your rice into 3 equal parts. Place 2 of the parts into 2 baggies, one for red and one for blue. The third part you’ll leave plain white. 2. Add your food coloring to each bag. Depending on your food coloring, you might need to add more than you think. I used 8-10 drops for each color. I also added 1 teaspoon of rubbing alcohol to each bag. This helps with the drying process of the rice, so it doesn’t get wet and gooey. You can make this without the alcohol, you will just need to act fast and help it dry quicker, maybe out in the sun. 3. Seal up the baggies and start to mix it around with your hands. Make sure it gets spread out evenly over each piece of rice. 4. Set out some paper towels on a tray. Open each bag and spread it out on the tray to dry. Avoid them touching, it’s not fun if they mix. It shouldn’t take too long, and you can use a spoon to help fluff them and speed up the drying process.
 Angie W
on Jun 26, 2014
Angie W
on Jun 26, 2014
-
Supplies for 4th of July Colored Rice:white uncooked rice, rubbing alcohol, food coloring, red and blue, paper towels and a tray... 1. Divide your rice into 3 equal parts. Place 2 of the parts into 2 baggies, one for red and one for blue. The third part you’ll leave plain white. 2. Add your food coloring to each bag. Depending on your food coloring, you might need to add more than you think. I used 8-10 drops for each color. I also added 1 teaspoon of rubbing alcohol to each bag. This helps with the drying process of the rice, so it doesn’t get wet and gooey. You can make this without the alcohol, you will just need to act fast and help it dry quicker, maybe out in the sun. 3. Seal up the baggies and start to mix it around with your hands. Make sure it gets spread out evenly over each piece of rice. 4. Set out some paper towels on a tray. Open each bag and spread it out on the tray to dry. Avoid them touching, it’s not fun if they mix. It shouldn’t take too long, and you can use a spoon to help fluff them and speed up the drying process.
Angie W
on Jun 26, 2014
-
Very cute for plants or herb garden....On the outside paint the name of the herb........
Angie W
on Jun 26, 2014
-
Gina, making baskets from them would be so cute..... For my sisters daughters shower, we bought these, added a pair of garden gloves, a trowel, a pack of seeds and wrapped it, added a bow...That was one of the baby shower gifts for the games... Another was one of these metal trays, with body pouf, a set of Bath and Body Works body wash, cream, spray.....Wrapped it with cellophane and gave it a beautiful bow.... Very nice gifts for Thinking of you gifts, Secret sister gifts, etc......
Angie W
on Jun 26, 2014
-
paint three of them red white and blue and nail them to the side of a big tree and put plants in them like geraniums.
 Teresa Grant
on Jul 02, 2014
Teresa Grant
on Jul 02, 2014
Sign Up to Answer