Asked on Sep 11, 2014

Any thoughts on repairing this lampshade?

Jan
by Jan
Our square lampshade had a bad day a while back. Can't find a new one that matches this one and I have really gotten used to the square shade. If this had 'ribs' in it, I could figure out how to fix it, but it is just a broken plastic shell. Any thought of how I might repair this?
  13 answers
  • Carole Carole on Sep 11, 2014
    Remove the plastic and use fabric stretched and attached to the wire frame instead?
  • Jan Jan on Sep 12, 2014
    Well, that was my thought, too ---- but if you take out the plastic nothing is there to hold up the fabric of the shade....there is wire in the top and bottom ... if it had the ribs that used to be in cloth shades, I could figure something out (I THINK!) LoL .... Thanks Carole ....
  • Lee Cunningham Green Lee Cunningham Green on Sep 12, 2014
    I have been struggling with one of those myself. the plastic on mine is a gonner, trying to create a new shade now. Good luck
  • Valerie Valerie on Sep 12, 2014
    Would it not be possible to tape it together on the in side? I would lay it on a flat surface, and then carefully try some transparent tape. If you can get your hands on some orange duck tape, that might also work.
    • Jessica Kimbrell Jessica Kimbrell on Feb 25, 2017

      Tape won't work because you can see the shadow or whatever it is called

      when the lamp is on if you use anything that isn't clear. And if there any holes the clear tape doesn't help because you can still see the holes when the light is on.

  • CK CK on Sep 12, 2014
    I've done this with a round shade with no ribs too. It wasn't super easy but it wasn't super hard either. The trick to making it work is something I learned from our son when he was in the Marine Corps. The secret is liquid spray starch :-) Below is a detailed method I used to make a new lamp shade. However since your fabric is OK but the plastic liner is damaged, you might be able to just spray the existing fabric. When it's dry and stiff, then you could break away the plastic. Since it's broken anyway, it's worth a shot. Or see how to make a new one below. Here's what ya do: (You'll probably want to do this for your other shade too so you have matching shades.)1. Take measurements of the existing shade. It's going to be your 'pattern' and you'll know how much fabric you'll need. Make sure you allow for about a 1/2 inch of 'seam' or overlap at both the top and bottom and each "panel" for the sides.2. Remove the damaged shade in a way that'll allow you to cut pieces the size of the sides of the shade. You'll end up with just the two metal squares from the frame.3. Now using string, tie the top and bottom frames together the size you need. They're not going to stay in place at this point but it'll help along the way in the next steps.4a. Attach two of the pieces together by sewing or using fabric glue. Attach it the frame. Here's where an extra set of hands will be most helpful holding up the frame.4b. Wrap the fabric over the frame at both top and bottom. 5. Repeat step 4a and 4b with the other two pieces. Using hot glue or fabric glue, make sure you seal up the sides where the two sewn pieces meet. Don't worry if it's not perfect. We'll fix that later :-)6. By now you should have a reasonable facsimile of the finished lamp shade ;-) But of course it's still flexible. SO you use a 50/50 mixture of liquid spray starch/water to wet it all down. Allow to completely dry.7. When it's completely dry it's going to be stiff. (That how the Marines keep those fabric hats stiff.) Now you can trim away any excess of the fabric's seam allowance from the inside of the shade.8. By now it should look just like a store bought lamp shade...except you're going to have some raw edges. You can glue on any sort of trim (gimp, lace, seam edging, etc.) you'd like to hide that and to give your shade some personality.9. Enjoy your new shades :-) OK....what might happen:1. My shade was a round one (smaller on top than bottom frame) and I didn't attach the frames to each other. Hence it didn't dry even. It dried with one side being rather flat. But...2.Bonus! That flat side made it perfect for the small space the lamp was placed because I could push it up against the wall further :-) Disclaimer: I used inexpensive simple muslin for this project. Other fabrics may not work as well. You may want to try this with inexpensive material first to see if it works and if you need to tweak the method for your lamp shade. Hope this works for you :-) If not, well.....the shade's kind of a gonner anyway but you can at least say you tried to salvage it :-D
  • Stephanie Rountree Stephanie Rountree on Sep 12, 2014
    How about removing the fabric and recovering it with ribbon? The plastic would get covered by the ribbon. I saw a great video tutorial by Martha Stewart showing how to do it and it turned out very elegant. That's what I will be doing with one of my older shades.
  • Sharon Sharon on Sep 12, 2014
    I repaired my cracked shade with fabric glue, holding my hand on the inside to get it into place and put a thin line of the glue in it and holding for a few seconds, it's not noticeable at all. Good Luck.
  • Melinda Cohenour Melinda Cohenour on Sep 12, 2014
    Perhaps remove the plastic, stretch window screening over the framework to provide a stiff surface to support your fabric. You can fold the screening at the corners, then trim the excess and roll the remaining wire screening up each corner brace. Flatten, if you wish, using pliers. Then use fabric of your choice to refurbish. Good luck. Would love to see pics of your finished project.
  • Donna J Donna J on Sep 12, 2014
    Jan you can do so much with this shade. There are ideas and tutorial videos to choose from. However, what ever you choose be mindful of the bulb you use. I would say that nothing over 60 watts should be used. Good luck.
  • Shirley Kalinosky Shirley Kalinosky on Sep 13, 2014
    I bought a lovely white square shade at Walmart for an antique lamp about 6 years ago. Don't know if they still have them, but it would look great on your lamp.
  • Jan Jan on Sep 15, 2014
    Oh my goodness!! You guys !! THANK YOU for such great ideas/suggestions! Now.... to choose one and do it, right?? :) Thank you again!
  • Victoria Sexton Victoria Sexton on Jul 22, 2015
    Jan, curious if you tried repairing this shade? (I have a few in my store with same boo-boo's. well, in truth, they are in my stock/storage area, hiding. lol.) I am most curious if you tried the actual repair ideas mentioned by Sharon or Melinda. Being I have a few, I am now curious about these, as they seem very low cost.
  • Dee Dee on May 10, 2017

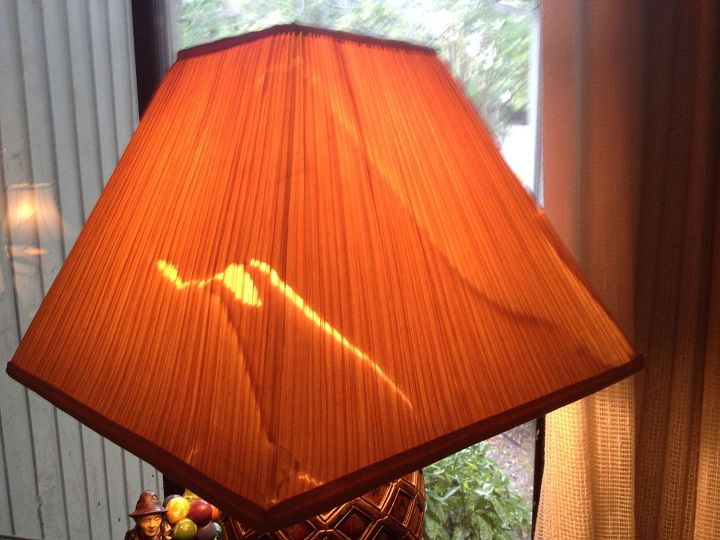
    How about trying to replace only the broken area with something that is a little bit stiff, like and old-type clear page protector or a transparency sheet. Hopefully you could cut to the size of the side you require and then lightly glue to the top and bottom 'rings' of your shade. Or you might find some light plastic type material at a craft store. Somebody must make whatever kind of materials that lamp liners are made of!