


How to Stencil a Modern Wallpaper Look

4 Materials
$50
3 Hours
Easy
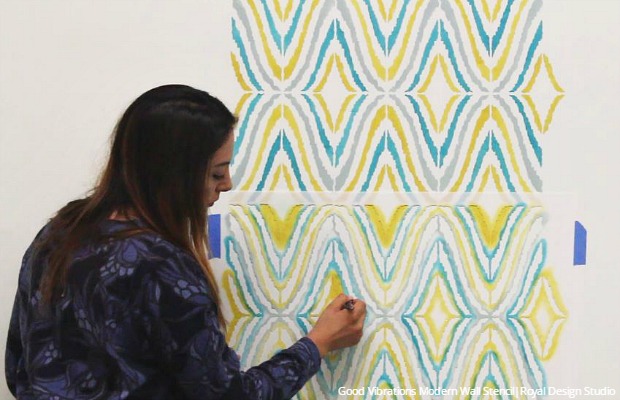
A modern interior style is only a paint stroke away! Rather than dealing with the hassle, damage, and hefty price of regular wallpaper, you can decorate your home with Modern & Geometric Wall Stencils from Royal Design Studio. These stencil designs give your walls a wallpaper look but gives YOU the control of color scheme and pattern. This DIY tutorial features the Good Vibrations Wall Stencil, which is inspired by the varied edges of ikat patterns but with a modern or retro twist. Using multiple paint colors would make coordinating and pulling together a room and its decor super easy!
Watch the video to see how you can quickly create a modern wallpaper look in your home using Modern & Geometric Wall Stencils from Royal Design Studio.
{
"id": "4078835",
"alt": "",
"title": "",
"video_link": "https://www.youtube.com/embed/qucPsLY6i1Q",
"youtube_video_id": "qucPsLY6i1Q"
}
{
"width": 634,
"height": 357,
"showRelated": true
}
Supplies:
- Good Vibrations Modern Wall Stencil from Royal Design Studio
- Royal Stencil Crème in Peacock Fancy
- Four 5/8” Royal Stencil Brushes
- Behr Ultra Premium Plus Interior Flat Paint colors in Summer Green, Caribbean Current, Oceanus, and Indian Spice
- Paper towels, painter’s tape, and measuring tape
Step 1: Before starting your stencil project, paint the wall with Summer Green Behr paint and allow to dry.
Step 2: When stenciling a symmetrical design, it is important to start at the center of your wall. Use measuring tape and mark the center of your wall. This will ensure your wall stencil design is centered and the completed design will end at the same point on each side of your wall.
Step 3: Use painter’s tape and a level to secure your stencil to the top center of your wall.
Step 4: Since we are using multiple colors, you will need multiple small stencil brushes. You will need one stencil brush for each paint color. It’s easy to work multiple paint colors into a stencil design when using stencil brushes. The amount of control that stencil brushes provide means that you can isolate different colors in different design elements by limiting the brush application to just certain elements at one time.
Step 5: Load the first stencil brush with the first paint color and offload the excess paint onto a paper towel. Paint all the desired stencil elements with the first color.
PRO TIP: Before stenciling, you can try out your favorite color combination by stenciling a sample on paper.
PRO TIP: Before stenciling, you can try out your favorite color combination by stenciling a sample on paper.
Step 6: Repeat Step 5 to stencil as many colors as you want to incorporate in to that design.
Step 7: Once you are finishing stenciling the first repeat, remove and reposition the wall stencil to its next repeat. Use the registration marks as a guide to align the stencil design.
Step 8: Repeat Steps 5 through 7 until the entire wall is stenciled.
Optional: We later wanted to add a metallic touch, so we repositioned the stencil on top of each previously stenciled repeat and painted the Peacock Fancy Stencil Crème over the Caribbean Current paint color.
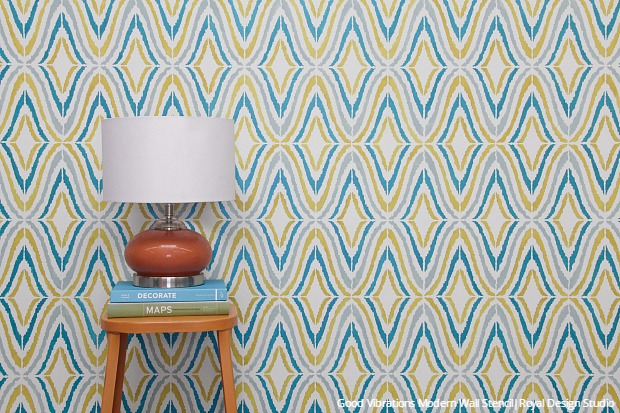
Remember to tell them that it isn’t wallpaper and wasn’t professionally done – or don’t!  We can also see this Good Vibrations Modern Wall Stencil by Royal Design Studio in a home office or nursery in both muted or multiple contrasting colors.
We can also see this Good Vibrations Modern Wall Stencil by Royal Design Studio in a home office or nursery in both muted or multiple contrasting colors.


Frequently asked questions
Have a question about this project?