


A Step-by-Step Guide on How to Fix a Running Toilet

If your toilet is making a loud, gurgling sound even when you haven’t recently flushed it, odds are your toilet is running. And there’s no need to call a plumber quite yet: Luckily, a running toilet can be a simple fix and is also a common problem to have, especially with a tank-type toilet.
Though you may think you can live with a running toilet, chances are it will start to grate on your nerves and rack up your water bill.
Luckily, there are a few quick fixes to fixing a running toilet—if you’re not afraid to stick your hands in your toilet tank (don’t worry, the water is clean in there, but it doesn’t hurt to clean the tank once in a while).

What Causes a Toilet to Run?
If there’s an issue with your toilet, it will continuously run after a normal flush. You might try jiggling the handle, which probably won’t do anything. There are typically a few reasons why a toilet will keep running:
- The fill valve is worn out.
- The float height needs adjustment.
- The flapper is leaky and needs replacing.
- The refill tube is too long.
Fill valves, floats, flappers, and refill tubes are all located in the toilet tank. Happily, dipping your hands into the tank won’t be as disgusting as, say, fixing a clogged toilet bowl.

Important Toilet Parts
Before we get to explaining the steps you need to take to fix a running toilet, it'll help to know the makeup of a toilet and what parts make it work.
Fill Valve
This is the vertical assembly inside the tank, usually on the left side. Here is where the fresh water refills the tank when you flush. The tank closes when the correct level of water is reached inside.
Float/Float cup
This device senses if the water in the tank is at the right level by monitoring the water level by its position when flushed. When it’s in its proper position, the water supply is then closed off so there’s no overflow.
Flapper
The flapper is a rubber piece that sits over the valve opening to keep water from leaking out of the tank after the flush is complete. The flapper will typically wear out over time.
Lift Rod and Lift Chain
The rod and chain are connected. When you flush, the rod will lift the chain to lift the flapper.
Overflow Tube
This tube leads from the tank into the bowl and also prevents water in the tank from overflowing—too-high water spills into the tube and makes its way into the bowl. If your toilet is running, there’s a chance the water level in the toilet could be too high.
Refill Tube
This tube is located in the overflow tube, letting the water fill the bowl after a flush.

How Much Water Does a Running Toilet Waste?
A running toilet wastes hundreds of gallons of water a day, which can significantly increase your water bill. In general, a running toilet can cost you an extra few hundred or even a thousand dollars in wasted water a year.
Of course, the costs depend on the toilet tank’s size, flow, and your utility company.
According to the Environmental Protection Agency, newer toilets hold between 1.28 and 1.6 gallons in their tanks for one flush. Older toilets can run as high as six to seven gallons a flush.
If the toilet is constantly running, it will waste about 4,000 gallons of water a day and older toilets can waste at least two or three times that amount.
This may result in an additional couple hundred dollars a month, and thousands a year, to your average water bill. We mean it when we say it pays to fix a running toilet.
Check Float Tank Ball
Disclaimer: Hometalk may receive a small affiliate commission from purchases made via links in this article but at no cost to you.

How to Fix a Running Toilet by Replacing the Fill Valve
A worn-out fill valve may be causing your toilet to run. To figure out if this is the culprit, check if water is constantly running into the tank and making its way into the overflow tube.
If this is the case, you have a fill valve that needs to be adjusted or replaced.
Although there are many steps to replacing a fill valve, the process takes well under an hour to complete even if you’ve never handled the tank before.
Tools and Supplies Needed:
- Fill valve assembly
- Adjustable pliers
- Bowl
- Towel
- Pail (optional)
- Jar/cup (optional)
- Shop vac (optional)
- Rubber gloves
1. Remove the Lid
Carefully remove the toilet tank lid.
2. Adjust Float Cup
Lift the float cup and see if the water flow stops. If it stops, the float probably needs adjustment. Most modern fill valves have a spine that runs down the side of it. To adjust it, turn the screw on the spine counterclockwise and that should lower the float cup. If this doesn’t fix the problem, replace the fill valve.
3. Shut Off the Water Valve
Shut off the water supply valve that’s located behind the toilet on the wall by turning its knob clockwise.
4. Catch Leaks
Put a bowl under the valve to catch any leaks.
5. Flush
Flush the toilet so the tank can remove as much water as possible.
6. Remove Excess Water
If you have a shop vac, use it to get rid of the rest of the water in the tank. Remember to remove the filter from the shop vac before using it. If you don’t have a shop vac, have a pail ready to catch water dripping out of the tank as you tackle the next step, or you can scoop out the remaining water in the tank with an old jar or cup.
7. Locate and Remove the Nut Under the Tank
Find the water supply nut at the bottom of the tank that allows the water to go into the fill valve from the water supply. Here’s where you can also place the pail to catch drips. Remove the fill valve retaining nut under the toilet tank with pliers.
8. Remove the Fill Valve
Remove the fill tube from the overflow and lift the entire fill valve out of the tank.
9. Place New Valve
Place a rubber washer on the bottom of the fill valve assembly. Put the fill valve into the hole in the tank.
10. Secure New Valve
Secure the valve by securing the retaining nut on the bottom of the tank to hold the valve in. Use pliers to secure the nut, but be sure not to over-tighten it. Reattach the supply line nut and hand-tighten it.
11. Attach the Tube in the Tank
Attach the fill valve tube to the special holder positioned at the top of the overflow tube.
12. Turn On the Water Valve
Turn the water valve back on by turning the knob counterclockwise.
13. Replace Tank Cover
Replace the toilet tank cover.

How to Fix a Running Toilet by Replacing the Flapper
To figure out if the flapper is the problem, see if the water intermittently runs but is not flowing into the overflow tube. If that’s the case, you need a new flapper, which should take under a half-hour to do.
Check the Flapper Seal
Tools and Supplies Needed:
- Flapper
- Adjustable pliers
- Jar/cup (optional)
- Shop vac (optional)
- Rubber gloves
1. Remove the Lid
Carefully remove the toilet tank lid.
2. Shut Off the Water Valve
Shut off the water supply valve that’s located on the wall behind the toilet by turning the knob clockwise.
3. Catch Leaks
Put a bowl under the valve to catch any leaks.
4. Flush
Flush the toilet to remove as much water as you can from the tank.
5. Remove Excess Water
If you have a shop vac, use it to get rid of the rest of the water in the tank. Remember to remove the filter from the shop vac before using it for this step. You can also scoop out the remaining tank water with an old jar or cup if you don’t have a shop vac.
6. Remove the Flapper and Chain
Reach into the tank and pull the flapper off of the two studs on either side of the flush valve. Remove the chain from the flush handle lever.
7. Position Flapper’s Holes
Position the new flapper by threading the holes onto each side of the studs on the flush valve.
8. Attach Chain
Attach the new chain to the flush handle lever. Make sure that when you do this, the flapper is not opened up and instead is sitting flat over the opening. If the chain is too long, it may be catching underneath the flapper as the tank empties. In this case, you don’t need to cut the chain, just slip a different link of the chain on the hook. This causes the flapper to lose its seal.
9. Turn on Water Valve and Flush
Turn the water valve back on. Flush the toilet to see if the running has stopped.
10. Check Chain Length
The length of the chain in the tank may still need adjusting if the flapper has trouble sitting flat over the opening.
11. Replace Cover
Carefully replace the toilet tank cover.
How to Fix a Running Toilet By Shortening the Refill Tube
Your running toilet could mean that the refill tube (or overflow pipe) in the tank is continually pumping water into the bowl.
This can happen when the fill tube is too long and isn't positioned correctly in the overflow tube. This causes the toilet to run because the refill valve creates a suction that pulls water out of the fill valve.
Tools and Supplies Needed:
- Scissors
- Bowl
- Rubber gloves
1. Remove the Lid
Carefully remove the toilet tank lid.
2. Shut Off the Water Valve
Shut off the water supply valve that’s located on the wall behind the toilet by turning it clockwise.
3. Catch Leaks
Put a bowl under the valve to catch any water leaks.
4. Grab Overflow Tube
Pull out the toilet overflow tube and hold it just above the overflow opening.
5. Trim
Trim it slightly and reclip it to the overflow tube to keep it in place.
6. Turn on the Water Valve and Flush
Turn the water valve back on and flush. Flush the toilet to see if the running has stopped.
7. Replace Cover
Carefully replace the toilet tank cover.
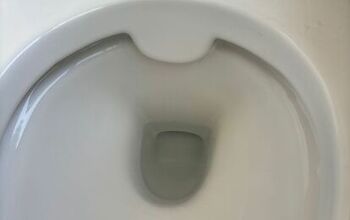
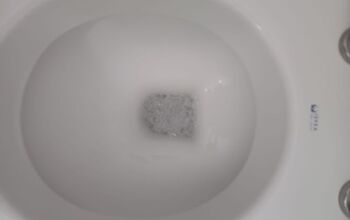
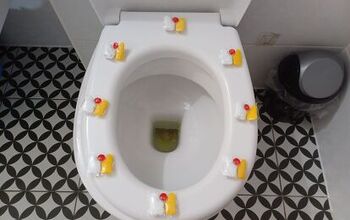
Food Coloring Hack

Tips and Hacks for Difficult Cases
If the above fixes didn't work, your problem may be a bigger issue. Here are your last few options:
Replace One Last Flange
There’s one last-ditch effort you can make if all else fails before calling a plumber or replacing the toilet: replace the tank to bowl gasket.
This involves removing the tank from the bowl (if you have a two-piece toilet) and requires DIY skill and muscle. Don’t take this on if you feel you cannot handle the weight of a tank, which is heavy.

Replace the Toilet
A running toilet may be leaking water out of the toilet. That small leak can become a big problem. In this case, it is essential that you replace the toilet or it could seep into your floors and ruin them, costing you even more repairs.


Frequently asked questions
Have a question about this project?
Our toilet runs because the overflow tube is too short, what do you suggest?