Saving A Curb Find And Turning It Into A Victorian Gothic Beauty

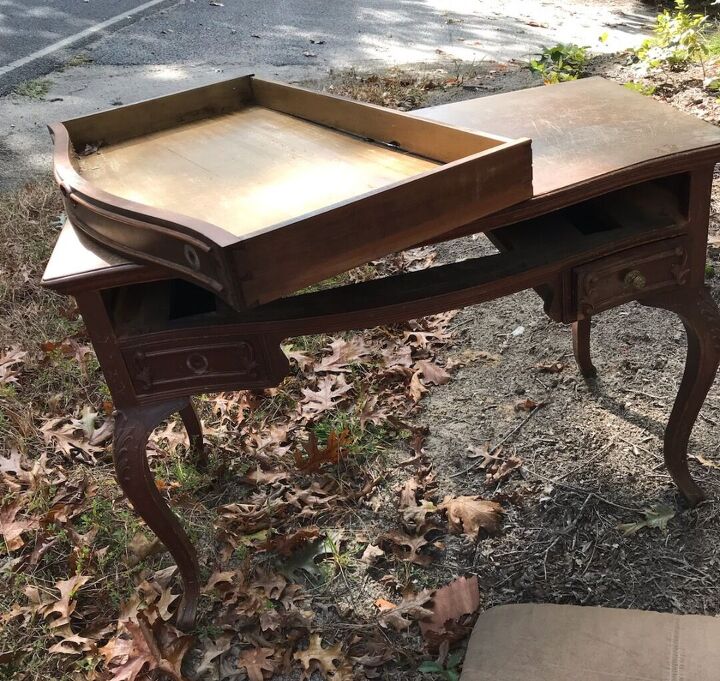
My mother in law called me one day and said there was a vanity on the side of the road by her house. She knows how much I LOVE to pick up roadside trash pieces and transform them! So I stopped what I was doing and went to grab it!
This piece was in pretty rough shape....but that didn't stop me! I saw the potential and already had the finished piece pictured in my head!
Read below to see how I turned an antique roadside vanity into this elegant piece of furniture.....
*Total cost is for the amount of product used, not the initial cost of the products
*Time listed is for work time only, does not include dry times
Amongst the endless number of scratches and gouges, there were also initials and words that I couldn't quite make out carved into the top 😔
You can tell how old the finish was on this piece
First things first...
With any used furniture, check for bugs. Especially roadside pieces. Spray the inside with a bug killer, and if possible, let sit outside in below freezing temps or wrap in a plastic bag and let sit in the sun for a few days.
Now...
Prep
I cleaned the piece really well inside and out using totally awesome from the dollar store, but any degreaser will work. Be sure to clean off any bug spray as well.
Then, I had to strip the top and drawers since the finish was so rough and flaky.
Apply your stripper to the surface, allow to sit for a few minutes, then scrape off using a metal scraper.
Be sure to protect yourself and wear gloves, mask and eye protection whenever working with chemicals.
To remove the stripping residue and any remaining varnish, use mineral spirits. For this piece, I poured it right onto the surface and used a hard bristle brush to really get into the details.
Then wipe clean with paper towels and allow to dry completely
Then I was ready to sand.
Thankfully, the top was solid wood and not veneer, so I was able to sand off all the marks and get a smooth top.
I've been using the Black & Decker 5inch random orbit sander for a few years now and it works great! Plus, it was cheap!
Starting with 120 grit sandpaper, I sanded off the stain and got through majority of the scratches.
Then I switched to 150 grit sandpaper and sanded off any remaining marks.
Then finished with 220 grit to smooth it all out
For the rest of the piece, I used 220 grit sandpaper to do a quick scuff sand by hand and sanded out any scratches and filled gouges with wood filler.
By scuffing up the surface, you're giving the paint some tooth to really grip onto.
Then wipe down the entire piece with a clean damp rag and remove any sanding dust and/or residue
Electric Sander tips*
Allow the sander to do the work for you. Sanding requires patience, which I have very little of, so it took me a long time to get the hang of it. Don't apply a lot of pressure, if you do, it'll leave behind little swirl marks. Don't hold it in one place for too long, you can firm divots this way.
Always go in the same direction of the wood grain.
Don't skip the different grits. Sanding works by basically leaving behind thousands and thousands of little tiny "scratches". The lower the grit, the bigger the scratches, which is why you can remove more of the unwanted stuff quicker with lower grits. As you move up in grit, the scratches get smaller and smaller, until you finally end at 220 grit which leaves behind a smooth surface.
I usually never go any lower than 100-120. That's enough to get the old stain and deep scratches out.
Never go any higher than 220 if staining the wood afterwards. The higher the grit, the more closed the wood grain becomes. When staining, you need the wood grain open to absorb the stain.
I chose the color western oak from varathane to stain the top.
I used a chip brush to quickly and evenly apply the stain to the top. You can also use a rag or paper towels if you prefer.
Then wipe off the excess stain with paper towels.
I allowed the top to dry for 48 hours
** I knew I was applying waterbased products over the oil based stain, so waiting for the stain to dry completely is a must. 48-72 hours minimum is the wait time between using oil and waterbased products
While the stain was drying, I moved onto the rest of the piece.
I needed to make the appliques for the large drawer that is missing the details. I have a silicone Mould from Redesign With Prima that has a design similar to the details on the smaller drawers, the mould is called "Glorious Tree". It's a brand new Christmas mould and it's beautiful!
So I mixed up some Fast Cast resin following the directions on the box, and poured it into the silicone mould like shown in the video above
When the resin first sets enough to pop out of the mould, it's still pliable. This is when I like to glue them into place because it forms to the surface.
Use a small paintbrush and brush some wood glue onto the back of the resin applique, then place it where you want, glue side down and slightly press down to adhere it.
If any glue oozes out, just use another small paintbrush and brush off the glue.
Now it's time to paint.
I used Renaissance brands chalk finish Paint in Midnight Black, this is a true matte black. To get a brush mark free finish, I used the F50 cling on paintbrush and a misting bottle full of water
Pour some paint out into a bowl or plate. You don't want to dip the brush directly into the paint container because you can contaminate the paint by introducing any debris from the piece into the container.
Dampen the cling on brush slightly and dip just the tip of the brush into the paint.
Then apply the paint to the surface in a light even coat, reapplying paint to the brush as necessary. Don't apply too much paint at once. Thick coats will always show brush marks. So keep the coats thin.
Mist the surface periodically to keep the brush gliding smoothly over the surface.
Don't go over the painted surface too many times.
This process will give a brush mark free finish 😊
For the top, I wanted a "burnt edge" look. For this, I dampen the brush and some paper towels, spritz the edges of the top, and apply a little bit of paint starting at the edge bringing the brush towards the center. Then, using the damp paper towel, I wipe the paint towards the center while removing majority of the paint. I repeat this process untill I'm happy with the look.
This technique gives dark edges blended to the lighter stained center.
For the sides, I added a beautiful decoupage paper from Redesign With Prima called Uniqua.
This decoupage tissue paper is nothing like a regular tissue paper. This paper is super easy to use, is nearly impossible to tear, even when wet, and feels more like a fabric.
First, apply a coat of Redesign with Prima's decoupage Gel in matte, then position the paper where you want it over the wet gel. Apply another coat of the gel over the paper and use a plastic scraper to push the paper right up to any edges. Be sure you have applied the gel around all of the edges of the paper so that it adheres well. Allow to dry completely and then take an xacto knife and cut off any excess paper.
For the base (everything but the top), I sealed with wax. I prefer wax, but some don't. So if you'd rather seal with something else, especially if your piece will be used a lot, I'd use something more durable and skip this wax step.
I use terry cloth sponges meant for car wax from Amazon to apply the wax. Put a small amount on the sponge, and rub it into the paint. I rarely ever buff, I prefer the extra matte finish and the wax that I use (Retique It Furniture Wax) doesn't require buffing. But, buffing will add a slight Sheen
For the top, I used something more durable than the wax. Crystalac makes great topcoats, and they are easy to use and go on smooth.
Slightly dampen a sponge (I get these sponges from Amazon, they are also meant for car wax) Then put some topcoat onto the sponge and apply it to the top in long even strokes going with the wood grain. I go from side edge to other side edge, only going back over it once to smooth it out. If you miss a spot, get it on the next coat. I applied 3 coats
Final touches...
Using Redesign With Prima's Eternal Decor Wax and a small Paintbrush, I applied a small amount of gold accent to the details...
I also refinished an antique stool and shaving mirror in the same fashion to make a complete set
And there we have it, the completed project 😍
I really love the way the top came out
The paper adds a romantic touch
I've had this stool for over a year now just waiting for the perfect piece to pair it with
I also added gold and black contact paper to line the drawers
You can find most of the products used to create this piece as well as this vanity set in my Etsy shop
Thanks for reading! I hope you've enjoyed this tutorial and are inspired to create something beautiful ♥️
You can follow me and see more of my refinished furniture and home decor on my Facebook page
Enjoyed the project?
Resources for this project:
See all materialsComments
Join the conversation
-
-
 Cindy Welch Harden
on Dec 22, 2023
Just beautiful, and with lots of great information!
-











Frequently asked questions
Have a question about this project?
where did you find the items that you put on the legs, would love to find some for a table I have?
I'm loving everything, but where did you get the fluffy cover for the chair?
Thank you so much for showing & inspiring us!
beautiful!! how did you avoid getting bubbles while using a sponge for the Crystalac?