DIY Guitar Case Lighted Jewelry Organizer

by
Kimberly Jonesy
(IC: vlogger)
4 Materials
$90
1 Month
Advanced
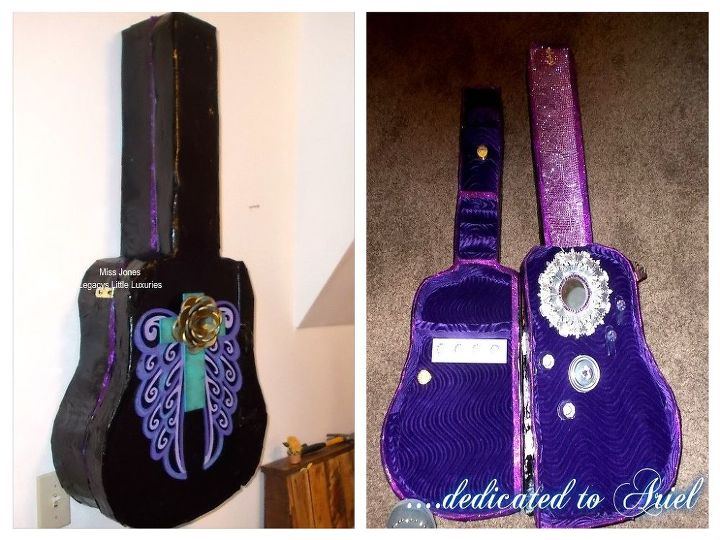
Hello! I spent last winter crafting a guitar case with cardboard and paper mache. I wanted to re-purpose a real case, but it is very heavy and I thought once jewelry is added, too heavy for a wall organizer-so-I traced a pattern around a real old guitar, and went from there. It was an couple months, but I finished and gave it to my daughter. Next winter, I am making a huge perfume bottom jewelry organizer. Subscribe to my Youtube channel and watch it all come to life.
This was not a 'cheap' project but you can choose what prices on the things you add. I used upholstery velvet-you can use regular velvet. I used crystal cabinet knobs, you can buy a package of knobs at Home depot for under $10. So on and so forth but the basic pattern idea is what you truly need. Comment below and any questions you might have.
Buy poster board from Dollar Tree-at least six sheets. Have cardboard boxes on hand. Exacto knife, scissors and a marker for pattern tracing. Find a guitar to trace, or, free hand it. The tip is to be sure both sides of the guitar are the same. A real guitar has one side curved differently than the other. I figured this out the hard way. See photos below and catch the rest on Youtube with the link I provide. Thank you and comments welcomed!
Trace the guitar. Cut it out. Use one side of the pattern and redo it an another cardboard so both sides are exactly the same....see next photo-
Now tape both pieces together with duct tape and take this pattern and trace over poster board.
The poster board pattern is now what you will use. Save the cardboard one if you want to make another project in the future. Now-you have the base.
Make your cover doing the same thing. I made four patterns total. Two for the base and two for the cover and duct taped them together and around the seams.
Cutting up long pieces of cardboard for the sides. Measure each piece the width you want. These pieces will go around your base and cover. Use a can of something to curl the cardboard. Get your hotglue ready-
Time to glue around your base and press firmly.
Tape seams when needed. Add some cardboard for shelving. Wherever you want.
The back side is secured with duct tape as well. I am using gorilla white tape.
Next, your cover will need to be cut like this-this is where hinges will go later on.
The cut you made for the cover-measure it and inside the base place a cardboard piece inside and build up the area. Also, this is when I added a shelf with cardboard.
Take a real piece of wood and measure two inches-get the jigsaw and cut FOUR pieces. This will hold the screws for the hinges.
Take your base cover and built it up with cardboard and tape. Then, glue inside two pieces of wood. This is the last photo I can provide on here. The rest of the idea is to paper mache-then paint. Find a strong wall hanging kit at the craft store. Look for a kit that holds up sporting equipment on a wall. You will use this kit to place on the bottom of the base before adding fabric. Look for screws that can hold twenty or more pounds of weight to hang your guitar case later on. This step is important for once you lay down fabric, it will cover your access to them. See my Youtube video link for the entire project. I do have LIVE video's of this project as well. Important: Find time and an area to do this. It is not completed in a week-takes longer. Thank you. Miss Jones, Bay City, MI
*dedicated to my daughter-Ariel and her favorite color-purple.
Enjoyed the project?
Published July 2nd, 2017 9:52 AM












Frequently asked questions
Have a question about this project?
That you tube address just took me to fairy garden. What gives?