Deconstructed Inspired Vintage Chair

My free Vintage office chair makeover that literally cost about $15 to make. Now I have a Restoration Hardware (RH) inspired chair without the high cost of RH!
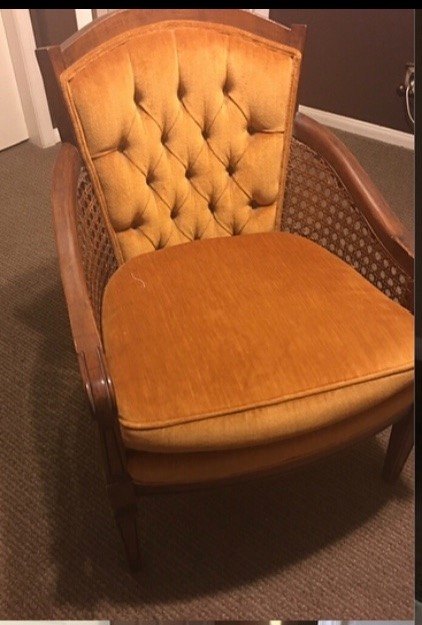
Isn’t it awesome when you come across a not so pretty piece of furniture that was free and you know you can give it new life! That’s exactly what happened when I came across an antique store that was closing its doors. I went in looking for glassware and on my way out, I saw this chair. The owner of the shop asked me if I liked it. I told him I did and can see it getting a facelift. He told me, “Take, it’s yours, have fun”. Score!!! I knew exactly what I was going to do with it. This was now going to be my RH inspired deconstructed guest room chair. I was not going to let the tufts scare me 😳 either!
This is what the back and arms looked like. I was originally going to remove the cane sides but decided that I’d use them to work in my favor. You will see later what I mean by this. My first job was to remove the fabric. I wish I would’ve taken a photo of what it looked like when I pulled the fabric off but I was too excited to get it finished and forgot! The underlying fabric was more like a foam and it wasn’t in bad condition so I ended up reupholstering it instead of starting from scratch and buying new material. Why reinvent the wheel right  I also chose to sand off the original finish instead of painting it because I thought it would give it a more distressed and deconstructed look.
I lined the bottom cushion and the sides of the arms with burlap because after all, isn’t burlap a must when creating that deconstructed look  I also glued the twine to the edges along the burlap and the chair.
Here’s a closer look of the burlap and the twine. I love the look the two create. In this photo you can also see a sneak peak of the painters cloth and the antique brass hammered nailheads I used.
I took the existing buttons of the chair and covered them with burlap. I did this by hot gluing the burlap to the buttons. I then placed them in the exact location where they originally were. This was easy because all I had to do was insert them through the fabric and into the foam. I made sure to secure them tightly so I could achieve a nice tufted look. I think they turned out great!
A close up of the antique brass nail-heads I used. All you need to do is hammer them where you want them. It’s truly that easy! The close up also shows the raw wood. I opted to sand off the majority of the original finish because I wanted to create that deconstructed finish.
See, I used the cane to make my life easier. I first applied the burlap on both sides of the arms by hot gluing it to the chair and then I tacked it with twine. So easy! For the back of the chair, I glued the jute trim first from the front of the chair, and then glued the burlap over it. The seams were not visible since I reupholstered the front foam with the painters cloth.
Here is a photo of the front of the chair. As you can see, I used the burlap for the bottom of the chair seat, the arms and the buttons.
Views of my before and after.
It doesn’t look like the same chair does it? I love how it turned out, it’s soft, simple but lovely, I think!  If you’d like to see more of what I do, come visit me at https://www.instagram.com/mycreativekneads/
Here is a closer look of the jute trim and the nail-heads I used. They both come in various colors but these were my picks!
Enjoyed the project?
Resources for this project:
See all materialsComments
Join the conversation
-
 Sue30746319
on Sep 02, 2020
Hi, you did a terrific restoration.
I was wondering how you treated the
wood frame? Did you apply a wood stripper? Or is that a stain?
-
 Irma | mycreativekneads
on Sep 02, 2020
Thank you so much! I actually just sanded it but not to completely remove the existing stain. I liked some of it peeking through 💕
-
-
-










Frequently asked questions
Have a question about this project?
Hi Irma! Love your chair. You did an awesome DIY! Here is a picture of my small antique chair. Could I use the same method on this?