


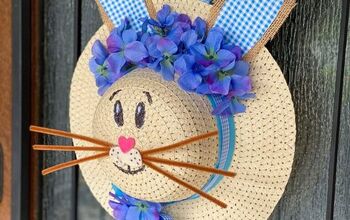
Easy Grapevine Easter Bunny Wreath
I was walking around the dollar store last week, looking for different sized grapevine wreaths that I could make into an Easter Bunny.
You can find more DIY crafty and home decor projects on my blog, Color Me Thrifty, here.

Well I didn’t find those, but I did find a grapevine wreath already formed like an Easter Bunny.
Jackpot! And for only $5 I thought it was well worth it.
Especially because I’m using some bits and pieces of thrifted florals from my stash to dress it up, making it very inexpensive.

I really wanted to give my Easter Bunny a backing and after looking through my thrifted fabric and scarf stashes, I decided on this bright green $1 knitted scarf. It just sings spring to me.
Supplies needed for this Easter Bunny wreath project
- Grapevine Easter Bunny wreath
- misc florals
- scarf or fabric for backing
- hot glue gun and sticks
- scissors

This scarf was knitted in the round so I folded it beneath the wreath to get a sense of how I wanted it to look.

And then I started gluing with my hot glue gun. I did it bit by bit by holding up the wreath slightly; adding glue onto the scarf; and then pressing down on the wreath.

Then I turned the form over and glued the second layer of the scarf onto the first layer; cutting around the wreath form as I went.

Here you can see how it looks lying down. I did the two body sections with one piece of the scarf.

And then I did the ears separately, but using the same process.

I really like the texture and color of the scarf.

I forgot to take a pic of the process of adding the flowers to the body sections of the Easter Bunny, so here you can see what I did with the ears. I tucked the ends of some faux vine-like white flowers into the grapevine wreath, and then glued them in place as a base.

And then I added the main flowers; just winging it as I went. There’s no right or wrong here. It’s just about doing what looks good to you.

Want more of the grapevine wreath to show through? Then add fewer flowers. It’s really just a personal choice. Flowers make me happy, and you can still see the wreath peeking through them here and there.

I’m super happy with how she turned out, and here she is on my front door. I decided against a bow, because bows aren’t really my thing. But if you’re a bow lover, then go for it.
This was such an easy and fun project, and it only cost somewhere between six and sever dollars. It’s a great project to use up bits and pieces of this and that.
I hope this project has inspired you. There are so many different looks that could be achieved with this Easter Bunny wreath. The possibilities are virtually endless.
If you enjoyed this project you might also enjoy:
DIY Spring Bouquet from Upcycled Easter Egg s
Easy Easter Egg Wreath from Pipe Cleaners

Comments
Join the conversation
-
OH this is so cute , Great job. Syb
-
This is beautiful! 💚 What a unique idea for a bunny wreath. Thank you for the inspiration!


Frequently asked questions
Have a question about this project?