


Disney Princess Hair Clip Made Out of Ribbon...Snow White, Belle

by
Knelso18
3 Materials
$60
15 Hours
Medium
My husband has a large family! And all his nieces and nephews are older but are having 6 kids a piece. Love them all so much...But Christmas shopping is a nightmare. So every year I make them homemade gifts. Granted they are still young (all under 10) so for now I can get away with it. And when I say homemade gifts, I mean Bought some item and just painted a design on it or added their names, etc... I have done Sippy cups, plastic tray tables (did a Minnesota wild design on one, Minnesota Viking on another), and even snack holders. My nieces and nephews always look forward to opening these gifts for their kids as they know I take the time on each child and
But this year the girls are out weighting the boys! So I decided to do something special for the girls.
They all have long beautiful hair! I found a website that made Disney princess hair clips, but were charging $15.00 each! I thought, with a little time and practice I could make them too. And a lot cheaper. I will say my first few were a bust. But then slowly I found my groove. I made 4 princesses for each girl.. which was 60 princesses! Took all weekend to do them (and a lot of Netflix shows) but now, I am done for Christmas for these princesses. Now have to figure out something for the boys ;) Hope you enjoy and decide to try them.
Here is the supplies you will need (I bought all my ribbon at Walmart as it was only $.50 a roll. I used cheap ribbon, not upgraded. Bag of hair clips from Walmart also and was the most expensive part of this craft (being I needed so many):
thin ribbon for the hair (so buy the color of the hair you want)
thin ribbon for the dress of the princess
thin cream ribbon for the face/arms
very thin white ribbon for the accents on dresses
hair clippies (or a headband, magnet, clothespin... whatever)
hot glue gun and glue
scissors
And patience...
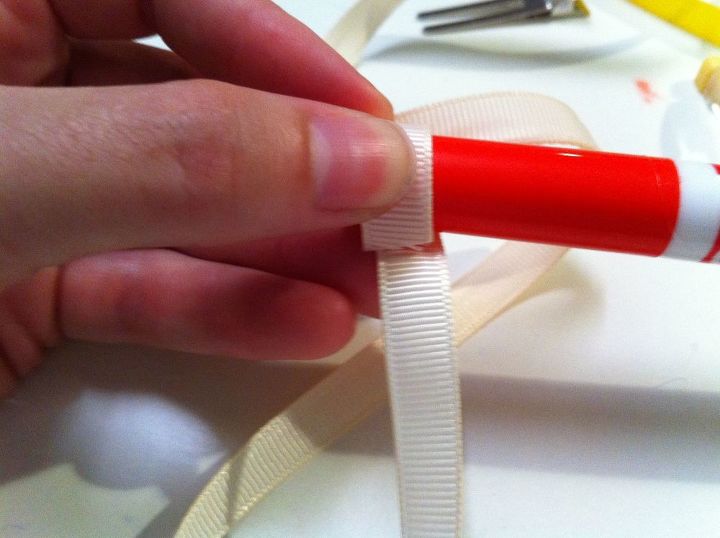
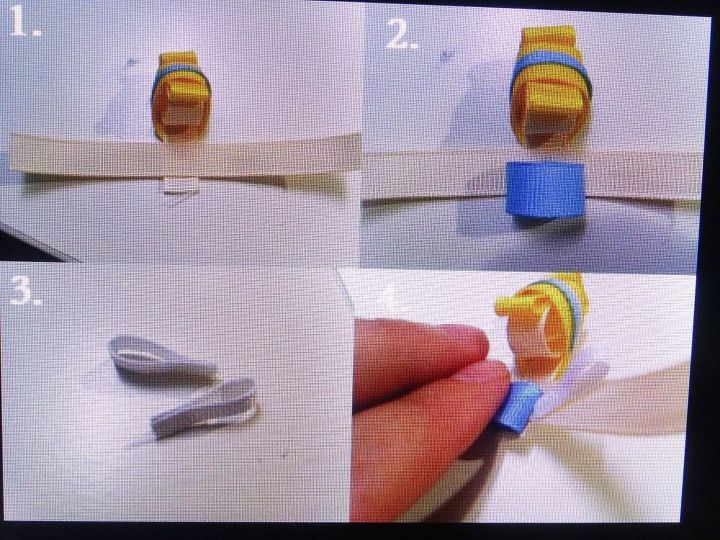
Start with a thin cream colored ribbon for her head. Wrap it around a marker or pencil and secure it with a dab of hot glue. Leave about an inch hanging rom the loop (head) for her neck and to attach the body.
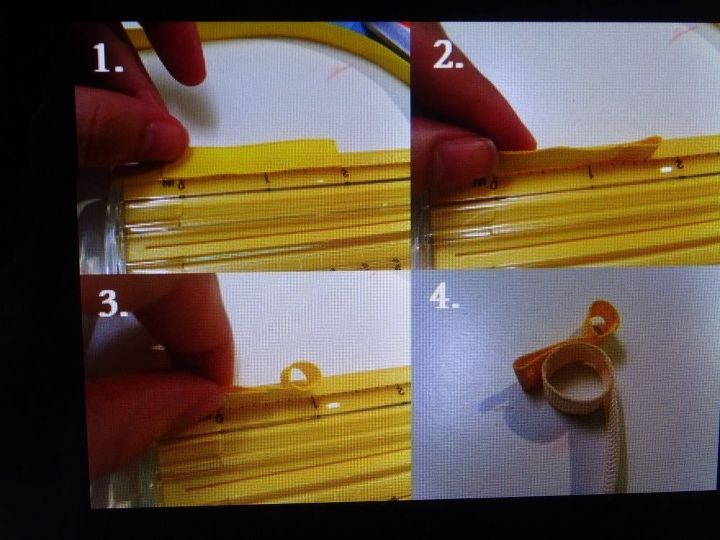
Sorry my pictures are so bad...I tried to be fancy and organize them better but then file was too big to upload. So a picture of the picture here...You get the idea...
1. Cut about 2" of thin hair ribbon. 2. Fold over one end and glue down, making a small, flat loop. 3. Wrap the other end around a pencil and glue, making a circle loop. 4. Glue to top of head almost like a baseball cap.
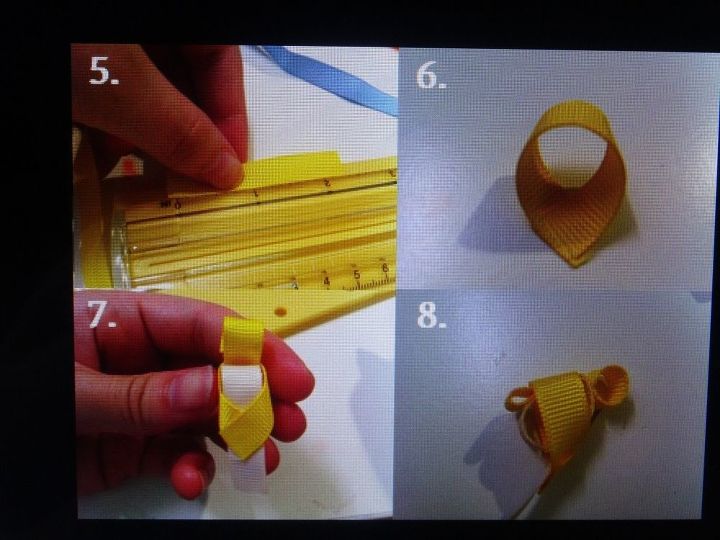
5. Cut just over 2" of hair ribbon. 6. Match the ends together as shown and glue, making an angled loop. 7. Place the loop over the "baseball cap" on the head. 8. Glue on the top and on the back (as shown)
9. Place a dab of hot glue inside the circle loop at the crown of the head and lightly press, creating a flatter bun. 10. Cut a sliver from a 2" length of thin dress ribbon (or use super skinny ribbon) 11. Glue down to the hair to create headband.
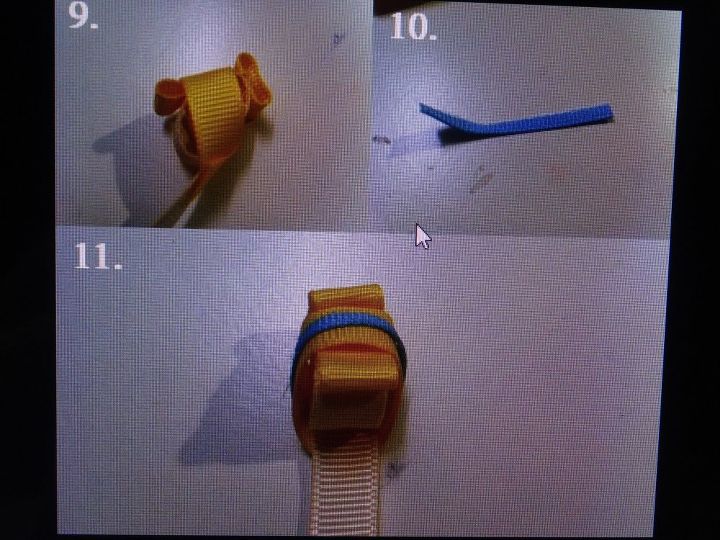
1. To make the shoulders/ arms, cut about 3 1/2" of thin cream ribbon and glue down across the neck. 2. Make a circle loop with about 2" of thin dress color ribbon and glue down to create the chest. 3. Using about 1 1/2" of thin dress ribbon, glue a flat loop, then cut it straight up the middle to create (2) flat loops. 4. Glue the loops down at an angle by the sides of the chest to create cap sleeves for the dress.
Using your four fingers as a length guide, cut (4) long loops of thin dress ribbon and glue them. Note: be sure to glue them slightly on top of one another, since the bottom of the dress has to fit inside the chest loop! Using just your index, middle, and ring fingers, cut 2 long loops of thin white ribbon. Glue them to the sides of the dress. Use a small piece of thin dress ribbon to cover the ends. Then hot glue your hair clip to the back, along the arms... (no photo of this but here's the finished products...
Here is a picture of the ones selling for $15.00 each and gave me the inspiration... Cute right?
(Note these are not the ones I made...Just the examples I saw online to make myself...)

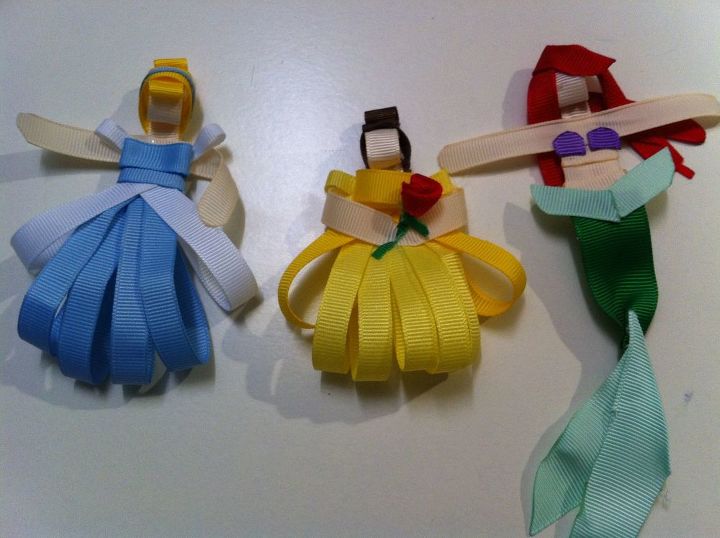
My Finished products:
Snow White and Merida (Brave). I did do Ariel, but could not get the tail to work etc..
And the curly hair on Merida, easy! Did you know you can curl ribbon just like you curl the cheap plastic ribbon? That's all I did. I did also wrap around a pencil and used hairspray...Both worked the same.
Overall they turned out good I think. Not professional but they were made with love.
Note: The cost and time was high as I had to make 60 of them. Just to make one would cost about $1.00 with lots of ribbon left over.
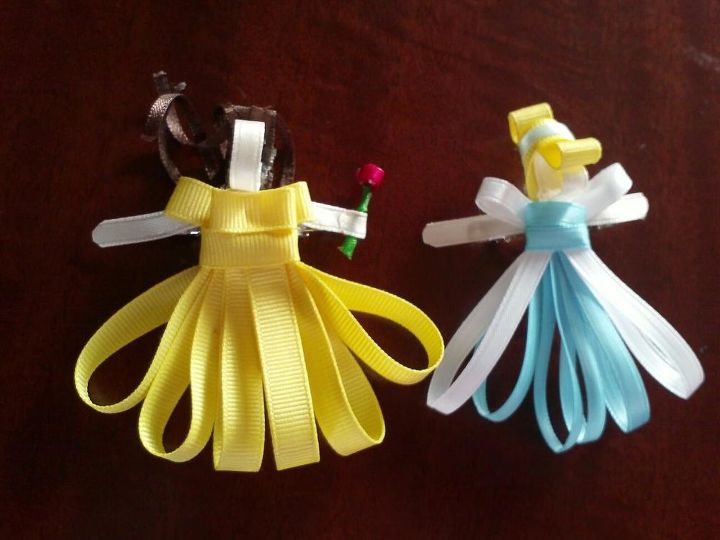
My finished products:
Belle and Snow White...
Comments
Join the conversation
2 of 7 comments
-
Thanks! They were a lot of work but fun to see their faces when they open the present...
-
Lucky nieces and nephews to have such a thoughtful Auntie! They look wonderful and you're done early. :-)


Frequently asked questions
Have a question about this project?