Going to tile kitchen backsplash....need advice!

by
Aggie
+23
I have bought tile and adhesive to install a backsplash tile in my kitchen. I've had it for awhile now, but have been afraid to start for fear of messing it up. I have looked at different sites on the internet, and it seems to be a fairly easy project. My fear is that I will not get the tiles on straight, and I don't know how to do the corners, which I have two. I don't know if I should butt the tiles together at the corners or leave some space there and fill in with grout. Also, I was wondering if anyone has used the product called "Simple Mat" which Home Depot sells. It is a sticky, double sided adhesive mat that you stick to the wall and then pull off a protective plastic shield and press the tiles onto that. It seems like it would be so much easier, but I have to wonder if it would really stick in the long term. Any advice or comments will be appreciated.
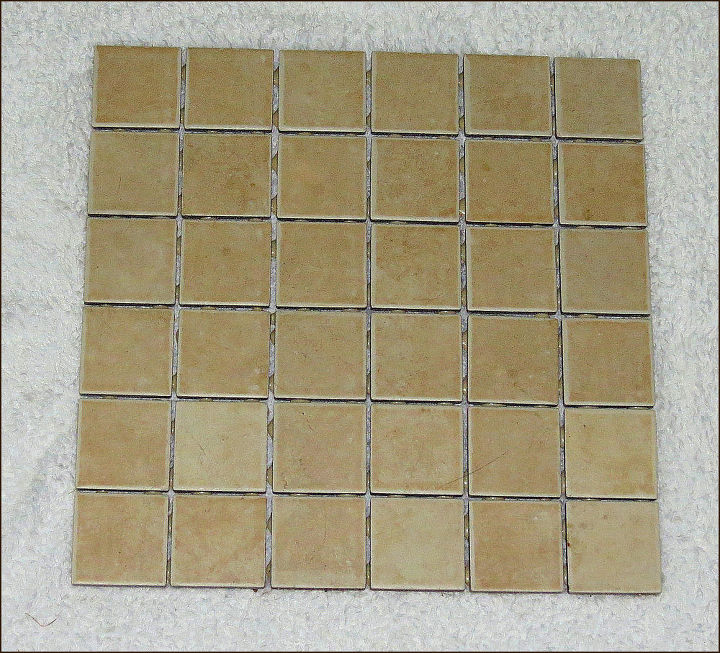
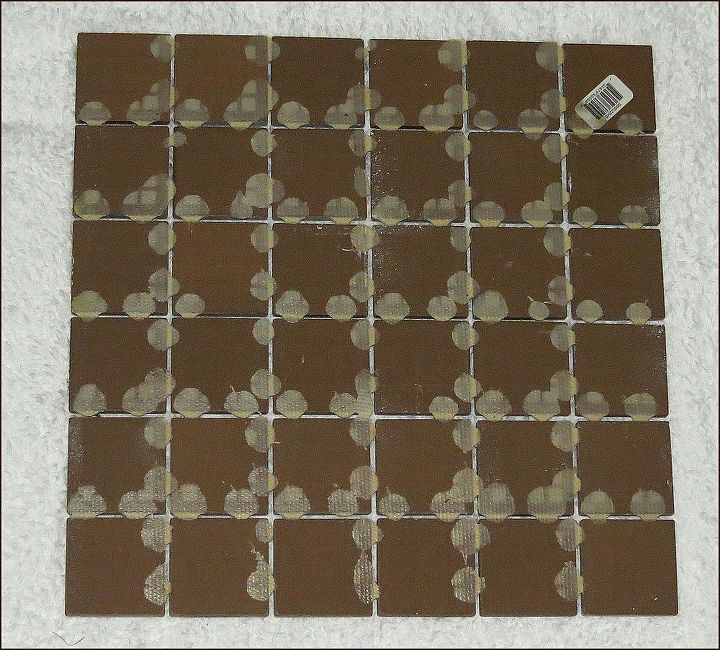
I am including a couple of photos of the tile I will be using.....front and back.
I am including a couple of photos of the tile I will be using.....front and back.
13 answers
-
These types of tiles are coming on strong in the DIY market place as your not needing to use the mastic or thinset adhesives to install the tiles. This can be a challenging task for someone who has never tiled before. But it can be done with a little thinking and foresight. The most important thing to remember using these tiles or any pre-glue double stick types is the wall or surface needs to be perfectly flat. If you have any unevenness the tiles will not bridge the unevenness and will tend to rock on the high spots. This is something you will not have using a thinset mastic install. As that adhesive will simply fill in on the low spots and bridge those gaps. A low cost electrical tile saw is in order if your cuts need to be within the field (center) of a tile. If the cuts can be between the tiles and properly fit, then all you need is a sharp utility knife. Where there are outlets in the middle of a tile,, you will cut out several around the outlet and install the remaining onto the wall, Then you carefully using a grease pencil mark the tiles that need to be cut then after cutting them fasten them around the outlet. Remember however, you may need mastic cement on those areas as the water used in the cutting may destroy the glue on the back of the tile. You need to read the cutting instructions carefully in that regard that should come with the tile you purchase. As far as lasting? With proper cleaning and prep of the wall, and without gluing onto wall paper or something other then a painted surface these tiles will remain for a very long time. Grout plays a very important roll in this. So be sure to grout carefully and seal it once it dries. These tiles are ideal for backsplashes. Be sure to take photos of before, during and after and share it with everyone. If you run into difficulty come back and post the question on this thread.
 Woodbridge Environmental Tiptophouse.com
on Aug 10, 2014
Woodbridge Environmental Tiptophouse.com
on Aug 10, 2014
-
The previous reply forgot to mention drawing a plumb line from the upper to lower cupboards to establish a straight line to start from. This is especially important if your corners are not square (as it is in most old houses, like mine). I would start in the area you see the most with a full tile grouping, then work outward from there, so your cuts are in a less obvious area. As for the corners, inside corners can be butted together just leaving a space for grout. Outside corners would look better with a special corner piece, or even a piece of wood corner molding. Good luck with your project. Make sure to post pictures when you get it finished.
 Penny Massey
on Aug 10, 2014
Penny Massey
on Aug 10, 2014
-
Let me encourage you.... I am a 73 yr. old woman, and I put up a tiled backsplash all by myself with 6" tiles and glass tiles in between the rows. People always comment on how beautiful it is! I started on the left side and worked to the right, ending with a cut tile, which I just grouted and continued around the corner with the other half. Just make sure your first row is straight, & go from there. (I used a level which I think is so much easier than a plumb line. Believe me, it's not as difficult at it seems. If you have outlets in the wall, which most of us do, then you have to bring them out the thickness of the tile. The easiest way is to add nuts underneath the interior of the outlets to bring them out, rather than to have to redo the 2 x 4's in the wall. If you need a photo of that process, see Pinterest..... How to raise a wall outlet. You can do it, so just start!
 Tegma
on Aug 10, 2014
Tegma
on Aug 10, 2014
-
'Glad I could be of encouragement! If you can't find that Pin on how to do your outlets, please let me know. I would be glad to send it to you. I had 4 outlets to deal with, too, but this is the easiest solution yet. It must be done before you tile around it or it makes it difficult. Let me tell you.... I do all my own remodeling with no help from anyone. I recently put in a new bathroom.... toilet and all, all by myself. It's just a matter of re-doing what you're undoing in many cases.... and a willingness to try. Most often than not you will be successful! If you get stuck, stop and ask questions of others. You can do it, believe me! I do electrical wiring, simple plumbing and everything at 73. I've layed my own wood floors and everything. Doing a backsplash is one of the simpler projects, believe me! BTW, it's easiest to use the grout/glue combined..... get it at Lowes. It works just fine for backsplash. No need to do mortar, then grout.
Tegma
on Aug 10, 2014
-
Good morning Patricia! You just blow my mind away when I read your posts. I can't tell you how much you are inspiring me to try to do things on my own. I will be 70 in a few months, and I had myself convinced that I am getting too old to do much of anything. I now know that isn't the case. I will keep asking questions and try until I am able to do the things I always have to ask everyone else to do for me. Thank you so much again for being such a motivator. Also, I found a link on Pinterest on how to do the outlets. I don't know if it's the same one you are talking about, but it looks like a good solution. http://thespacebetweenblog.net/2013/10/18/the-secret-to-getting-your-outlets-to-sit-flush-with-the-outlet-cover/
 Aggie
on Aug 11, 2014
Aggie
on Aug 11, 2014
-
@aggie I have two tutorials up on my blog for tiling a backsplash. If I understand your question correctly, you do want to leave a space between the tiles in the corner. This allows for some movement and also if your walls aren't exactly plumb. After doing extensive research I found that using thinset instead of the sticky mats was the better route. Some reviews online had issues with either the mats failing or the opposite where once they were stuck, you couldn't undo wrinkles or move tiles after it was adhered. Here's the link to the first tutorial and the link to the grout tutorial is at the end of that tutorial: bit.ly/tileBack
 Brittany aka Pretty Handy Girl
on Aug 11, 2014
Brittany aka Pretty Handy Girl
on Aug 11, 2014
-
Yes, Aggie.... that is exactly the way to do your outlets the easiest of all. It is sooo simple to do and will make things much easier to tile. So, do the outlets first, and then do your tiling. Like I suggested, if you haven't already bought anything, get the combination mortar/glue for the tile. It comes in a bucket and is so simple to use. You put it on the wall, & set your tiles in place. After that hardens, then apply the same goop over the tiles to fill in the spaces, & wipe down with a sponge. If any questions, ask at Lowes or any big box store where you will find this product for sale. Good luck and let me know how it goes! I am sure you will do an excellent job!
Tegma
on Aug 11, 2014
-
Glue was probably the wrong word to use, but perhaps you know how Senior minds can be at times. It's a mortar & adhesive combined.... ready to use right out of the bucket. It comes in different sizes, so figure your sq. footage before buying. You put it on the wall with an edged trowel as usual. It's very simple to use and I've had it under tiles for years with no problems. The size I buy is about $16 at Lowes, and it's plenty to do a reg. sized kitchen backsplash. Have fun! Perhaps we can see some of your other projects????
Tegma
on Aug 12, 2014
- See 2 previous
-
You can never give up I am only 60, but I wear braces on both legs and am falling apart.lol But, I tiled all around my tub last year and had never tiled before. It took me two weeks to do it, but it turned out beautiful.
 Diane Arnold
on Aug 13, 2014
Diane Arnold
on Aug 13, 2014
- See 1 previous
-
Diane Arnold.... you are truly an inspiration! Not only did you do your own tiling, but you were also very creative with the design! Wonderful!
Tegma
on Aug 13, 2014
-
Aggie.... now I know you can do your own backsplash without any problems. If you can take a cart and do that with it, you're okay! I love it! Did you use chalk paint or what?
Tegma
on Aug 14, 2014
-
I just bought some plaster of Paris to make my own chalk paint.... it's a lot cheaper that way. Anyway, fantastic job on that tea cart! I just love it! Does your daughter have a site or blog? If so, I'd like to check it out. While I live in PA, I have a daughter living in Palatine, IL. She might be interested in looking at her merchandise if it's not too far away.
Tegma
on Aug 15, 2014
-
@Aggie and Patricia Morse = BFF. :)
 Jeannie Andrews
on Jan 17, 2015
Jeannie Andrews
on Jan 17, 2015
Sign Up to Answer