


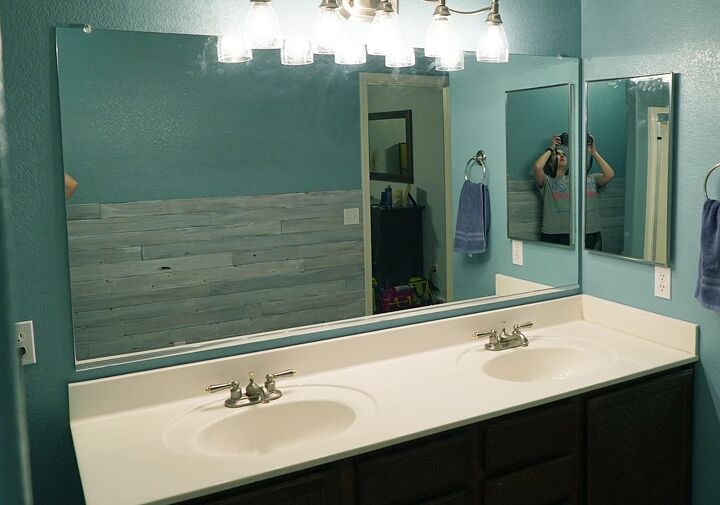
DIY Bathroom Mirror Makeover for Under $10

If there were only one DIY project I could share with you, I think it would be this one. It is so. easy. and transforms your bathroom. Affordably. It involves the #1 thing you look at in the bathroom: your mirror! Best of all, the whole project only cost me $7.50. BRB, I'm going to frame all my mirrors! Click here to read the original post.
DIY Bathroom Mirror Frame Materials
- 2 small plastic washers (plastic will ensure they don’t crack the mirror)
- 2 screws
- Wood, trim, or other framing that’s the length of the perimeter of the mirror
- Liquid Nails
- Miter saw or saw with miter block
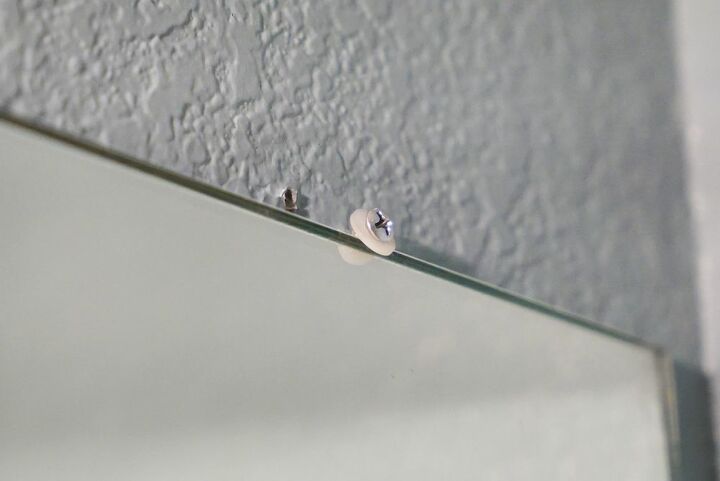
Step 1: Replace the mirror clips. At the top of the mirror, there are little plastic clips holding the mirror in place. They’re a bit bulky and the new frame won’t lay against it very well, so you’ll need to replace the clip with washers. Unscrew the mirror clip (one at a time), and screw in the plastic washer to hold the mirror in place.
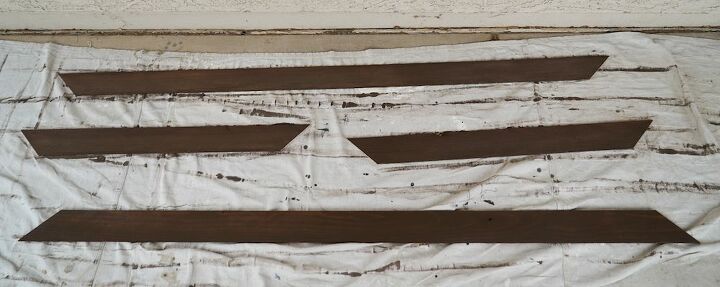
Step 2: Saw the boards to the correct length. We wanted to find some very thin, inexpensive wood for the mirror. Thin, so it wouldn’t be too heavy to glue onto the mirror, and inexpensive, because duh. While in the lumber section of Lowe’s we came across redwood which was perfect – each 8 ft. board was only $2.50.
When measuring the length of the mirror for cutting the boards, we added an inch so the outside edge of the frame would extend about 1/2″ past the edge of the mirror. You don’t want any hint of mirror showing outside of the frame!
We cut the end of each board at a 45-degree angle so the boards would fit together as a frame (make sure to put them together as such before you start gluing later on).
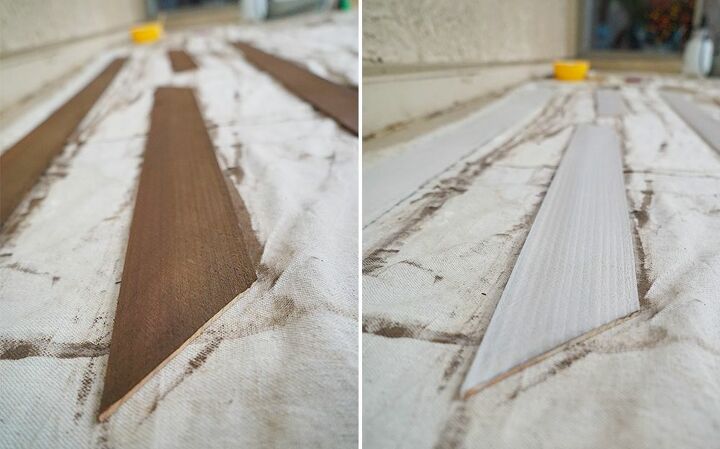
Step 3: Treat the boards. We decided to treat the wood the same way we treated our accent wall, which you can find in my DIY Master Bathroom Makeover article. We stained it, white-washed it, then lightly sanded it. I’d also recommend waxing the boards after it’s assembled to protect the wood.
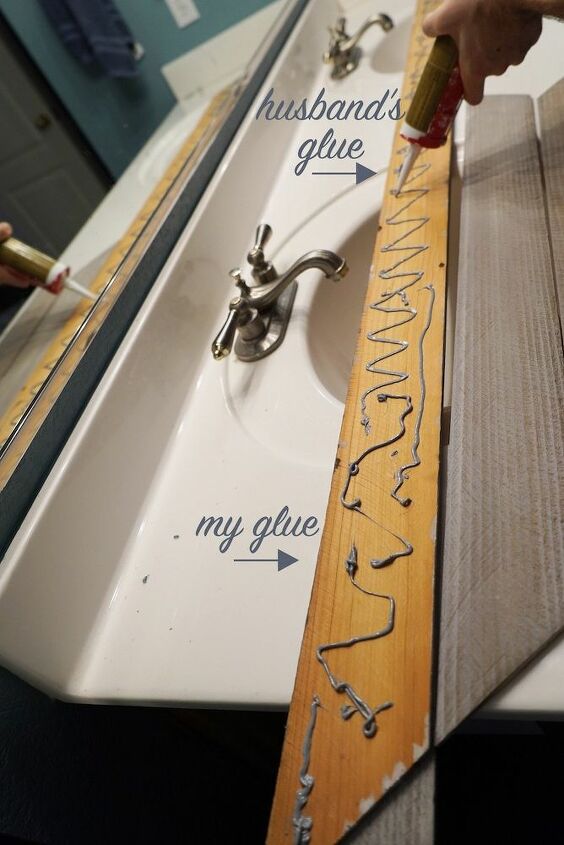
Step 4: Glue the boards to the mirror. Once the boards are treated, it’s time to glue them to the mirror! Grab your Liquid Nails, caulk gun, and husband because it’s kind of hard to squeeze the glue out of the tube. 😂

Once the glue is on, stick the boards, one at a time, on to the mirror and make sure it’s level. You may need to hold it there for a few minutes until the glue starts drying and it stays in place. Glue up the rest of the frame, making sure to nudge it around if necessary so all the edges fit together properly.
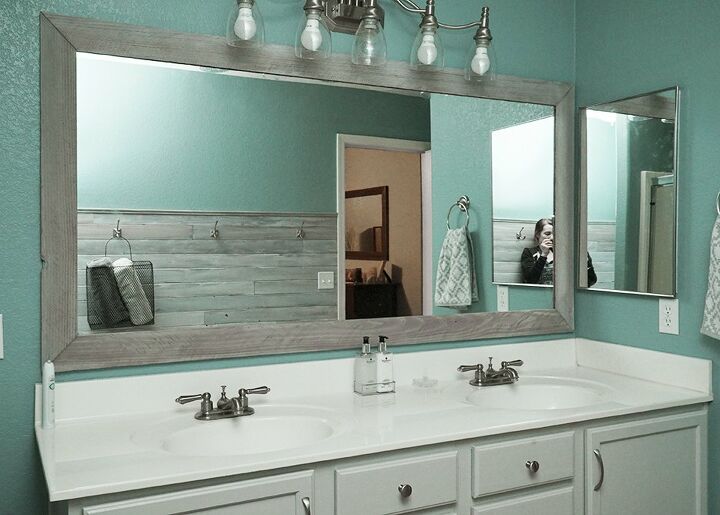
Wah-lah! You now have a beautifully framed mirror. Instant class.
Redwood Fencing for Wood Frame: $7.50
White paint: On hand (~$5 at Home Depot for a sample size)
Stain: On hand ($10.77 at Home Depot)
FUZE IT Liquid Nails: On hand ($6.47 at Home Depot)
Caulk Gun: On hand ($2.77 at Home Depot)
Small Plastic Washers: $1
If you had to buy everything new at the store, it would cost around $32 and you’d have a TON of supplies leftover – like, with more (cheap!) wood, you could probably frame 10 more mirrors. We had most of the items on hand as they’re fairly common for many home improvement projects.
Resources for this project:
See all materials


Comments
Join the conversation
-
I have done this but instead of glue, I used Velcro.. You can buy it in a roll and it has adhesive on both sides.. Then if you want to change this out-- or are a renter, it is easy to remove!!!!!
-
Very inspiring idea!☝️😃💡
Every time I look at my bathroom mirror
I wish there was something other than a plain, dull edge.🪞😕👎
Thank you so, SO much Miss Hayley for sharing your wonderful, inexpensive, and much needed solution to my 32 year old mirror conundrum! 🥰👍✨🖼✨
Happy New Year and new mirror!!!
🖖 🥳


Frequently asked questions
Have a question about this project?
How is the mirror attached to the wall? I cannot see anything on the bottom of the mirror that attaches it to the wall.
Im still not understanding how to attach the mirror with washers?
Nice idea, but read a few posts where they have said paint the back of the wood black so it doesn't reflect - did you do anything to your wood?