


Easy Budget Sink Update
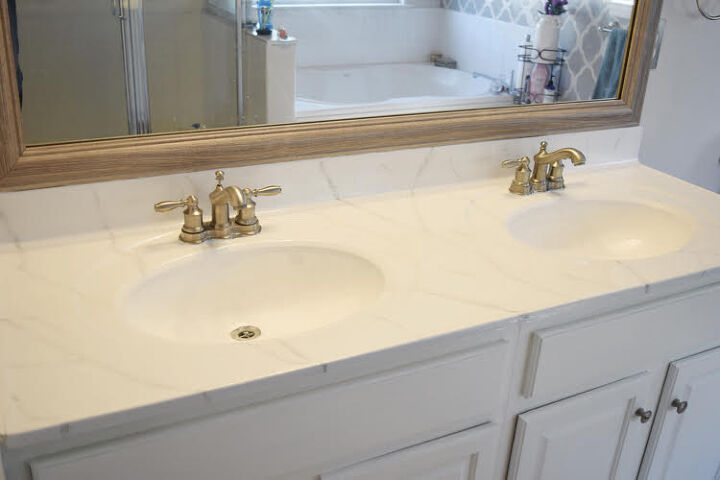
If you have been following my blog, you may have noticed that I’ve been updating my previously boring and blah builder-grade bathroom bit by bit. I painted a stenciled feature wall using a Cutting Edge stencil, painted the oak vanity with DecoArt Satin Enamels Paint, installed an easy to hang MirrorChic bathroom mirror frame and added a beautiful glossy painted Giani marble counter! (I painted and updated the counter myself!) I also recently updated two stained bathroom cultured marble sinks with a product I found on Amazon, an Ekopel 2K Bathtub Refinishing Kit.
How to Resurface a Sink
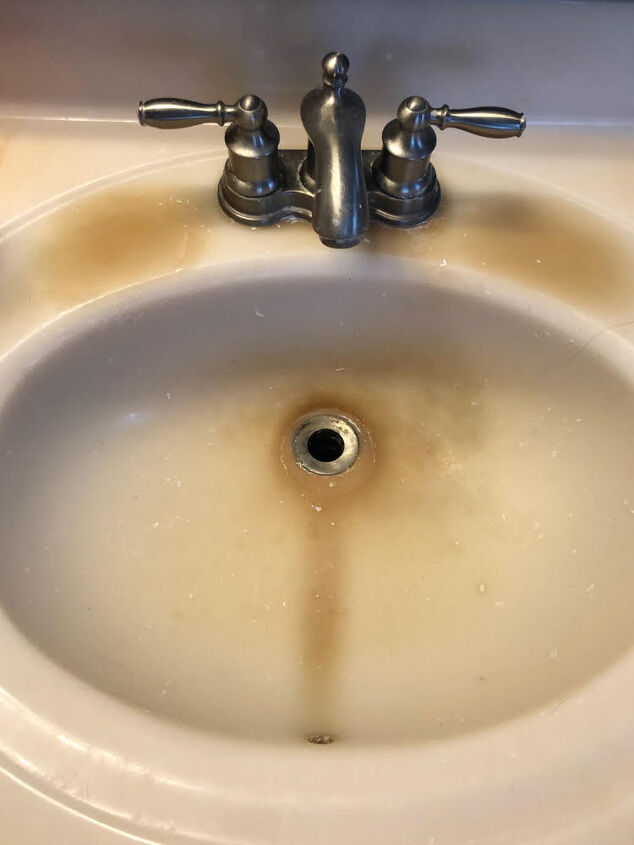
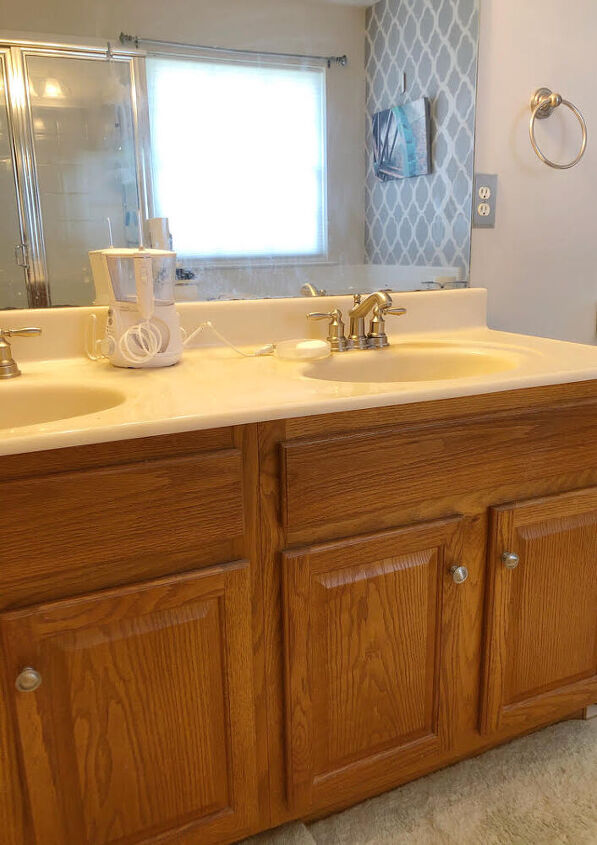
The cultured marble double countertop and sinks in my home’s master bathroom were disgraceful!
A darkened stain had developed down the middle of both sinks where the water runs, and both sink tops sported dark yellow ovals on either side of the faucets (where soap dishes were placed.) Yuck!
I thought about possibly replacing the countertop (or vanity and top) someday. I discovered that a new double vanity top would cost about $400, plus installation costs. A new double vanity with a countertop would be at least $1,000 or so. (Plus extra costs, since I don’t have plumbing skills.) Quite expensive.
I’ve seen many fabulous countertop upgrades using a Giani Carrara White Marble Epoxy Countertop Kit. (Check out my Giani Carrara countertop transformation here on Hometalk!)
I love how these kits can transform just about any countertop into a beautiful marble counter!
Once I decided to update my once ugly, beige cultured marble double vanity with a Giani Carrara White Marble Epoxy Countertop Kit (about $180 on Amazon – my kit was given to me by Giani), I knew I had to update the sinks somehow, too.
The Giani marble countertop kit is specifically made for countertops and is not designed for areas that will be submerged in water.
So I decided to find another way to brighten and update my bathroom vanity’s sinks.
After some research, I discovered the Ekopel 2K Bathtub Refinishing Kit (approximately $100 on Amazon).
I liked that the kit is low VOC and doesn’t create toxic, smelly fumes, especially since the bathroom is right off the master bedroom. Ekopel also provides a much thicker coating than those spray on sink coatings do.
The Ekopel kit can be used to resurface bathtubs as well as cultured marble sinks.
Budget Bathroom Sink Update Supplies
Ekopel 2K Bathtub Refinishing Kit (approximately $100 on Amazon)
Ekopel 2K Touch Up Bathtub Refinishing Kit (300 Gram) (approximately $40 on Amazon)
Scotch-Brite Heavy Duty Scrub Sponge
Brillo pad
Lysol Power Toilet Bowl Cleaner
Frog Tape
600 Grit Sandpaper
Vinyl Disposable Gloves
Portable Room Heater
Plastic Drop Cloth/Tarp (to keep the Ekopel off the cultured marble counters)
Paint Stirrer
How to Refinish a Sink with Ekopel
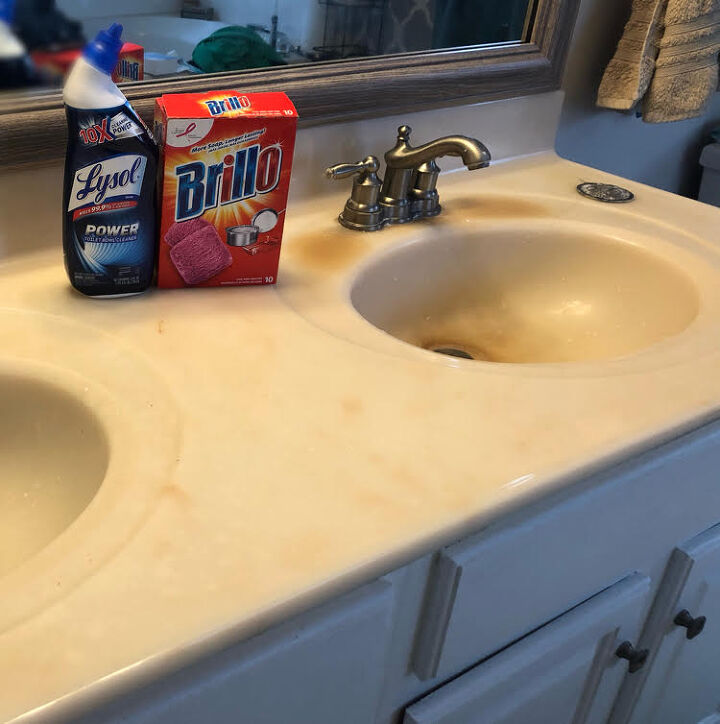
To prepare the sinks for the Ekopel kit, I first scrubbed the sinks with Lysol Power Toilet Bowl Cleaner and a Scotch-Brite Heavy Duty Scrub Sponge. The makers of Ekopel actually recommend this step as part of the prep!
The toilet bowl cleaner has a little bit of acid in it, which helps prepare the surface of a sink or tub for the Ekopel glossy refinishing coating.
I followed up with a Brillo pad to clean off any residue of the cleaning agent in the sinks and to remove some of the sinks’ glossy finish. (I thought this would also help the Ekopel adhere to the sinks.)

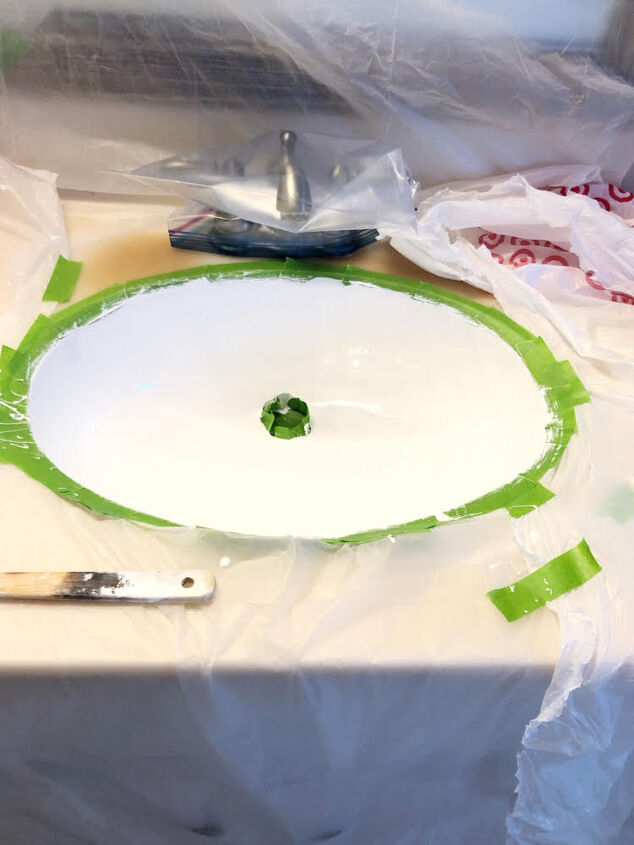
I taped off the sinks with Frog Tape. (I completed the sink project before I updated the vanity’s counters, so I wanted to avoid getting any stray Ekopel coating on the countertop.)
I also wrapped some FrogTape around the sinks’ faucets to avoid getting any Ekopel coating on them.
I very carefully taped off the drains and the overflow holes in the sinks.
I applied several layers of FrogTape over the drains. I also used FropTape to create vertical dams of sorts to help prevent the Ekopel from getting into the drains.
When using Ekopel, it would be best to disconnect the pipes to a sink to avoid getting any of the product in the pipe. (The product hardens within two hours or so. If some got into the pipes, it could block the plumbing.)
I have zero plumbing skills, so I was afraid that if I disconnected the pipes, I’d have to call a plumber to hook them back up again! So I opted to securely tape off the drains instead.
Before starting my project, I ran a portable room heater set at 75 degrees for 3-4 hours in the space with the bathroom door closed.
Ekopel dries and hardens more quickly and more efficiently when a room is kept at about 75 degrees, according to the makers of Ekopel.
I kept the bathroom windows closed and made sure that the air from the heater wasn’t blowing directly on the sinks. I ran the bathroom fan, too, to make sure that I didn’t breathe in anything I didn’t want to.
When you are working with Ekopel, you want to make sure that no stray dust, hairs, etc., fall into your sink(s). You don’t want the Ekopel sink coating hardening with visible dust or hair in it!
When I was ready to begin my project, I made sure to strictly follow the instructions that came with the Ekopel.
I poured the small bottle of component B of the coating from my Ekopel kit into the larger tub of component A of the tub.
I used a paint stirrer to mix the components together for a full 10 minutes. I let the mixed Ekopel sit for 10 minutes without touching it. I then stirred the mixture together for another full minute.
Then it was time to use the product on the sinks! I worked by pouring a small amount into a sink, and then used the included roller to carefully spread the Ekopel coating entirely on the sink’s surface.
The hardest part of the process was making sure I kept the drains of the sinks clear. I found it necessary to babysit the sinks as the coating dried, as the coating kept pooling on top of the taped off drains. I only had to watch the sinks for about an hour, though.
After a little over an hour, I carefully removed the tape that I had applied around the sinks and over the drains, so the tape wouldn’t be permanently affixed to the sinks.
I thought I was going to use the rest of my Ekopel solution to apply a second coat. But the almost full tub of Ekopel coating had completely hardened after about 2 hours! (Which, I later learned is to be expected.) I might have actually only used less than a third of the Ekopel solution on my sinks.
If you would like to do more than one coat of Ekopel on your sink, you will need to purchase an additional kit. I purchased the smaller Ekopel 2K Touch Up Bathtub Refinishing Kit (300 Gram) for the second coating.
After the sinks had cured for about 2 days or so, I used 600 Grit Sandpaper to remove any drips in the Ekopel coating. (As I was new to using Ekopel, I wasn’t as vigilant as I probably should have been to prevent drips. I was able however, to smooth out any drips with the sandpaper.)
A few days later I applied a second coat of the Ekopel to the two sinks in my bathroom vanity, using the same process I had used before.
I am happy to report that the Ekopel has formed a strong, durable, bright white finish on my vanity’s sinks.
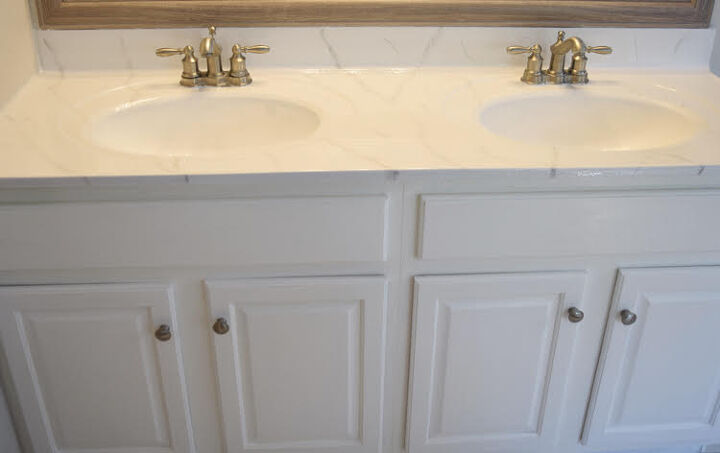
I am truly pleased with the transformation I was able to achieve using a Giani Carrara White Marble Epoxy Countertop Kit and the Ekopel. The vanity, countertop and sinks look brand new!
It doesn’t look like the old old and cultured marble vanity that it once was!
The vanity now fits in better with my master bathroom’s current gray and white theme.

My “new” double vanity and sinks have really transformed the look of the master bathroom!

I am thinking I might want to update my home’s other bathroom countertops and sinks at some point, too!

Comments
Join the conversation
-
Nice! Thanks for sharing!
-
Looks great. Giani is a great product. Actually has ground up minerals in it. Ekopel seems better than Rustoleum or Homax tub and tile paint kits. One couple finished their tub and after 15 years it started to peel, but 15 years a good length of time. As with any type of refinishing products proper prep is the key to a long lasting finish.


Frequently asked questions
Have a question about this project?