Pallet House Shaped Headboard for a Shared Boys Bedroom

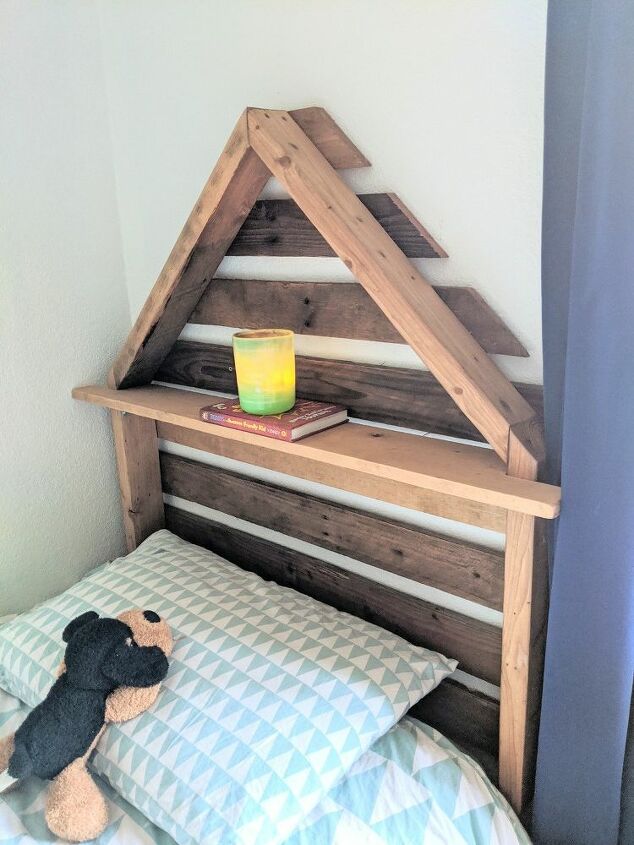
When my son asked for a house bed, I was inspired to create a house shaped headboard out of free pallets. In this shared boys bedroom, there wasn't room for building the cute house framed beds that I've seen circulating on Pinterest. Rather than give up on the idea, I used the house shape to create this super inexpensive and unique headboard for my boys' twin beds.
Check out the video for the full tutorial.
Tools and Materials:
- 2-3 wood pallets (broken down)
- Wood screws
- Wood stain
- Miter saw
- Skill saw
- Jig saw
- L brackets
- Level
I started by cutting four pieces of wood, two at 24 ½” and two at 23”. These pieces would form the frame of the “house”. On the 23” pieces I cut one 45 degree angle on one of the ends. On the 24 ½” pieces I cut two opposite 45 degree angles on each side of the board.
I used a speed square to help me mark the proper angle, and then cut it with a miter saw. At the same time I cut a bundle of pallet wood down to 40” in length.
I screwed the pieces for the frame together with 2” wood screws. It’s easier if you first drill pilot holes and then screw the pieces together.
Next I screwed the pallet board slats onto the frame. I made sure that there was an overhang of about 1 ½”.
I screwed them into place with the back facing me, so I put the rough side of the boards facing up. This headboard will be near pillows and blankets, so I don’t want any of the rough side of the wood snagging them or tearing a hole.
I continued adding the slats, using a scrap piece of 2”x4” to help me evenly space them as I went. I tried to alternate colors and shades of wood because I wanted a more rustic look.
As I went I didn’t worry about cutting down the pieces as the roof of the house got more narrow, I would deal with that later.
Tip:
Sand all of these pieces beforehand, it will make it easier to work with them when you assemble the headboard.
Once I had built the house I went to my dad’s house to use his skill saw. Conveniently, the guard for the saw was 1 ½” in width, so I just used the frame of the house as a guide.
I also wanted to add a shelf to the headboard for extra storage and decor. I took a scrap piece of 1”x6” wood that I had lying around to make this. I cut a notch in the end of the board so that it would sit snugly against the frame of the house. I also made sure that there would be enough at the ends for a 1 ½” overhang, as I had done with the rest of the pallet wood.
I used Minwax Golden Pecan stain to stain the whole piece. I wanted a thick coat, so I brushed it on evenly but did not wipe it off with a rag. I love the color this created!
As these headboards were going into my kids’ room, I wanted to make sure that they were as secure as possible. Using a stud finder I found the studs in the wall and hung them there. My son helped me hold the headboard level and I screwed them directly into the studs.
I put the shelf I had made at the height I wanted and checked to make sure it was level.
Then I used a few L brackets to attach the shelf to the frame. I added two L brackets on each side of the headboard.
And that’s it! A recycled farmhouse pallet headboard to create an extra homey feel in your little one’s bedroom! This project was so quick and easy that I made two, one for each of my boys! I love how they look on either side of the room. Have you tried my project? Let me know in the comments below
Enjoyed the project?
Resources for this project:
See all materials
Comments
Join the conversation
-
 Cjf62856375
on Jun 24, 2022
Great to hear from you, Mary. I’m so thankful that we grew up in an era where fear wasn’t a guiding principle for parents or for society, in general. I wish my grandchildren had had the opportunity to go barefoot all summer, swing from a knotted rope into a river, get on their bikes and have an adventure everyday. The only rule we had was to show up for dinner at 5:00pm and wash our hands. After that all the kids met out in the streets and played games until dark before we had to go inside. Luckily, we didn’t have cell phones! I can’t remember very many obese kids back in the day, either.
Carol
-
-
 Elaine Meredith
on Jun 27, 2022
So cute and very clever!
-









Frequently asked questions
Have a question about this project?
I THINK YOU ARE MOST AMAZING TO MAKE THAT LOVELY HEADBOARD FOR YOUR SON, BRAVE TOO. Can u help me please I have a cabinet which I took down from a work top. I wish to make a base for it and maybe put legs under it also. The trouble is It is so heavy because the cabinet has glass shelving and mirrows on all inside walls and glass front and back. It is a glass cabinet. Can you tell me please how to go about making a frame base to place the Cabinet on as now it will be used on the floor level and not on the work top.. the wood and diagram would be a great help . olive H.
Very well done n can u tell me where uu got the plush dog that's in the finished picture resting on the blue pillow

Absolutely perfection, great idea, very well done, proud of you mom❤️🥰❤️🥰❤️🥰👍🏻👍🏻👍🏻👍🏻👍🏻👍🏻👍🏻👍🏻👍🏻👍🏻