


How to Build a Barn Door Yourself

By Brooke Ressell
Sliding barn doors are super popular these days in both homes and businesses. Not only are they pleasing to look at—with tons of different styles, paint colors, and wood stains to choose from—but they also take up little space and are a great way to maintain privacy, especially with open floor plans.
The only real downside to barn doors is that the cost can add up quickly. By the time you add in the materials, labor, and custom finishes, the perfect barn door may no longer seem so perfect after all. In fact, it could very well end up giving you a serious case of sticker shock.
So save yourself hours of scouring local stores near you and scrolling endlessly online. There’s a simple solution that can help you afford and customize the perfect barn door after all: Assembling one yourself. Learning how to make a barn door is not as difficult as you think. We’ll show you how to build your own barn door in a matter of hours and say goodbye to sliding barn door sticker shock for good.
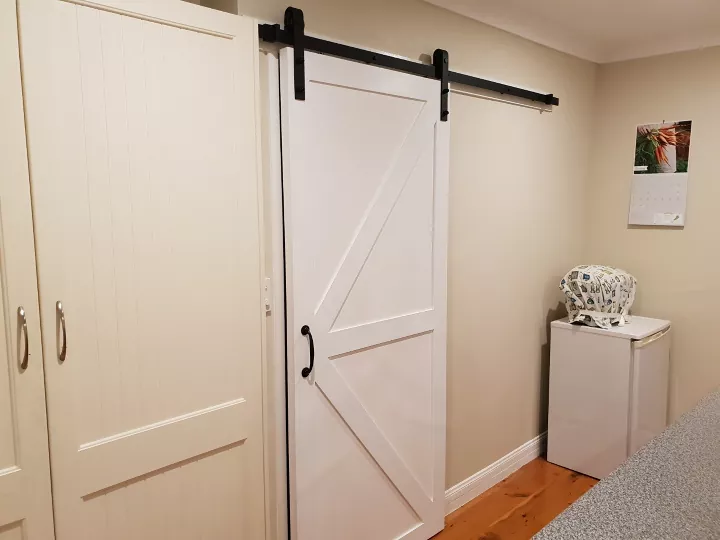
Photo via Sandra R-J
How to Measure a Barn Door
One of the first questions people often ask is, “how do you build a barn door that will fit in this exact space?” And the answer to that question is to take accurate measurements and build a custom barn door that’s tailored to your space. We’ll outline it for you:
Measure Door Opening. First, use a tape measure to find the exact size of the door opening you’re working with. Then, add two inches to this measurement so that, once built, the barn door will extend slightly past the current door opening, minimizing any gaps and giving you the privacy that you’re looking for.
Measure Wall Space. Next, use this total measurement to make sure that your room can accommodate a sliding barn door of this size. To do so, measure the wall space on one side of the doorway to be sure that it’s larger than the sliding barn door will be. After all, when you slide the barn door open, you need enough space for it to go so it’s not obstructing the door opening.
Measure Door Height. Then, it’s time to determine what the height your sliding barn door should be. If there’s no molding around the door opening, simply measure from the floor to the top of the door opening then add one inch to your measurement. If there’s molding around your door opening, measure from the floor to the outside edge of the molding frame and then add one inch to your measurement.
How to Choose Hardware for a Barn Door
Building a barn door may certainly start with taking measurements, but another big consideration is choosing the hardware. Nowadays, you can make a barn-style door with any number of custom finishes, and some of them may affect the functionality of your door. Hardware kits are by far and away the most affordable—and easiest way—to customize your barn door. Or, if you’re up for the challenge, you can make your own barn door hardware with our help.
Here are some things to consider when choosing hardware for a barn door:
- The track you choose should be twice the width of the barn door you build and should also be rated to support the weight of your barn door. If you're building the door yourself, you may have to hold off buying the track until the door is done so you have an accurate determination of the door's weight.
- The barn door will have to sit a half-inch above the floor to slide properly, so review the installation instructions to make sure this track will work in your space.
- You need enough clearance above the door opening to lift the barn door onto the track.
- The handle you choose should be sturdy enough to support the weight of your barn door. Again, if your door is custom-built, wait until you're finished with it to seek this out.
- The finish on all pieces in the hardware kit should match other finishes in your room.
How to Build a Barn Door
Learning how to build a barn door is not as difficult as you may think—some might even think the hard part (taking measurements and picking out hardware) is over! With some basic tools, good instructions, and a willingness to try something new, anyone can build a bar door they’ll love at a fraction of the cost. Learn how to convert an antique door into a barn door here.
Tools and Materials Needed:
- Safety glasses
- Measuring tape
- Miter saw
- Drill
- 1-inch screws
- Sander
- Finish nailer
- Finish nails
- Lumber
- Wood glue
- Spacers
- Pencil
- Straight edge
- T square
- Primer and paint or stain
- Hardware kit
Step 1: Design Your Barn Door
There are tons of different styles of barn doors out there. Find inspiration online and draw up your plans using the measurements you’ve already taken.
Step 2: Purchase Any Lumber, Tools, and Materials You Need
Once you know exactly what you need to build your barn door, purchase any of the lumber, tools, and materials you need.
Step 3: Put Safety Glasses On
It’s always a good idea to wear safety glasses when you’re working with any type of saw or sander. So be sure to protect your eyes before you begin by putting safety glasses on.
Step 4: Measure and Mark the Boards
The length of boards you need will vary depending on the size of your door opening and the style of barn door you’ve chosen. In most cases, barn doors will be made with vertical 1x8s, 1x6s, or 1x4s. Once you know what lengths you need for each board, measure them with a measuring tape and mark where you need to cut them with a straightedge and a pencil. Check out these tape measure hacks.
Step 5: Cut the Boards
Using a miter saw, cut all of the boards you need to length for the base layer of the barn door. If your design calls for any diagonal trim pieces, use the miter saw to make your 45-degree cuts.
Step 6: Sand the Boards
Give the boards a quick sanding to prep them for painting or staining later on. Be sure to also sand the edges of each board to eliminate any rough corners or splintering that may have occurred while you were cutting them.
Step 7: Dry Fit
Next, dry-fit the pieces together to make sure they fit well and line up correctly.
Step 8: Make Sure It’s Square
Use a t square to make sure that each corner of the dry-fitted barn door is square—meaning it has a 90-degree angle.
Another option for making sure that your door is square is to use a measuring tape to measure the length from the top left corner to the bottom right corner of the door. Then, measure from the top right corner to the bottom left corner of the door. Adjust the boards as needed so that the two measurements are the same length.
Step 9: Assemble Barn Door
The next step is to assemble your barn door. This step will vary greatly depending on which style of door you choose.
In many cases, you will use spacers to ensure the appropriate gap between boards, glue the decorative trim boards on the front, and then pin nail them into place. Let any glue dry for the entire recommended time frame. Next, flip the whole door over, drill pilot holes, then screw through the base boards and into the trim boards on the other side.
Step 10: Paint or Stain Barn Door
Once your barn door is completely assembled, it’s time to paint or stain it the color or shade of your choice. See our advice for staining wood here.
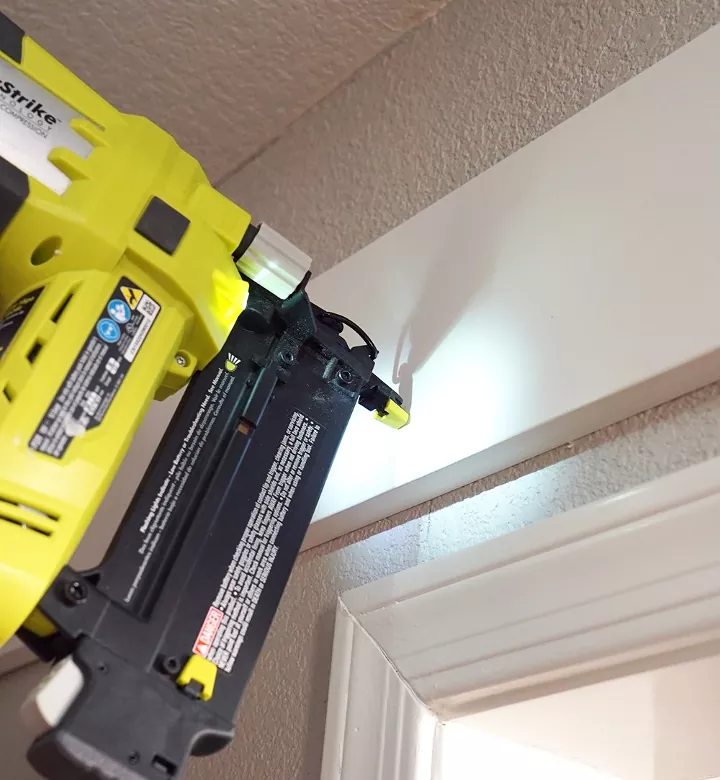
Photo via Hayley
How to Hang a Barn Door
Making a barn door is never complete until it’s successfully hanging on your wall. Next, we’ll show you how to hang a barn door so that it glides perfectly on its track every time you open and close it.
While installation of your barn door will vary slightly based on the hardware kit you choose, there are many similarities when it comes to hanging any sliding barn door. Just be sure to read the installation instructions included in your hardware kit carefully before you begin.
Here is a list of steps to help you hang a barn door in your home or office:
- Install support molding above your door opening. Support molding should be a 1x4-inch board cut to the same length as your track. Make sure the support molding is level with the door casing (the trim above the door opening) and attach it by drilling it into the studs. Don’t forget that the completed sliding barn door will need to sit a half-inch above the floor to open and close smoothly.
- Attach the Rollers and Hardware. For this step, you’ll need to mark your screw locations first, drill pilot holes, then attach the rollers and handle to your barn door.
- Install the Track. Next, install the track directly onto the support molding by drilling holes as instructed. Check to make sure that the track is level before moving on.
- Lift the Barn Door. Then, lift the barn door high enough that the attached rollers come into contact with the track and roll the door into place. This step can be difficult for some to do alone so you may need someone to help you.
- Install Spacers or Floor Guides. If your hardware kit came with spacers or floor guides to keep the barn door away from the wall as it slides, install those now.
- Add Door Stoppers. Add door stoppers to each end of the track so that your barn door doesn’t slide past the end of the track and fall off.
Have you built a barn door yourself? Do you have any tips to share with us in the comments below?


Frequently asked questions
Have a question about this project?