DIY Giant Pegboard Shelving Without Drilling Into Your Walls

I love the look of staggered shelving and wanted to add that style to my home office but didn’t love any of the options I found in stores to create the look. I also worried about spending the money and drilling into my walls to hang several shelves only to have to move them if we bought new furniture or wanted to change the set up in the office. We created a giant pegboard style shelf that can easily move from one space to another and are in love with the options it gives us! I can change the height, number, and layout of my shelves any time depending on what I want to display or where I want to display it.
This giant pegboard was a very inexpensive alternative to buying and hanging several different shelves at various heights that I would need to be certain were where I wanted them to stay. We made five shelves for around $30!
You Will Need:
- Plywood Sheet (4x8)
- Planks for Shelves (if not using from plywood sheet)
- ¾ Inch Wood Dowels
- Drill and ¾ Inch Drill Bit
- Circular Saw
- Hand Sander
Step 1: Trim Plywood Sheet into Shelves
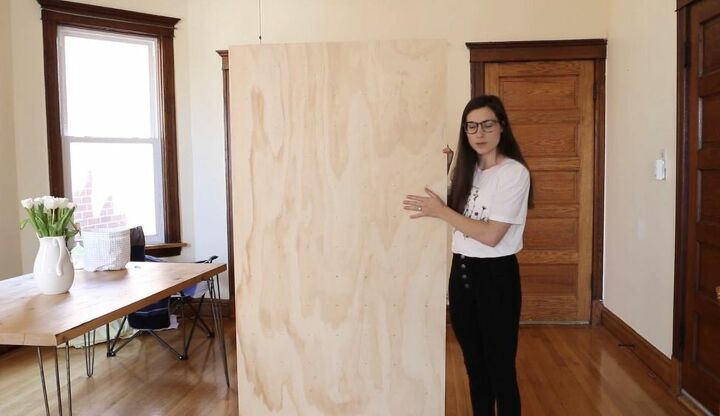
We purchased a 4x8 sheet of plywood and cut it with a circular saw at the top and the sides down to 3x6. We set aside the cut pieces to use as our shelves.
Step 2: Mark Drill Holes for Pegs
I measured 3 inches in on all sides and marked my rows of peg holes with a pencil. I spaced each pencil mark 5 inches apart. This made 7 columns of 14 holes each.
Step 3: Drill Peg Holes
I used a ¾ inch drill bit to create openings to fit the ¾ inch wooden dowels we purchased. I placed the drill in the center of the pencil mark and drilled straight down. It is very important for the drill to be at a 90-degree angle so that the pegs will sit snugly inside and through the hole. If not, you could end up with shelves that aren’t level.
Step 4: Sand Pegboard Surface
After drilling all of the peg holes, we removed any large splinters of wood surrounding the holes on the back side of the board by hand and then I used a hand sander to smooth the entire surface of the front and the back of the pegboard. This will remove any frayed bits of wood left after drilling all of the holes and make the entire pegboard nice and smooth.
Step 5: Trim Dowels and Sand
I trimmed the dowels to the length I wanted them to be and then lightly sanded the trimmed ends. I chose to let the ends of the dowels protrude from under the shelf a bit to make sure they wouldn’t tip if leaned on.
Step 6: Arrange and Insert Dowels
I inserted the dowels where I wanted them to be and measured how long my shelves would be. We used a circular saw to cut the dowels down to the exact size we wanted and gave the edges a light sanding. We made sure to leave enough length for the dowels to fit through to the back of the board to counterbalance any weight placed on the shelves securely.
Step 7: Cut and Install Shelves
I cut the leftover pieces of the plywood sheet for my shelves and sanded them lightly before installing them on the dowels. I placed each shelf on two dowels spaced apart to hold each end of the shelf. If you want to display heavy items on your shelf or just want to prevent any sagging that could occur in the plywood over time, use a third peg to support the shelves in the center. We created five shelves and staggered them at different heights and opposite one another.
Step 8: Install the Pegboard Unit
We wanted to be able to move our pegboard shelf if necessary as we moved other office furniture in and around, so we leaned ours against the wall and fastened with a short length of wire at the top for safety. If you would rather fasten the pegboard to the wall, affix two boards to the wall and attach the pegboard to them. This will create a space for the pegs to sit back through to the back of the pegboard and allow the pegs to counterbalance and support the weight placed on the shelves adequately. Just be cautious of the amount of weight you place on the entire unit if you attach it to your wall. We left our wood unfinished but you could get creative with color options depending on what room you plan to use the pegboard in.
The giant pegboard shelving is my favorite part of the office now and I absolutely love the flexibility it gives me without any worry about having to patch holes every time I want to adjust my office setup. It is so much fun to change the way I style the shelves with the seasons and like these at Hometalk!
Enjoyed the project?
Resources for this project:
See all materialsComments
Join the conversation
-
 Connie Jones
on Feb 25, 2021
I love this! Awesome idea! Thanks for sharing!
-
-














Frequently asked questions
Have a question about this project?
Lindsay, what thickness of plywood is used?? It was not mentioned in your post, just the length and width.
How is it fastened to the wall?
How did you prevent prevent chip out of the plywood around the edges of the holes?