Upcycled Lysol Wipes Lids Christmas Ornaments (Wrapping Paper & Card)

Is recycling one of your new year's resolutions? If yes, then please follow this tutorial! If you have plastic lids from empty Lysol wipes containers, Christmas wrapping paper and Christmas greeting cards lying around, you can make upcycled Christmas Ornaments. I am that person who likes to save used Christmas wrapping paper and Christmas greeting cards for crafts. It is always a great idea to recycle and prepare for Christmas! Have fun!
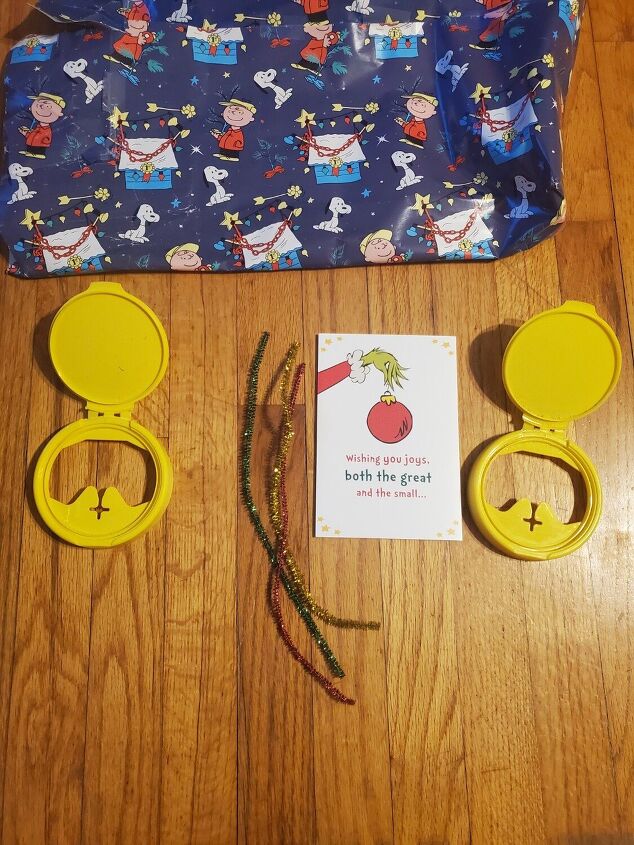
Supplies:
- 2 Lysol wipes plastic lids
- Christmas greeting card of your choice
- Christmas wrapping paper of your choice
- Metallic pipe cleaners (chenille stems)-I used red and gold
- Spray paint (I used red and green)
- Hot glue gun and glue sticks (not in this picture)
- Red beaded garland (not in this picture)
- Pencil or pen or marker (not in this picture)
- Scissors (not in this picture)
- Modge podge (not in this picture)
- Sponge brush to apply modge podge (not in this picture)
I used green and red spray paint for this upcycled project.
Here is the beaded garland I used.
1). Paint the Lysol lids with the color of your choice. Follow the instructions on your paint product. Let dry for at least 1 day.
2). Grab a greeting card of your choice and one of the painted lids. I used a Christmas Grinch greeting card and a green painted lid for one Christmas ornament.
3). Use the opening part of the Lysol lid as a template, and trace with a pencil or pen or marker.
4). Here is the traced template. Use scissors to cut out the traced greeting card.
5). For the second ornament, use the traced greeting card circle as a template for the Christmas wrapping paper. If your Christmas wrapping paper is flimsy like mine, cut out another circle from the back part of the greeting card.
I ended up with 3 circles.
6). The next step is to trim pipe cleaners to your desired length for the ornament hangers. Then wrap the pipe cleaners inside both lids (as shown in the picture). With a hot glue gun, apply glue to the inner borders of the lid. Make sure you use the low temperature setting on your hot glue gun.
7). Close the lids so that the glue will seal the lids.
Here is a bottom view of both plastic lids.
8). On one of the lids (green painted), glue the greeting card circle to the inner part (as shown in this picture).
9). On the other lid (red painted), glue the other greeting card template to the inner part (as shown in this picture).
10). Apply modge podge on the greeting card (red painted lid). Then apply the Christmas wrapping paper circle on top of the greeting card. Apply modge podge over the Christmas wrapping paper. Let dry for at least 2 hours.
Note: The wrapping paper might get wrinkled especially if it is thin.
11). The final step is to gradually glue the red beaded garland to the inner borders of both red painted and green painted plastic lids. Glue by sections. Use scissors to cut the excess beaded garland.
Your upcycled Christmas Ornaments are ready to be hung on your next Christmas tree!
I hope you will try to make your own upcycled Christmas ornaments! The possibilities are endless. You can even personalize these upcycled Christmas ornaments by using family pictures instead of greeting cards or wrapping paper. Good luck and Have fun! Merry Christmas and Happy New Year!!!

DIY Christmas Decorations
Enjoyed the project?
Suggested materials:
- Lysol wipes lids (Walmart (Most stores carry Lysol wipes))
- Red and green spray paint (Walmart)
- Christmas greeting card (Target)
- Chenille stems (pipe cleaners) (Dollar Tree)
- Christmas Charlie Brown wrapping paper (Dollar Tree)
- Red beaded garland (Walmart)
















Frequently asked questions
Have a question about this project?