DIY TeePee Tent for Kids or Pets!

by
Nickell Morgan
(IC: blogger)
6 Materials
$40
6 Hours
Medium
Take some 1x2's from your hardware store and make this collapsible tent! Perfect for small spaces!
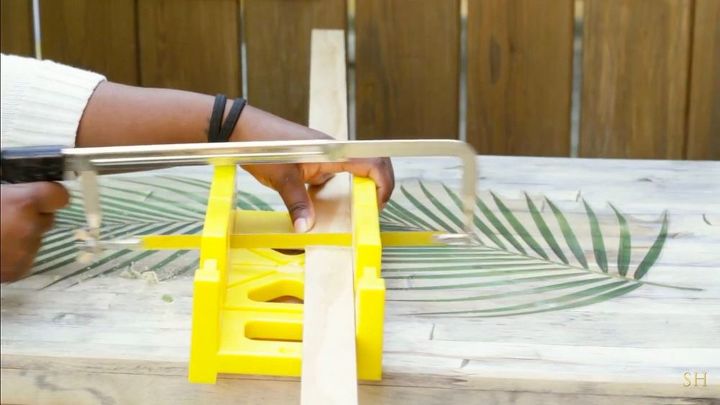
To make this tent, you’ll need three 1 by 2’s. You’ll also need a 3/4 inch wood dowel. Two of the 1x2's should be cut into 4 37-inch pieces and the third should be cut down to two 28-inch pieces
Cut them down to size then sand down he jagged edges. I also sanded down the top and edges of the dowel and the 1 by two’s so it wasn’t too sharp for my kids.
Here’s a trick to make sure the 1 by two’s are even. Tape them together, sand down the top and sides and remove the tape and sand down the inside where you couldn’t get to then tape it together again.
Measure approximately 3 inches down from the top of the wood and Grab a 3/4 inch spade drill bit to make the hole for the dowel to go through.
I sanded the outside until it was smooth and repeated it for the next set of 1 by 2’s
When you’re done ,you should have 4 1 by two’s a wooden dowel, and 2 1 by 2’s without the hole
I then took the dowel and attached the 1 by two’s on either side.
We’ll need to attach the wood to the bottom to the bottom but keep in mind that you should attach one of the outside and opposite inside pieces together.
I opened the tent to how wide i wanted it to open and marked where the L bracket would need to be drilled.
I took a drill bit the same size as my nail and drilled the wood.
Attach the L bracket to the wood base and then to the sides and you’ll have something like this. Repeat it on the other side.
I notice over time the dowel might fall out of place so I decided to drill a hole and add a thumb screw on the outside and inner part of the dowel to make it more secure.
Moving along to the fabric. I got this tapestry from WallPops and folded it in half and folded it again. I then ironed out all of the cases and wrinkles so I have a smooth surface to work with.
I calculated my measurements and I had to cut this 64 inches long and 28 inches wide so I measured 35 inches down and 15 inches across. I made sure to pin down the fabric so I had a nice even cut.
I then took a ruler and marked the exact measurements i need for the tent. I used the ruler as a straight edge and ironed down the excess. I did it for all four sides then sewed it all around.
I took some leftover fabric, cut it down and folded it on top of itself. I sewed that together as well and tied the ends.
I took the tapestry and attached the strings to the corners and placed it on the teepee to see where I should place the rest of the strings.
I noticed there was nothing keeping the teepee in place so my husband and I attached a chain to the top to keep it from opening too wide.
I took some extra fabric to make a back, I sewed together some leftover pieces, and tied it to the top of the teepee. I started pinning where I wanted the fabric to lay, sewed it, and attached the strings.
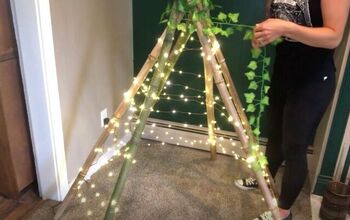
When you attach the fabric onto the teepee, you will have something that looks like this. I really love this and since I don’t have much space I love that it’s collapsible and can be stored away.
The tent isn’t only for the kids but it can also double as a pet tent!
{
"id": "3877162",
"alt": "",
"title": "",
"video_link": "https://www.youtube.com/embed/68BuzjX-Cs0",
"youtube_video_id": "68BuzjX-Cs0"
}
{
"width": 634,
"height": 357,
"showRelated": true
}
I'll be making this on Hometalk Facebook Live TODAY June 6th at 5PM!
Feel free to message me if you have any questions on how to create this! I love interacting with the HomeTalk Family!
For those wondering the tapestry is from wallpops you can get here: https://www.wallpops.com/wpt2282-loni-wall-tapestry.aspx
I did receive it for free but I honestly would purchase and I recommend it. It's pretty large and I have a lot of fabric left over after making this project. I also have a coupon code (Simply30) it's case sensitive and it'll give 30% off of your purchase. It's good until May 2018!
Contact Me:
Instagram - @simplyhandmade
Facebook - SimplyHandmade89
YouTube - SimplyHandmade
Email - SimplyHandmade89@gmail.com
Enjoyed the project?
Resources for this project:
See all materials
Any price and availability information displayed on [relevant Amazon Site(s), as applicable] at the time of purchase will apply to the purchase of this product.
Hometalk may collect a small share of sales from the links on this page.More info

Want more details about this and other DIY projects? Check out my blog post!
Published June 5th, 2017 10:52 PM













Frequently asked questions
Have a question about this project?
Wow what a cute idea?!
where did you buy the peacock fabric from?
So cute do you think it would work at the beach or poolside to keep sun off?
Love this