Stencil How To: Replicate Aged Terracotta Wall Art

by
Royal Design Studio
(IC: professional)
One of the lingering memories from our Tuscan vacation years ago, beyond the wine and food, was the terra cotta color everywhere. It was on the roofs. It was on the bricks. It ran along the village roads. And of course it was in garden pots. It's said that although the stone is crumbling at Rome's historic sites, Italian terra cotta bricks and tiles made during Caesar's time still look good today.
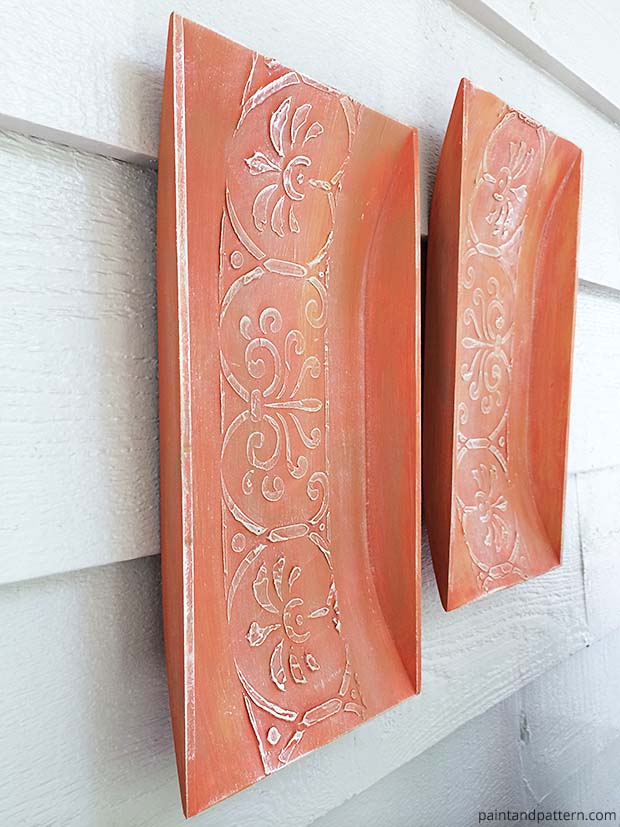
You can recreate the terra cotta look on any surface with paint. Today I'll show you how to paint wall art on curved wood panels that are reminiscent of the curving terra cotta roof tiles in villages. As a bonus, because terra cotta pots from Italy often have raised panels on them, we'll go through how to create raised designs with Wood Icing.
Supplies for this project:
First, we'll create a raised pattern. Tuscan villages like Impruneta are famous for making terra cotta pots with raised patterns. I chose a simple Pompeiian design from Royal Design Studio's vast selection of Italian style stencils to create a raised effect. This was my first time using Wood Icing, so even though I'm not an expert, the result was pretty good for a newbie. . I'd suggest, the first time you work with a new material, test it out on foam core board or scrap wood. It also helps to use the Wood Icing on a flat surface. Even though my wood panel is lightly curved, the stencil lays flat on it.
Once the Wood Icing dries, paint the surface with a terra cotta color paint. I used Persimmon Americana acrylic paint. Terra Cotta has variations in color. To create some variation, paint a very light layer of a lighter terra cotta color in some random spots, like "feathering" on the color. It's okay if it's a little streaky. You might even want to add some blotches like naturally-aged pots.
Then, feather on a darker terra cotta color in some random spots. You can paint these colors more heavily if you like depending on the look you are going for. Once the acrylic paint dries, it has a non-shiny, matte surface like terra cotta.
Terra cotta pots can develop a chalky white patina on them as they age. This chalky look is perfect to make the raised stencil pattern pop out more visually. To do this, dip the tip of your brush into the Chalk Paint(R). I used Country Gray Chalk Paint(R) brushing off most of the paint on a paper towel. Your brush should be nearly dry. Then flick the brush lightly over the raised stencil. It's better to brush very lightly and build up the color by repeatedly flicking the brush over the raised stencil.
Enjoyed the project?
Published September 18th, 2014 11:43 AM
Comments
Join the conversation
2 of 8 comments
-
Your wall is absolutely breathtaking, @Bonnie Medearis! The joint compound work and your wall finish is lovely!
 Royal Design Studio
on Sep 23, 2014
-
-
 Gig69451122
on Apr 10, 2023
What a lovely project! It 💡 an idea using my, peel & stick dollar store Gothic tiles. By shaping them around a cheap plastic pot. Then painting them with ( Terra cotta outdoor paint). Let dry, lightly sponge the raised design,( off white). Dry, then see if lightly sanding wouldn't add the "aged" charm. Been wondering how I could use them. Thanks for inspiring a new idea 😉
-









Frequently asked questions
Have a question about this project?