9 Ways to Upcycle Bakeware With Outstanding Results

Do you have some bakeware that you no longer use but don’t want to throw out? These nine projects let you use them to create stylish and practical new objects that you will love.
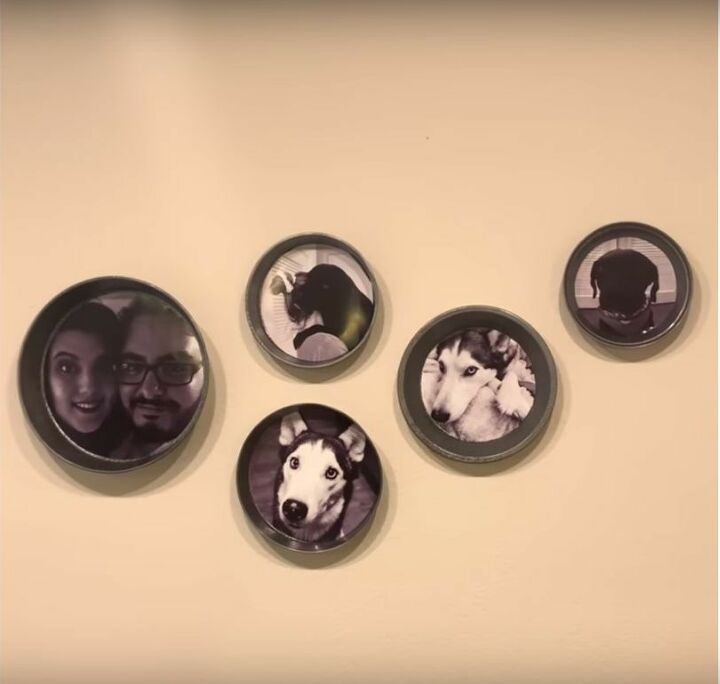
Cute Baking Tin Frames for Your Favorite Photos
Tools and Materials
- Baking tins
- Photos
- Scissors
- Glue
Step 1: Gather Your Materials
I chose a variety of baking tins of different sizes. I also had to choose a few of my favorite photos that I wanted to put on display.
Step 2: Print Out and Cut Your Pictures
It is important to measure the tins and then print off photos that are going to fit in well. After that, you can simply cut them out so that they fit in perfectly.
Step 3: Glue to the Inside of the Tin
Stick your photo firmly inside the tin. I also painted the tins so that they were all the same color.
Cute Cake Tin Decor with Style
Tools and Materials
- Cake tins
- Candlestick
- Spray paint
- Glue
Step 1: Gather Your Materials
I found a nice baking tin and a candlestick that was a good size to go with it. There is no need to worry about the colors of the materials on this project.
Step 2: Glue the Tin to a Candlestick
I glued the two objects together. This is the most crucial part of this upcycle bakeware project, as you need to make sure the candlestick goes right in the center.
Step 3: Paint
I used spray paint and primer to get the look I wanted. You will want to paint the entire object to get a uniform finish.
Step 4: Fill with Decor
This is the fun part, as you fill it with flowers, boxes, or whatever else catches your eye. I added in a perfumed candle and a nice sign.
Eye-Catching Baking Tin Sign Project
Tools and Materials
- Baking tin
- Wood
- Drill
- Paint
- Stencil
Step 1: Gather Your Materials
This is an enjoyable project that uses very few materials. I discovered the perfect baking tin that was the right size for the piece of wood I wanted to use here.
Step 2: Drill Holes in the Tin
Just two holes are needed. They go in the side of the tin, and will be used to screw it into the wood.
Step 3: Create the Sign
With the help of a stencil, I was able to very quickly paint the sweet message that I wanted on this sign.
Step 4: Fill the Tin with Flowers
After joining the two pieces and hanging it, I was ready to fill the tin with flowers. I used floral foam bricks to help keep them in place.
A Bakeware Mirror That Looks Amazing
Tools and Materials
- Baking tin
- Mirror
- Drill
- Belt
- Glue
Step 1: Gather Your Materials
The key is to find a round mirror that is the right size to fit inside your tin. I was lucky that I had both objects already, so I was ready to get started.
Step 2: Glue in the Mirror
I put some glue on the tin and then firmly pressed down on it.
Step 3: Drill Holes in the Sides
This bakeware mirror needs some holes in the side, which is how I attached the belt that I used to hang it with.
Step 4: Attach a Strap and Hang
I cut the ends off a belt and attached it to the mirror as a strap. The final step was to fix it securely and then hang the mirror where it looks great.
Cool Bakeware Shelves That Give You Trendy Storage Space
Tools and Materials
- Baking tin with removable base
- Wood
- Drill
Step 1: Gather Your Materials
You will need a round baking tin with a removable base. I found a piece of wood of approximately the right size, as I planned to cut it to size anyway.
Step 2: Cut Wood to Size
I cut the wood so that I ended up with two pieces that fit inside the tin neatly.
Step 3: Attach Wood to Bakeware and Hang
The wood can be attached by drilling into the side of the tin and through to the wood. You then attach a screw that joins the two pieces and hang it on the wall.
A Bakeware Spice Rack for Busy Cooks
Tools and Materials
- Baking tin
- Small spice containers
- Magnets
- Wooden frame
- Glue
Step 1: Gather Your Materials
I started this project with a baking tin that was just big enough to fit the nine small spice containers that I planned to use.
Step 2: Glue a Frame to the Tin
A frame over the top of the tin changes its look completely. I chose a wooden frame and glued it on, but you could really use anything to suit your space and style.
Step 3: Glue Magnets to Spice Containers
To make the containers stick to the tin, I glued small magnets to them. This is a simple task and it meant that I could now arrange them on the display.
Step 3: Hang
A simple hook on the kitchen wall is all you need to hang this fabulous spice tray in place.
Gorgeous Grass Decor in a Baking Tin
Tools and Materials
- Baking tin
- Rocks
- Soil
- Sod
Step 1: Gather Your Materials
The requirements are simple here. You need a reasonably big baking tin and enough rocks to fill it. A few sods of grass and you are ready to go.
Step 2: Fill the Tin with Rocks
Fill the tin completely with rocks but leave enough space on top for the soil and the sod.
Step 3: Add Soil and Sod
I sprinkled some soil over the rocks. You don’t need to use a huge amount, but try and cover the full tin. It is then ready for you to finish it off by placing some sod and pressing it down.
Practical and Fun Baking Sheet Shoe Storage
Tools and Materials
- Baking sheet
- Rocks
- Glue
Step 1: Gather Your Materials
I used an old baking sheet and collected a variety of rocks of different shapes and sizes, to give this storage space a quirky look.
Step 2: Glue Rocks to the Baking Sheet
After making sure that the rocks filled the baking sheet, I glued them into place. This makes it far easier to use.
Step 3: Store Your Shoes
It is now ready for you to place your shoes in it. This is an incredibly fast and easy project, and the results are great.
You will find that this is an excellent place to store boots and even umbrellas without getting the floor wet.
Smart and Simple Tin Sheet Home Decor
Tools and Materials
- Baking tin
- Scissors
- Pens
Step 1: Gather Your Materials
The basic materials needed for this task are a baking tin and a neat image. I chose a drawing of a pineapple for the shape I wanted to make.
Step 2: Cut Out the Bottom of the Tin
We don’t need the full baking tin, so I cut out the bottom to use it.
Step 3: Poke Holes in a Design
I placed the pineapple design over the tin and traced over it. This let me see the shape marked on the tin, and I could then properly recreate the pineapple on the metal by poking holes.
Step 4: Display
The finished result looked fantastic and it was now ready to go on display on the wall or on a table.
You can add some art to your home very easily with most of these DIY projects.
Let us know in the comments below if you are planning on carrying out any of these upcycling tasks at home!










Frequently asked questions
Have a question about this project?
How do you hang the pictures?
I would use metal dog dishes for the dog photos. I have extras.