


Affordable Kitchen Table Makeover With Oops Paint
Do you have an outdated table that could use some TLC? See how easy it is to give your kitchen table an affordable makeover with just a bit of oops paint.

*This post contains affiliate links. When you make a purchase using these links, I earn a small commission (at no extra cost to you!) To learn more, you may read my Disclosure Policy. Thank you for supporting my blog!
Affordable Kitchen Table Makeover With Oops Paint
Today, I’m sharing how I used “oops paint” to give our kitchen table an affordable makeover. But before I do, I want to share the history of our table and why it’s so special.

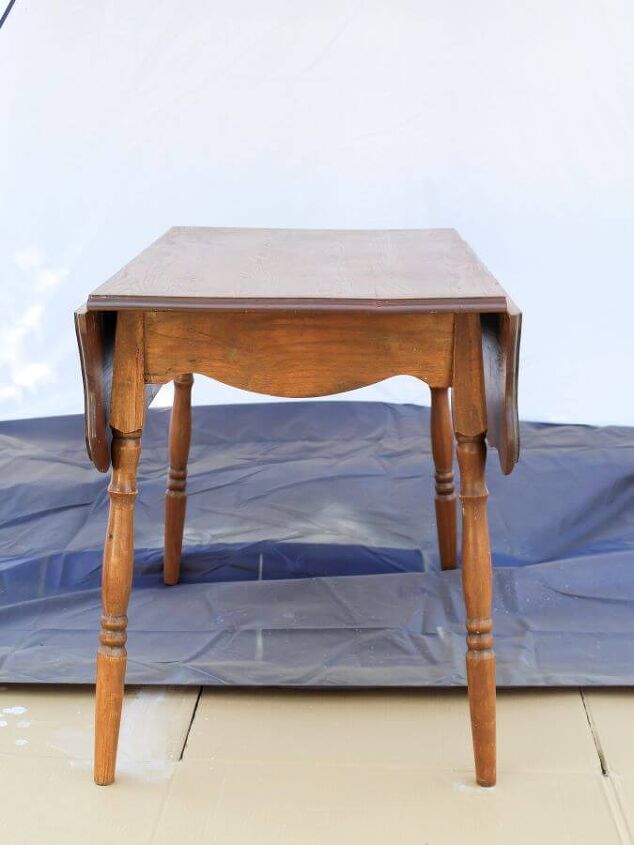
At first glance, the small, square table in our eat-in kitchen looks unassuming. You might even call it ho-hum.
But, if this table could talk. Oh the stories, I bet it could tell.
The antique table first belonged to my husband’s, Kirk, great grandparents, who purchased it in the late 1920s.
Over the decades, it has been passed down from generation to generation. First, to Kirk’s grandparents. Then to his parents. And eventually, the table made its way to us.
At almost 100 years old, the table holds a lot of sentimental value for Kirk and I. And not just because it’s a family heirloom.


It graced the tiny dining nook in our apartment, where we shared our first meals as a married couple.
Then, in our first home, it sat tucked neatly in the corner of the kitchen and kept watch as our family grew to include two beautiful baby girls.
And almost seven years ago, it joined us once again as we made the trek across town when we moved to our current home.
Through countless holidays, celebrations, and life moments. This little table has been there for it all.
Why Paint The Table?
Our kitchen table is more than just a table. It’s a part of our family story. When we began our kitchen renovation last fall, we knew that the table had to stay.
So why did we paint our table?
The decision to paint or not paint is a personal one. Amongst vintage decor lovers, I know painted furniture can be a hot topic. It seems that you either love it or you hate it.
I tend to find myself loving both! Ultimately, the dark stain made our table feel worn and dated. Which doesn’t match the light, airy, and modern cottage style I love.
And, since we didn’t want to replace it, we decided to paint it.
(*Note, if you prefer a more natural look, you can check out a previous post to see how I restored my favorite thrift store dresser.)
What is “Oops Paint”?
Before last spring, I had no idea that “oops paint” was a thing. Now, it’s one of the best DIY money-saving secrets that I’ve discovered.
Oops paint, also known as a mistint, is paint that has been mixed incorrectly. Mistints are unused or, in some cases, returned because they are not the right color match or finish. The variety of colors and finishes available will vary from store to store, and project to project.

But, if you love a good bargain, and the thrill of the hunt, it’s worth asking a store employee about their available choices of “oops paints” Someone else’s loss may be your gain!
At only $6 for a brand new gallon, the mistint paint I used for our table makeover was a steal. It’s the same green color that I used for our bathroom vanity makeover.
And, since I had leftover paint from the vanity, the table refresh didn’t cost me a dime!
Supplies Needed
- Microfiber cloths
- Rubber gloves
- Deglosser
- Primer
- “Oops paint” in the color of your choice
- Paint sprayer
- Spray tent
- Light-grit sandpaper
- Water-based polyurethane
How To Prep The Table For Paint
To prep our table, I wiped it down thoroughly with a damp cloth to remove any dirt, grime, and (ewww!) stuck-on food.

Then I used liquid sander deglosser and rubbed it all over the table. It was a huge time saver, and gave me all of the benefits of sanding, without all of the mess.

Tip: Liquid deglosser works like sandpaper to help remove old paint, gloss, and varnish. It helps the new paint bond better to your surface and prevents it from easily chipping off. And don’t forget to wear chemical safe gloves to protect your hands!

Once the liquid sandpaper deglosser was dry, I used a clean cloth to wipe off any excess. Then I used a paint sprayer to apply a light coat of primer to cover the dark wood grain.

After the primer cured, I used some light-grit sandpaper to gently sand down any rough spots, followed by a clean cloth to wipe off the dust.
Tip: I used whatever sandpaper I had on hand. For this type of project, an extra-fine grit paper between 320 and 400 works best.
How To Paint The Table

Once all of the prep work was done, I fired up my sprayer again and applied two coats of my “oops paint”.
Tip: Use paint cup liners when using a paint sprayer. It makes switching from primer to paint easy and clean-up is a breeze!

I let the paint dry fully between each of the two coats. And, just like before, I used sandpaper to smooth out any visible bubbles.

Then, to finish the table, I sprayed it with two coats of clear matte water-based polycrylic protective finish.
Since it gets used daily, the poly coat will provide extra protection to keep the paint on the table from getting knicked or chipped.

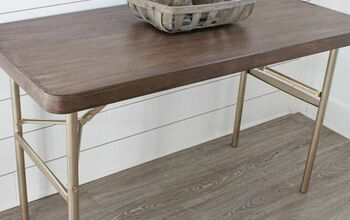
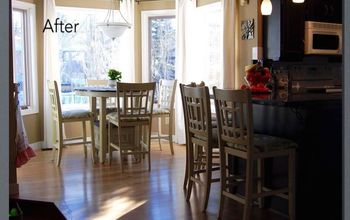
And here she is all finished. It’s so hard to take good pictures in our kitchen. These photos don’t do the table justice.

I love, love, love the pretty green color and the grey undertones that complement the adjacent accent wall in our entry and dining room.

I paired the table with some new bistro chairs and some botanical prints that I purchased a few years ago.

Soon we hope to replace the kitchen floors to match the chairs and finish painting the baseboard trim white…

…but that’s a project and post for another day.
Affordable Kitchen Table Makeover With Oops Paint
Thanks so much for stopping by. I hope you enjoyed reading this post and seeing how I used oops paint to give our kitchen table an affordable makeover.
Even after two projects, I still have some paint leftover. Talk about getting bang for your buck!
What should I paint next? I have a few ideas, but I’d love to hear your suggestions. Just drop ’em in the comments below.
Until next time,

Did you enjoy this post? PIN it for later!

Let’s Be Friends!
Don’t forget to follow along on my other social channels to get even more ideas for your home. You can find me on TikTok, come and pin with me on Pinterest, chat on Facebook, or catch up on Instagram.
You may also like: DIY Pottery Barn Easter Bunny Statue DupeHow To Fold Easter Bunny Ear NapkinsDIY Upcycled Winter Wreath For Under $10


Comments
Join the conversation
-
You could use the leftover paint to stencil your kitchen floor..
-
I have a little table just like that in my guest B&B cottage being used as an end table just now. A few people have not used the coasters I provide so it has some staining now. I hope to take it with me once I have found a townhouse to move to as I downsize. I also have a quart of paint I bought to redo the kitchen base cabinets in my basement suite but never got to it. It;s a light grey and will be perfect for this project.


Frequently asked questions
Have a question about this project?
I never heard of Liquid deglosser before, where can you find it? And you said that this helps to take the initial gloss off of it to make sanding easier?/