DIY Concrete Countertops

Hey friends!! These DIY concrete countertops are one of my most asked about DIY projects! This post was originally published in May 2018, but I am republishing it now with some updates for you! If you follow me on Instagram, I’ve been giving you all some updates in stories on how these have held up over the past 2 years (we completed them in early May 2018). So here ya go – how to install DIY concrete countertops with Ardex Feather Finish concrete with 2 year updates! I will tell you up front, these counters are NOT impervious to scratches. My husband opened two wine bottles (cue downward pressure in circular motion movement) on them and they scratched. Now, by “they,” I mean the SEALER scratched, not the counters themselves. And that is what the sealer is there to do, right? I’ll explain a bit more later, but I did already fix the scratches right up, and they are barely visible except in very specific lighting when you catch a glare off of them. That said, even marble and quartz counters scratch! With these, it kind of just adds to their character (though you can bet I have since banned my husband from wine bottle opening on the counters). But I digress… let’s get to the nitty gritty of the DIY concrete countertops process, and then we can return to the inevitability of USING your counters and what that might mean!
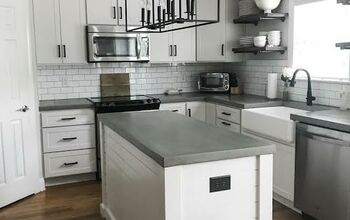
Aren't they pretty though? Perfectly industrial chic farmhouse vibes (especially when new counters are NOT in the budget!)
With 2 people, this project is totally doable in a 72 hour period (if you choose the Omega Sealer), not including the cure time for the sealer, which is 4-7 days, at least for ours. It was a lot of work, but for being able to completely transform our counters in less than 3 days?! I would do it again in a heartbeat
Before getting started on your DIY concrete countertops, you ideally should remove your sink (this is a whole other project that may require several other/different tools – you can learn more about how we removed ours on my ORC Week 5 Blog post!) However, this is optional. If you don’t remove it, be sure to tape it off with painters tape. Also tape off your backsplash with painters tape as well.
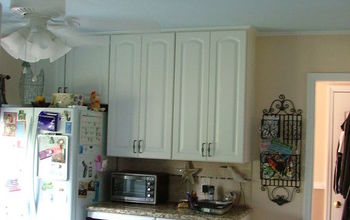
Assess what your current counters are made of – if they are something like laminate, you can just sand them down a bit with 80 grit sandpaper. But if they are granite (or another smooth stone) like ours were, I highly suggest you rent an angle grinder and a diamond blade and score the counters before tackling this DIY concrete countertop project.**NOTE: USE EXTREME PRECAUTION WHEN USING AN ANGLE GRINDER/DIAMOND BLADE – BE SURE TO HAVE A PROFESSIONAL AT YOUR LOCAL HARDWARE STORE EXPLAIN WHAT TO DO AND NOT TO DO WHEN USING, AND ALWAYS WEAR THE APPROPRIATE SAFETY EQUIPMENT! I AM NOT RESPONSIBLE FOR ANY INJURY DUE TO IMPROPER USE OF ANY POWER TOOL!**Anywho, you can see the result of the scoring in the photo above – basically a ton of cross-hatched lines all of the counters (and backsplash).
Also tape off EVERYTHING else you don’t want to get dusty, because there will be dust everywhere (i.e. cabinets, floors, applicances, etc). I would even suggest taping up a tarp over your ceiling if you’re able (because speaking from experience, scrubbing our ceilings with rags, water, and Cinch after this project was over really wasn’t that fun – and it’s still not fully clean). We also taped off our outlets, save for the one we used for the sander!Now, mix your concrete according to the instructions on the package – mainly, this means adhering to the 2 parts cement powder to 1 part water ratio. We mixed our concrete using a drill with the paint mixer attachment add on, and we mixed SMALL batches of 2 cups powder to 1 cups cement at a time. It will dry out quickly, so you don’t want to make more than you can spread at one time.
Pour your concrete mixture directly onto your countertop surface and use your putty/tape knives to spread! I used my 10″ knife first to get things mostly spread out and around, and then used my 2 footer to really smooth things out and get rid of as many of the trowel lines as possible.
You’ll also notice that as you spread (and use PRESSURE to make a VERY thin coat), that you’ll pick up a lot of excess concrete on your knife. This is what the 4″ knife is for – use that to scoop off the excess concrete that builds up on your 10″ or 24″ knife as you spread and just put it right back on the counters. If you make a very thin coat, as you should, you’ll be pretty surprised how far one batch will go!(If this sounds confusing to you, THIS video and THIS video are both super helpful to watch (and contain some great tips too). I highly recommend browsing around YouTube for several videos of this process before you begin – the more you know, the better prepared you are – but do NOT follow the videos that thin the concrete out to liquid! ALWAYS follow the ratio provided on your concrete bag!)
Continue to spread the concrete in this manner until the entire countertop is covered. Be sure you mix as you go. Do your best NOT to alter the ratio of 2 parts powder: 1 part water; rather, mix a new batch if your concrete becomes too hard to spread. (We did add a bit of water at times, mostly for the edges, but it wasn’t much, and it is also because we were running low on concrete!) That said, do your best NOT to follow in our footsteps on this one, and stick to the ratio. This ensures the integrity of your concrete stays in tact!
Once the top is done, spread concrete on your edges. Honestly, using your fingers for this part is much easier than a putty/tape knife, so that’s what we did. There was no specific of exact science to this, mostly just spreading it on as smooth as I could, knowing that I was going to sand it down after anyway.TIP: Swap out buckets as soon as you start to notice that dried concrete build up from the edges of the bucket is getting mixed into your new batches. This is why I suggest 2 buckets per coat.Now, clean ALL your tools (but you can toss your bucket(s), that’s why you have more than one!), and then let the concrete dry. We waited about 12 hours between coats 1 & 2, and about 8 between coats 2 & 3.
Put on your safety goggles, respirator mask, and get ready to get DUSTY. Use your orbital sander with increasing grits of sandpaper (we started at 80 grit and then moved to 120, and finally to 220 grit (but only on the final third coat). If you managed to keep your concrete pretty smooth when you laid it on, the sanding shouldn’t take too long. Honestly, it will probably take you longer to CLEAN after you sand, than it will to sand itself.Also be prepared to spend some time sanding the edges – I did a quick pass over them with the orbital sander, but then did a lot of that sanding by hand. They are FAR from perfect (aka smooth), but again, I love the character they add! Ours were also a bit more difficult because our counters have rounded edges. If you have 90 degree angles as your edges, applying and sanding them will be much easier.TIP: If you sand off too much concrete (i.e. back down to your counters), not to worry, you can easily cover this up with the next coat, or with just a little bit of concrete as touch up!
Clean up! Trust me, you’ll be happy you did when you have to keep working in your space. First I swept the counters themselves and then the floor. Then I vacuumed the counters and the floor. Lastly, I used a damp cloth to wipe off the counters a couple of times to remove any excess dust and debris! It’s annoying to do each time, but very much necessary. Repeat steps 4-9 one to three more times. We did a total of 3 coats of concrete, but I know of others who have done as few as 2 or as many as 4. Be sure your final clean up is a good one!Use your utility/Exacto knife to cut away the painter’s tape from the backsplash – this will be a bit tricky at times because the concrete may have trapped some of the tape. But be patient, and work slowly with your knife to remove as much tape as possible. Whether you will be tackling a backsplash after this project, or want to keep your current backsplash, you should absolutely CAULK the seam where the backsplash meets the counters in a color that matches your grout. So, a little leftover tape shouldn’t be a huge deal, unless your grout is white! In that case, you may be spending a little longer on this step making sure ALL of the tape is removed!
Allow your counters to cure for about 36 hours..Next, tape off your backsplash (and sink if necessary) again, and then SEAL! I won’t bore you with step by step instructions on the sealer we used, because honestly the Concrete Countertop Institute (the maker of Omega) has AMAZING resources if you go that route. But basically, we mixed the sealer accordingly, and then used a 6″ high density foam roller to roll on (and off) the sealer! Gloves were recommended too! And honestly, I HIGHLY recommend this sealer (and nope, totally not a sponsored endorsement)! The biggest reason I recommend it is because it is EXTREMELY FORGIVING – that means, absolutely ZERO streak marks, zero bubbles, nada.I will say, this sealer is a bit pricey (about $160 with the shipping). But it is food safe, you get oodles of tutorial videos, their customer service is top notch, and most importantly, is DOES IT’S JOB! Any scratches can be repaired easily with a car scratch repair kit (yup, a car scratch repair kit!) It’s ultimately up to you when it comes to the sealer, but I cannot speak highly enough about Omega!
Remove the painter’s tape along the backsplash, and allow the sealer to cure for the appropriate amount of time (for Omega it is 4-7 days), and voila! You have gorgeous, conversation piece counters for VERY little money! (Don’t forget to put your sink back in if you removed it, and caulk around the edges with silicone – actually, caulk around your sink with silicone even if you DIDN’T remove it – this will make certain that the concrete and sink are seamless, and protect any little spots that may have not gotten sealed next to the sink).
2 YEAR UPDATE: Our DIY concrete countertops have held up GREAT! Honestly, far better than I ever expected. The photo above is from just a couple of weeks ago. I still have no stains whatsoever on them, even after my husband left curry sitting on them overnight. A magic eraser got it right out. The water still beads up on the surface, but I am noticing a few spots were it does seem to wet the concrete below (though it dries just fine). Because of this, I will probably reseal using the Omega sealer in about 6 months or so. We do have a few more scratches, but just like the initial ones from the wine bottle, you can’t see them except in very specific lighting.So what do y’all think?! Are DIY concrete countertops something you would consider trying on your own counters? While this may not be a permanent fix for everyone, it has held up fabulously for us. I initially thought we might replace our counters at some point, but I think these will last us for as long as we are in this home! For anyone on a serious BUDGET, this DIY is a fabulous way to transform your ugly counters into a gorgeous conversation piece in your home!If you have questions or comments – feel free to drop them below! And as always, I'd love to see ya over on the blog!
As for heat/dropping things - Bowls/cups out of the microwave are fine. I have never set a hot pan on the counters because we have a cutting board and trivets for that. Dropping light things is fine. I can’t say I’ve dropped anything heavy on them, but just like other counters, they may scratch or chip. Scratches and small chips are easily repaired (if using the Omega sealer) with a car scratch repair kit! That said, I do not baby these counters at all and they have held up great. But I also take care to use things like trivets, etc, to keep them looking their best!
Enjoyed the project?
Resources for this project:
See all materials
Comments
Join the conversation
-
-
 Ellie Baer Hill
on Jun 01, 2022
Another great project with detailed instructions and pictures. Good job!
-













Frequently asked questions
Have a question about this project?
Do you know how many square feet a 10lb bag of the concrete will do? I want to make sure I buy enough to complete all the coats needed.
Can you do concrete over ceramic tile? I assume you would have to be careful that the surface was flat over the grout lines. Maybe they should be leveled with the tile some way before you even start. I have put up with this horrible tile for 20+ years and now that I have retired and no longer travel I can’t wait to get rid of it! I love the look that you achieved in your kitchen. Mine is tiny (California; everything is tiny) and I don’t have a backsplash. Not sure how I would score ceramic tile but if you can score granite, I guess it can be done. You are an inspiration! Many thanks for sharing your project, your helpful tips and your detailed instructions. Your generosity is greatly appreciated!
If I wanted to paint the concrete, what kind of paint would I use? Would I need to use a sealant over it, too?